Workshop -- agenda, slides, activities
The workshop agenda, slides, and activities correspond to full-day API workshop. The slides and activities mirror similar sections in the course.
Note that for API workshops, it helps to consolidate activities into a single page with brief instructions. The content for the activities below is the same content that appears in other parts of the course — it’s just pulled in here (single-sourced) for convenience. Workshops require a healthy amount of hands-on activities to be engaging. If you have feedback about how to improve the activities, or places where you keep getting stuck, let me know.
Not all activities in this course are consolidated here, since participants can only do so much during a workshop. The following activities are those I’ve selected for workshops.
- 8:00 - 9:00am: Registration + breakfast
- 9:00 - 9:30am: Intro to API documentation
- 9:30 - 10:15am: Using an API like a Developer
- 10:15 - 10:30am: Break
- 10:30 - 11:30pm: API endpoints
- 11:30 - 12:30: OpenAPI and Swagger
- 12:30 - 1:30pm: Lunch
- 1:30 - 2:00pm: OpenAPI and Swagger (continued)
- 2:00 - 2:30pm: Conceptual topics
- 2:30 - 2:45pm: Break
- 2:45 - 3:30pm: Code tutorials
- 3:30 - 4:15pm: Publishing API docs
- 4:00 - 4:30: Participant’s challenges surfaced and discussed
- 4:30 - 5:00pm: Thriving in the API doc space
- 5:00 - 5:30pm: Individual consulting
- Post-workshop review
8:00 - 9:00am: Registration + breakfast
Doors open at 8:00am. Check your name off at the registration table and get a name tag. Light breakfast (coffee and pastries) will be available. Find a table and get situated and acquainted with others. If you didn’t finish all the pre-workshop tasks as described in What You’ll Need, do that now.
9:00 - 9:30am: Intro to API documentation
Section: Introduction to API documentation
Activity: Identify your goals with API documentation
Identify your goals here and make sure they align with this course. Think about the following questions:
- Why are you taking this course?
- What are your career ambitions related to API documentation?
- Are you in a place where developer documentation jobs are plentiful?
- What would you consider to be a success metric for this course?
- Do you have the technical mindset needed to excel in developer documentation fields?
For live workshops, we typically share responses in a get-to-know-everyone format. But if you’re taking this course online, consider jotting down some thoughts in a journal or blog entry.
9:30 - 10:15am: Using an API like a Developer
Section: Using an API like a developer
Activity: Get familiar with the OpenWeatherMap API
Let’s explore the basic sections in the OpenWeatherMap API:
- Go to the openweathermap.org.
- Click API in the top navigation bar.
- In the Current weather data section, click the API doc button.
-
Click some of the links in the Examples of API calls sections.
Get a sense of the information this Current Weather Data API provides. The API calls provide developers with ways to pull information into their applications. In other words, the APIs will provide the data plumbing for the applications that developers build.
-
Answer the following questions about the Current Weather Data API endpoint:
- Does the API provide the information we need about temperature, wind speed, wind direction, and current conditions?
- How many different ways can you specify the location for the weather information?
- What does a sample request look like?
- How many endpoints does the API have?
- What authorization credentials are required to get a response?
Activity: Get an OpenWeatherMap API key
To get an API key for the OpenWeatherMap API:
- Go to openweathermap.org.
- Click Sign Up in the top navigation bar and create an account.
-
After you sign up, your API key is sent to the email address you provide.
You can also find your API key on the site’s Developer Dashboard. (To find your API key on the site, return to the OpenWeatherMap homepage and click Sign in. After signing in, you’ll see the developer dashboard. Click the API Keys tab (highlighted in the screenshot below).

API Keys tab on OpenWeatherMap Developer Dashboard - Copy the key to a place you can easily find it.
(Note: It can take an hour or so for a new OpenWeatherMap API key to activate. If you have trouble with your key, use one of the keys listed here. Put your name next to the key you’re using.)
Activity: Make requests with Postman
Make a request
In this exercise, you’ll use Postman to make a request using OpenWeatherMap’s current weather data API endpoint. To make the request:
- If you haven’t already done so, download and install the Postman app at https://www.getpostman.com/downloads/. (Make sure you download the app and not the deprecated Chrome extension.)
- Start the Postman app and sign in when prompted.
- If this is your first time launching Postman, a welcome screen appears. Click Create a request.
- Insert the following endpoint into the box next to GET:
https://api.openweathermap.org/data/2.5/weather -
Click the Params tab (below the box where you inserted the endpoint) and then add the following three parameters in the key and value rows:
- key:
zip/ value:95050 - key:
units/ value:imperial - key:
appid/ value: <insert your own API key>
For the value for
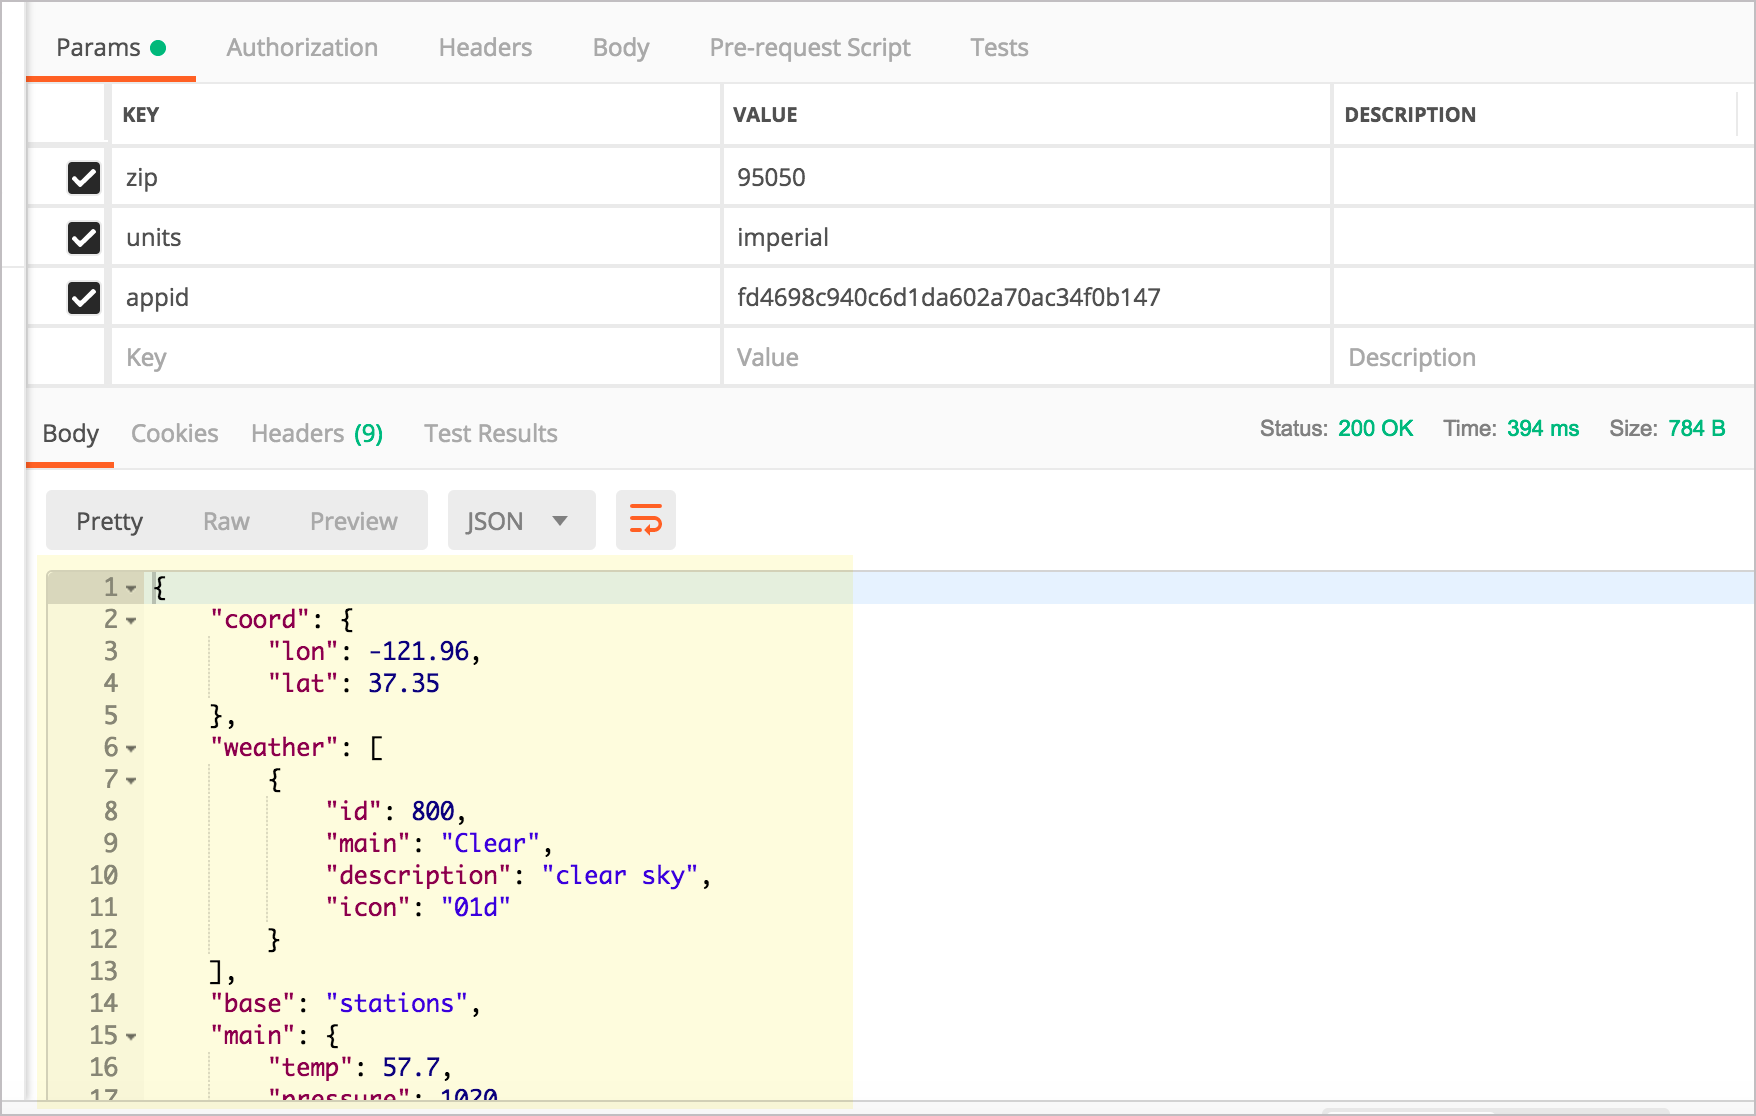
appid, use your own API key. (If you didn’t get an API key, use one of the keys here.) Your Postman UI should look like this:
When you add these parameters, they appear as a query string to the endpoint URL in the GET box. For example, your endpoint will now look like this:
https://api.openweathermap.org/data/2.5/weather?zip=95050&units=imperial&appid=APIKEY(but with different query string values and with your own API key instead ofAPIKEY). Query string parameters appear after the question mark?symbol and are separated by ampersands&. The order of query string parameters doesn’t matter.Note that many APIs pass the API key in the header rather than as a query string parameter in the request URL. (If that were the case, you would click the Headers tab and insert the required key-value pairs in the header. But OpenWeatherMap passes the API key as a query string parameter.)
- key:
-
Click Send.
The response appears in the lower pane. For example:
Save the request
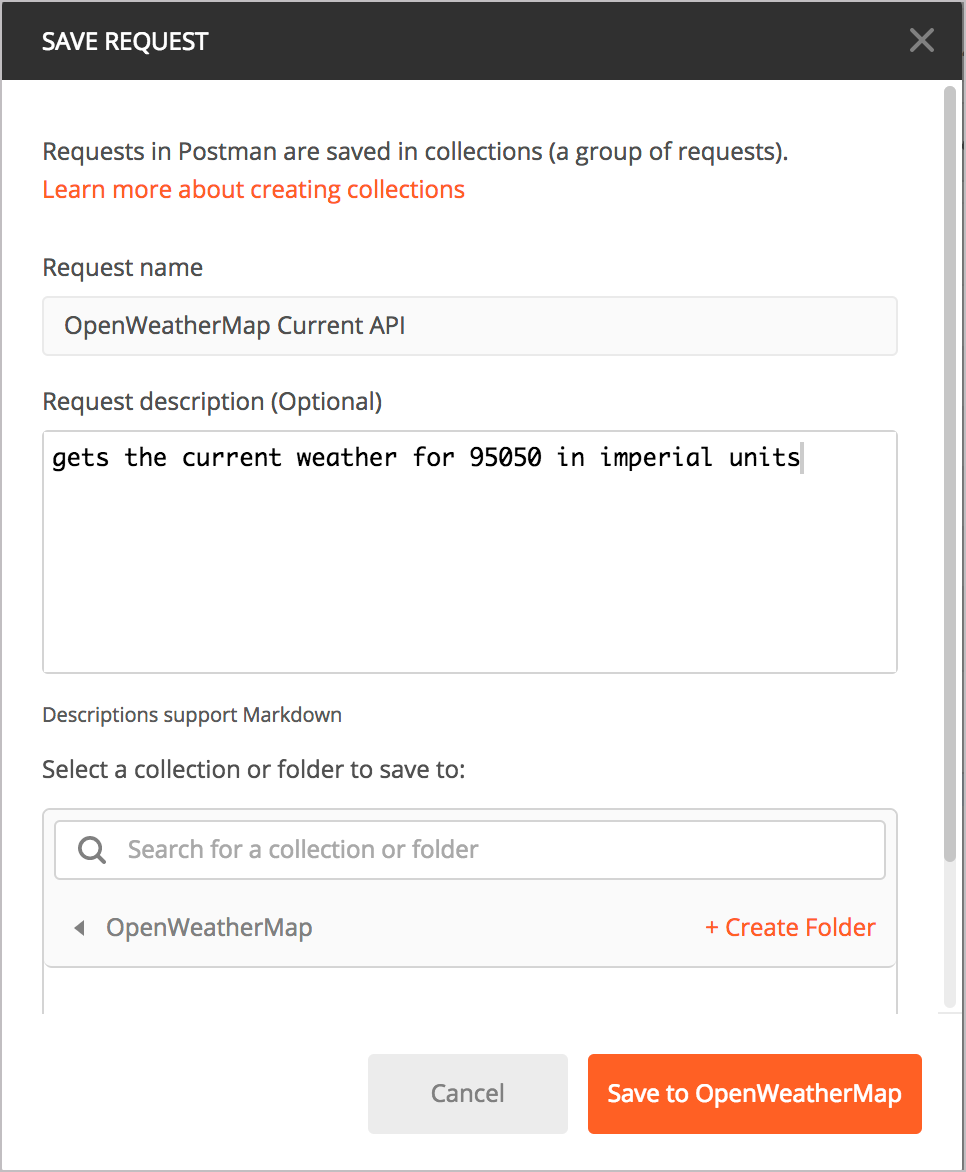
- In Postman, click the Save button (next to Send). The Save Request dialog box appears.
- In the Request name box, type a friendly name for the request, such as “OpenWeatherMap Current API.”
- In the Request description (Optional) field, type a description such as “gets the current weather for 95050 in imperial units.”
-
Scroll down a bit and click + Create Collection to create a folder to save the request in. Name your new collection (e.g., “OpenWeatherMap”) and click the orange check mark. Then select the new collection you just created.
After you create the collection, the Save button will be enabled. Your Postman collection should look something like this:
Collection dialog box -
Click Save to [collection name]
Saved requests appear in the left side pane under Collections. (If you don’t see the Collections pane, click the Show/Hide Sidebar button
 in the lower-left corner to expand it.
(Optional) Make a request for the OpenWeatherMap 5 day forecast
Now instead of getting the current weather, let’s use another OpenWeatherMap endpoint to get the forecast. Enter details into Postman for the 5 day forecast request. In Postman, you can click a new tab, or click the arrow next to Save and choose Save As. Then choose your collection and request name.
A sample endpoint for the 5 day forecast, which specifies location by zip code, looks like this:
https://api.openweathermap.org/data/2.5/forecast?zip=95050,us
Add in the query parameters for the API key and units:
https://api.openweathermap.org/data/2.5/forecast?zip=95050&appid=APIKEY&units=imperial
(In the above code, replace out APIKEY with your own API key.)
Observe how the response contains a list that provides the forecast details for five days.
(Optional) Make one more OpenWeatherMap API request
Make one more OpenWeatherMap API request, this time changing the way you specify the location. Instead of specifying the location by zip code, specify the location using lat and lon geocoordinates instead. For example:
https://api.openweathermap.org/data/2.5/weather?lat=37.3565982&lon=-121.9689848&units=imperial&appid=APIKEY
(In the above code, replace APIKEY with your actual API key.)
Postman has a lot of other functionality you can use. We’ll revisit Postman later in the course for some other activities.
Activity: Make the OpenWeatherAPI request using curl
This activity assumes you have curl installed. curl is available on Mac and some Windows 10 versions by default. If you’re on an older Windows machine that doesn’t have curl, see installing curl here for details. (Most likely, choose “With Administrator Privileges (free)” 64-bit version.) Close and restart your Command Prompt after installing curl.
To make a request with curl:
- Assuming you completed the exercises in the Postman tutorial, go back into Postman.
- On any request you’ve configured, below the Save button in Postman, click the Code link. (If you don’t see the link, scroll up.)
-
In the Generate Code Snippets dialog box, select cURL from the drop-down list, and then click Copy to Clipboard.
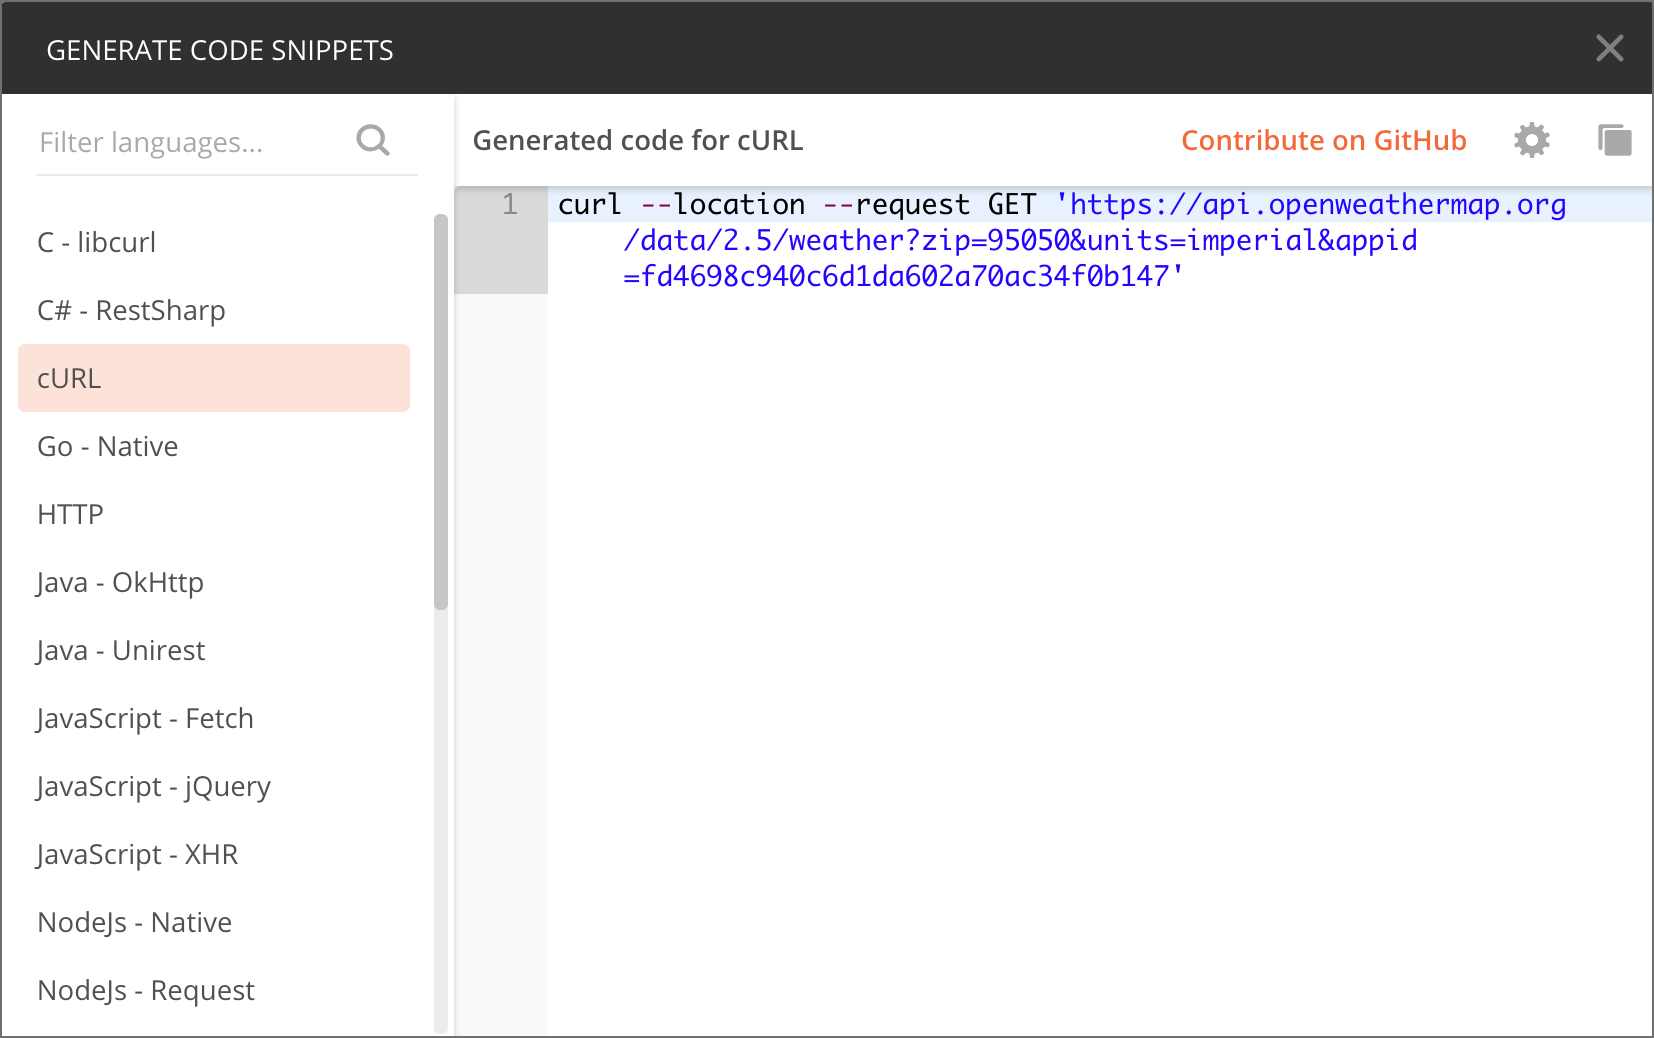
curl request in Postman The Postman code for the OpenWeatherMap weather request in curl looks as follows:
curl --location --request GET 'https://api.openweathermap.org/data/2.5/weather?zip=95050&units=imperial&appid=APIKEY'(In the above code, replace
APIKEYwith your actual API key.)The
--locationparameter will prompt curl to submit a new request if the URL is a redirect. The--requestparameter specifies the operation for the request.(Note that previously, Postman would its own header information, designated with
-H. If you see these parameters, delete them since they cause issues when submitted outside of Postman.)In general, the code snippets can be copied and pasted directly into your terminal on a Mac. However, for Windows, you must change the single quotation marks to double quotation marks.
Also, on Windows, if your curl has any backslashes, (
\) remove them and put all content onto the same line. (Backslashes are just added for readability). You can make these adjustments in a text editor before pasting the curl command into the Command Prompt. -
Go to your Terminal (Mac) or Command Prompt (Windows).
You can open your Terminal / Command Prompt by doing the following:
-
If you’re on Windows, go to Start and search for cmd to open up the Command Prompt. Paste in the curl request and then press Enter. (If you can’t paste it in, look for paste options on the right-click menu.)
-
If you’re on a Mac, open Terminal by pressing Cmd + spacebar and typing Terminal. (Or go to Applications > Utilities > Terminal). (You could also use iTerm.) Paste in the curl request and then press Enter.
The response from the OpenWeatherMap weather request should look as follows:
{"coord":{"lon":-121.95,"lat":37.35},"weather":[{"id":802,"main":"Clouds","description":"scattered clouds","icon":"03d"}],"base":"stations","main":{"temp":68.34,"pressure":1014,"humidity":73,"temp_min":63,"temp_max":72},"visibility":16093,"wind":{"speed":3.36},"clouds":{"all":40},"dt":1566664878,"sys":{"type":1,"id":5122,"message":0.0106,"country":"US","sunrise":1566653501,"sunset":1566701346},"timezone":-25200,"id":0,"name":"Santa Clara","cod":200}This response is minified. You can un-minify it by going to a site such as JSON pretty print, or if you have Python installed, you can add
| python -m json.toolat the end of your cURL request to un-minify the JSON in the response (see this Stack Overflow thread for details). -
Activity: Make an API request on a web page
For this activity, you’ll use JavaScript to display the API response on a web page. Specifically, you’ll use some auto-generated jQuery code from Postman to create the AJAX request. You’ll get the wind speed from the response and print it to the page.
-
In an editor such as Sublime Text, create a new HTML file called
weather.htmland insert the following boilerplate code:<html> <meta charset="UTF-8"> <head> <title>Sample page</title> <script src="https://ajax.googleapis.com/ajax/libs/jquery/1.11.1/jquery.min.js"></script> <script> POSTMAN CODE GOES HERE </script> </head> <body> <h1>Sample Page</h1> wind speed: <span id="windSpeed"></span> </body> </html> - Assuming you completed the exercises in the Postman tutorial to configure a request, go back into Postman.
-
In Postman, click the Code link (below the Save button) and go to JavaScript - jQuery:
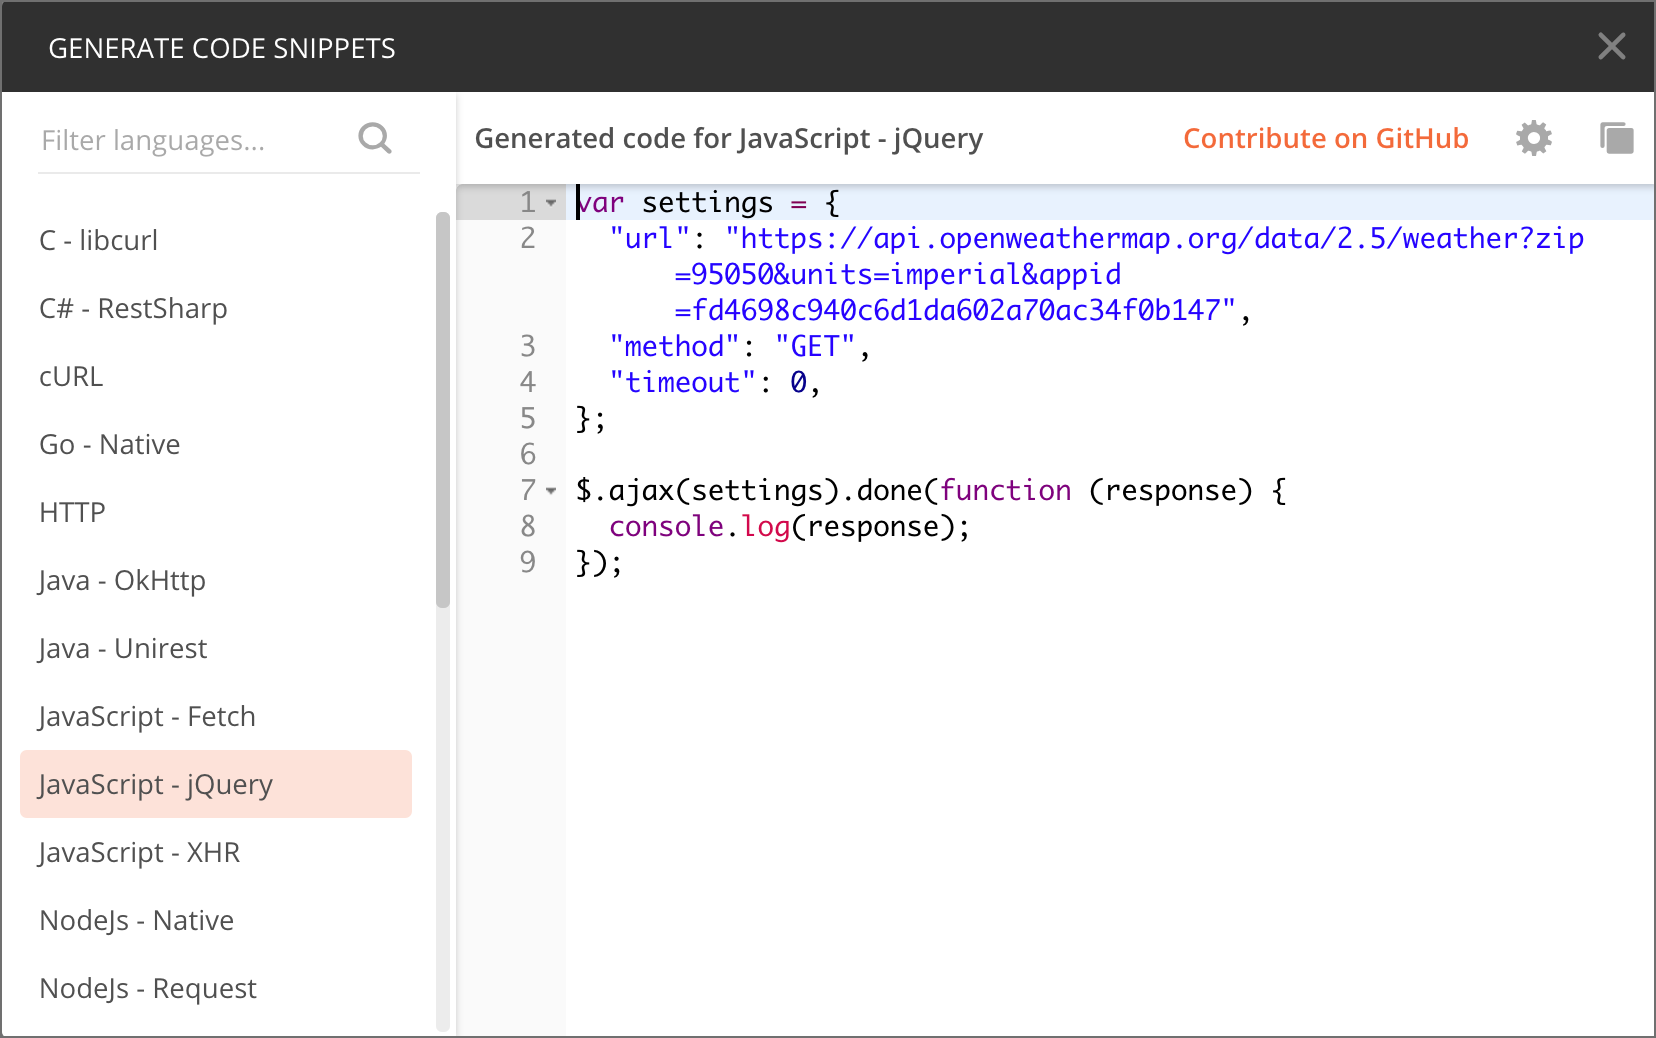
Copying JavaScript code from Postman - Copy the Postman code above and insert it into the
POSTMAN CODE GOES HEREplace in yourweather.htmlfile. -
Directly below
console.log(response);, add these two lines:var content = response.wind.speed; $("#windSpeed").append(content); -
Your final code should look as follows:
<html>
   <meta charset="UTF-8">
   <head>
      <title>Sample page</title>
      <script src="https://ajax.googleapis.com/ajax/libs/jquery/1.11.1/jquery.min.js"></script>
      <script>
      var settings = {
        "url": "https://api.openweathermap.org/data/2.5/weather?zip=95050&units=imperial&appid=APIKEY",
        "method": "GET",
        "timeout": 0,
      };

      $.ajax(settings).done(function (response) {
        console.log(response);
        var content = response.wind.speed;
        $("#windSpeed").append(content);
      });

      </script>
   </head>
   <body>
      <h1>Sample Page</h1>
      wind speed: <span id="windSpeed"></span>
   </body>
</html>
(In the above code, replace
APIKEYwith your actual API key.)What is this code doing? In a nutshell, when
ajax(a jQuery function) retrieves the response from the API, it assigns the response toresponse. A variable calledcontentis created and set it equal toresponse.wind.speed(dot notation is used to access this value). jQuery’sappendmethod insertscontentafter an element called#windSpeedon the page. (I realize this is an extremely abbreviated explanation, but explaining JavaScript is beyond the scope of this course. In general, you can learn more by reading about the jQuery.ajax() function.) -
Start Chrome and open the JavaScript Console.
To open the JavaScript Console, on Chrome on a Mac, go to View > Developer > Javascript Console; on Windows, click the menu button (vertical ellipses) and go to More tools > Developer tools. Then click the Console tab.
-
In Chrome, press Cmd+O (Mac) or Ctrl + O (Windows) and select your
weather.htmlfile.The weather response should be logged to the JavaScript Console (due to the
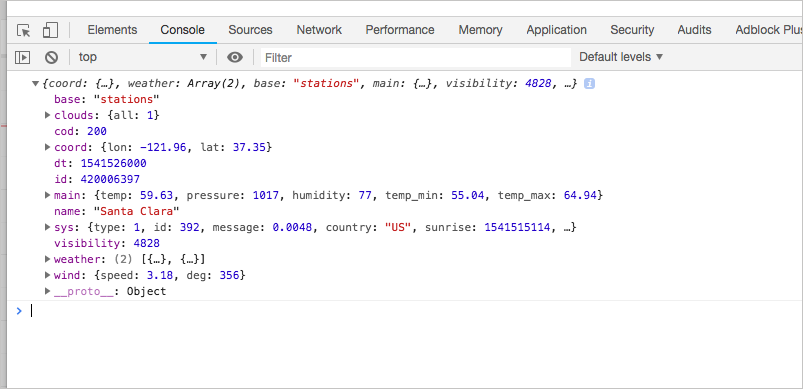
console.log(response)code in the request). If you expand the object returned to the console, it will look as follows:You can view the file here: weather-plain.html.
10:15 - 10:30am: Break
Break time
10:30 - 11:30pm: API endpoints
Section: Documenting API endpoints
Activity: What’s wrong with this API reference topic
The following is a sample API reference topic for an endpoint called surfreport. There are about 25 things wrong in the topic. A copy of this same content is available in a read-only Google Doc here. In Google Docs, go to File > Make a Copy to create your own instance. Then make comments in Google docs to note as many errors as you can find.
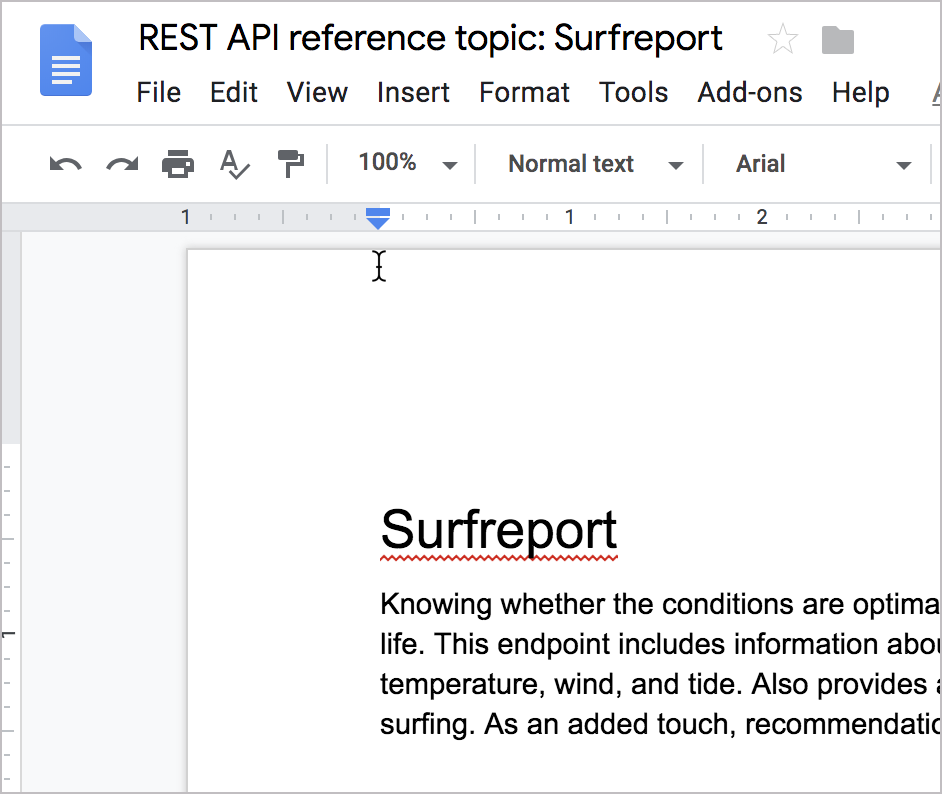
Here’s the same doc (with problems) displayed on the web:
Surfreport
Knowing whether the conditions are optimal for surfing is a necessary detail in every surfer’s life. This endpoint includes information about surfing conditions, including the surf height, water temperature, wind, and tide. Also provides an overall recommendation about whether to go surfing. As an added touch, recommendations are expressed in surfer lingo. Surf’s up!
Endpoints
GET/POST surfreport/{:beachId}
Gets the surf conditions for a specific beach ID.
Parameters
| Parameter | Use | Description | Type of data |
{beachId}
|
Required | Refers to the ID for the beach you want to look up. | Number |
days
|
Optional | The number of days to include in the response. Default is 3. Max 10. | Integer |
time
|
Optional | The time you want the report for. | Integer. ISO 8601 format. Example: 20180915T155300+0500
|
Sample request
https://api.openweathermap.org/data/2.5/surfreport/12345?zip=95050&appid=APIKEY&days=1
(In the above code, replace APIKEY with your actual API key.)
Sample response
{
    "surfreport": [
        {
            "beach": "Santa Cruz",
            "monday": {
                "1pm": {
                    "tide": 5,
                    "wind": 15,
                    "watertemp": 80,
                    "surf_height": 5,
	          "riptide":  "moderate",
                    "recommendation": "Carve it up, brah! The waves are crankin' wild out there."
                },
                "2pm": {
                    "tide": -1,
                    "wind": 1,
                    "watertemp": 50,
                    "surf_height": 3,
	         "riptide": extreme
                    "recommendation": "Waves are foam and frothy but rideable in places. Gravitate to the impact zone, due, and hang loose."
                },
                "3pm": {
                    "tide": -1,
                    "wind": 10,
                    "watertemp": 65,
                    "surf_height": 1,
                    "recommendation": "Scene is blown out. Bail inland and chill on the beach instead or you’ll the one who’ll be shredded, due."
                }
                ...
            }
        }
    ]
}
Response definitions
The following table describes each item in the response.
| Response item | Description | Data type |
beach
|
The beach you selected based on the beach ID in the request. The beach name is the official name as described in the National Park Service Geodatabase. | String |
{day}
|
The day(s) of the week requested. | object |
{time}
|
The time for the conditions. | string |
tide
|
The level of tide at the beach for a specific day and time. Tide is the distance inland that the water rises to, and can be a positive or negative number. When the tide is out, the number is negative. When the tide is in, the number is positive. The 0 point reflects the line when the tide is neither going in nor out but is in transition between the two states. | String |
wind
|
The wind speed at the beach. Wind affects the surf height and general wave conditions. Wind speeds of more than 15 make surf conditions undesirable because the wind creates white caps and choppy waters. | Int |
watertemp
|
The temperature of the water. Water temperatures below 70 usually require you to wear a wetsuit. With temperatures below 60, you will need at least a 3mm wetsuit and preferably booties to stay warm. | String |
surfheight
|
The height of the waves, returned in either feet or centimeters depending on the units you specify. A surf height of 3 feet is the minimum size needed for surfing. If the surf height exceeds 10 feet, it is not safe to surf. | Map |
recommendation
|
An overall recommendation based on a combination of the various factors (wind, watertemp, surfheight), etc. | String |
Answers
You can view the answer key here: What’s wrong with this topic answer key.
Activity: Evaluate API reference docs for core elements
In this activity, you’ll review API reference documentation and identify the common elements. To evaluate the API reference docs:
-
Choose three of the following sites. In the three you choose, analyze the API reference sections (where the endpoints are listed):
- Nexmo API reference
- Twitter API reference
- Stripe API reference
- Azure API reference
- Flickr API reference
- YouTube API reference
- Splunk API reference
- Zomato API reference
- Paypal API reference
- Basecamp API reference
- OpenSecrets API reference
- Dropbox API reference
- DBS Developers API
- Adyen Docs
- NBG Technology Hub
-
In the reference documentation, identify each of the following sections (if they exist):
The sections might be named differently in the API doc sites you browse, but they’re usually recognizable to some degree (if included). If you’re finding it somewhat difficult to locate them, this is part of the wild west of terminology and organization when it comes to API documentation.
-
Assess the API reference documentation by answering the following questions for each section:
Resource description:
- Is the description action-oriented?
- Is it a brief 1-3 sentence summary?
Endpoints and methods:
- How are the endpoints grouped? (Are they listed all on the same page, or on different pages? Are they grouped by method, or by resource?)
- How are the methods specified for each endpoint?
Parameters:
- How many types of parameters are there (header, path, query string) or request body for the endpoints?
- Are the data types (string, boolean, etc.) defined for each parameter? Are required/optional values noted?
Request example:
- In what format or language is the request shown (e.g. curl, specific languages, other)?
- How many parameters does the sample request include?
Response example:
- Is there both a sample response and a response schema? (And is each element in the response actually described?)
- How does the doc site handle nested hierarchies in the response definitions?
11:30 - 12:30: OpenAPI and Swagger
Activity: Explore Swagger UI through the Petstore Demo
Let’s get some hands-on experience with Swagger UI using the Petstore demo. The Petstore demo provides a good example of how the OpenAPI specification can be rendered visually.
-
Go to the Swagger Pet Store Demo.
As with most Swagger-based outputs, Swagger UI provides a “Try it out” button. To make it work, you must first authorize Swagger by clicking Authorize and entering your API key in the Authorization modal. However, the Petstore authorization modal is just for demo purposes. There isn’t any real code authorizing those requests, so you can close the Authorization modal or skip it altogether.
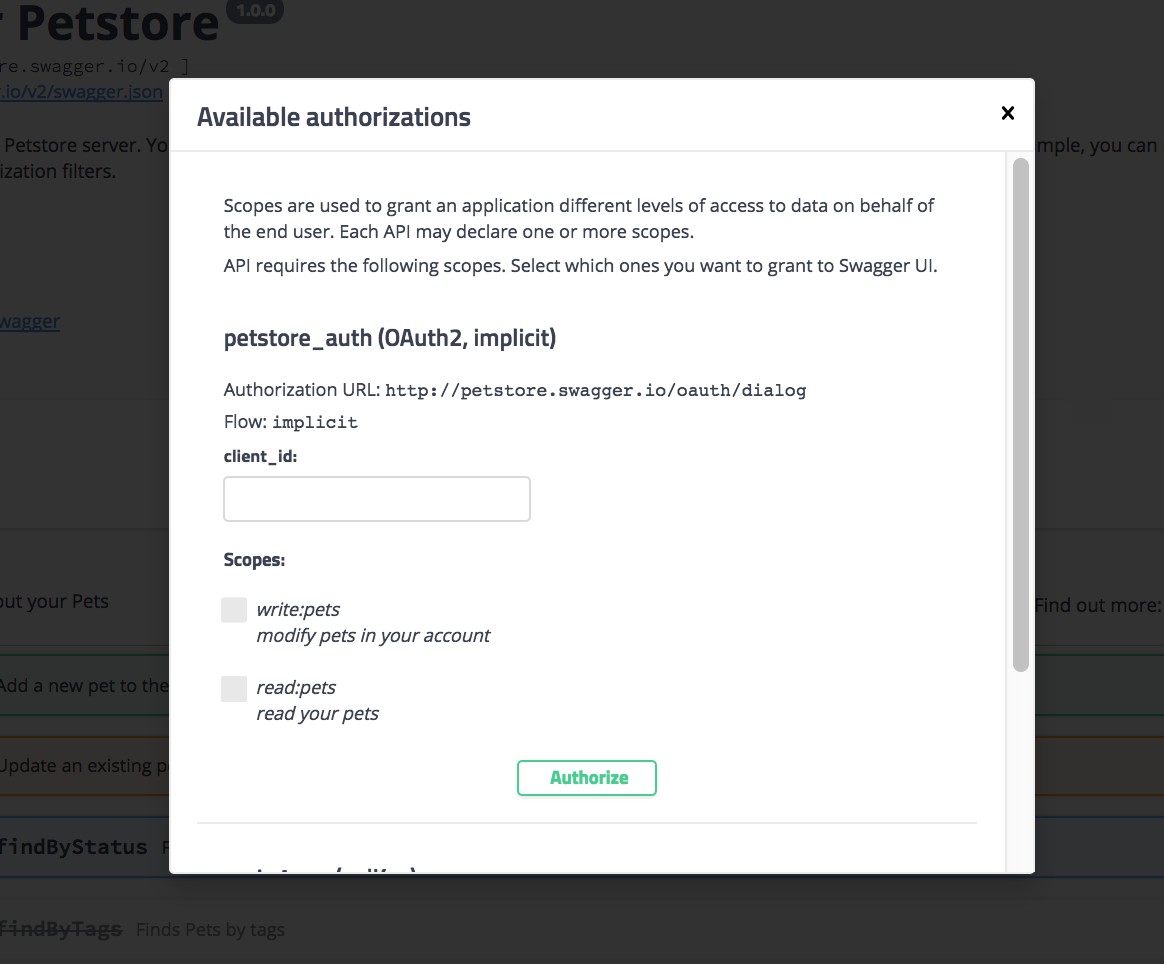
Authorization modal in Swagger UI -
Expand the POST
/petendpoint.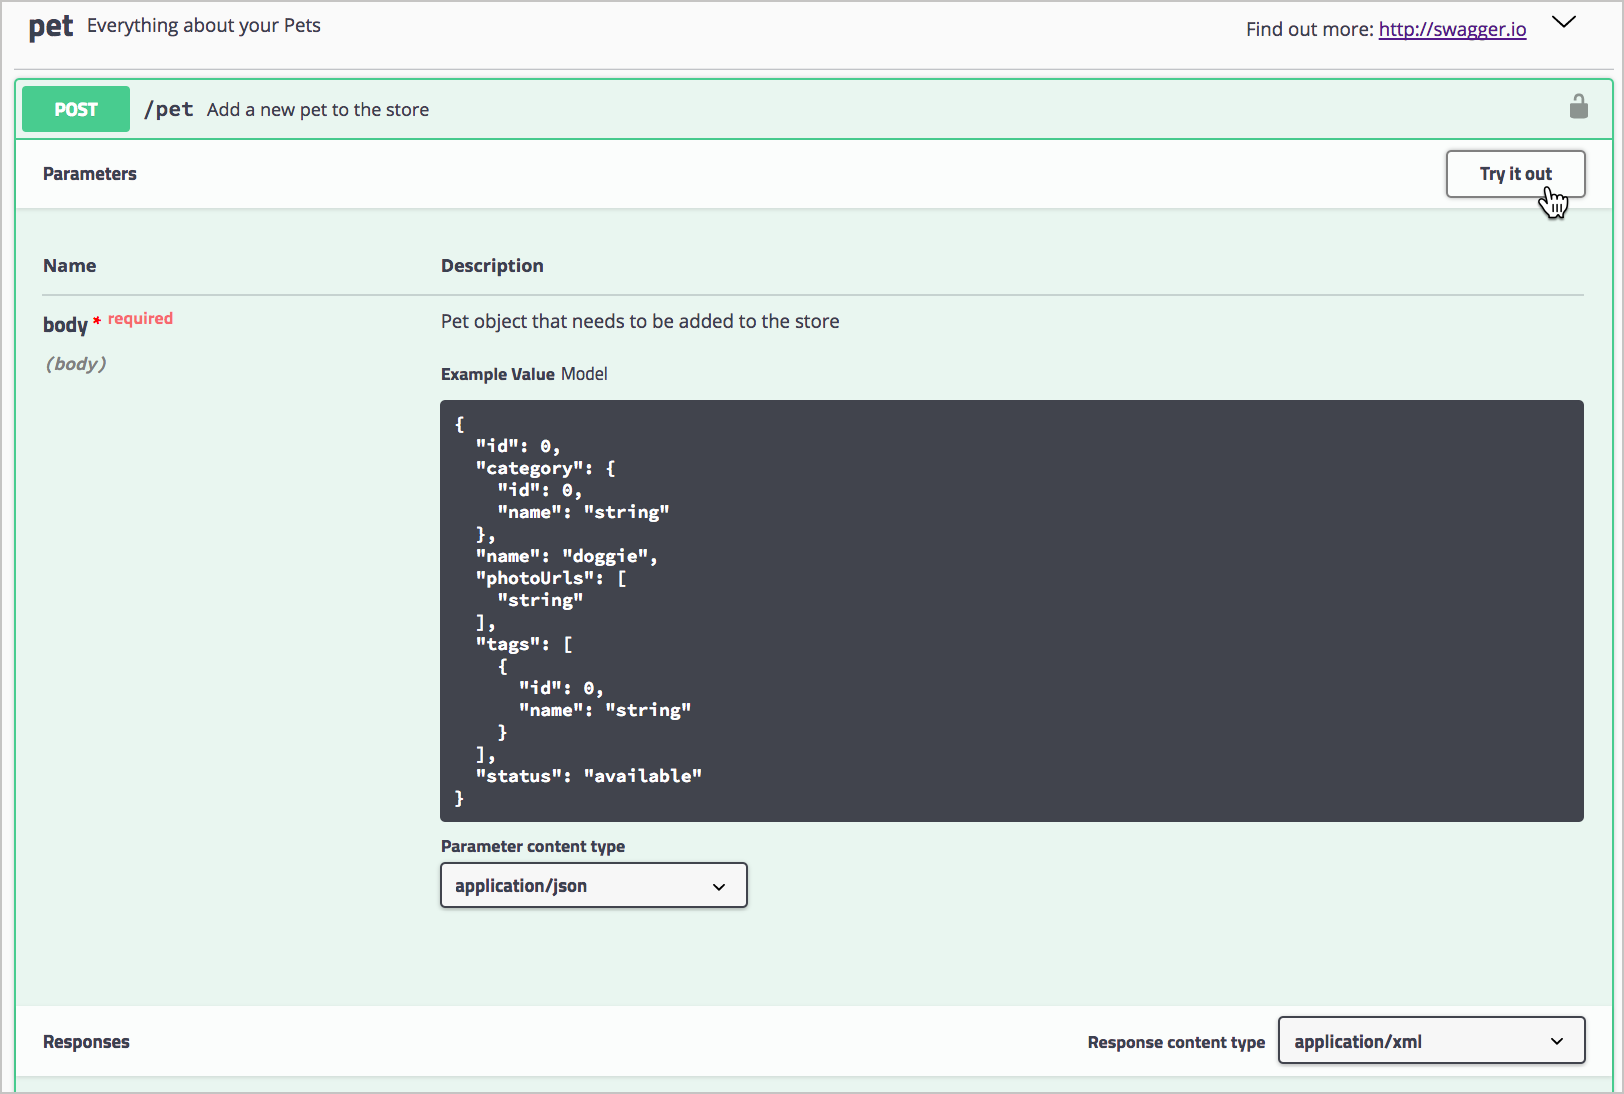
POST /pet endpoint and Try it out button in Swagger UI -
Click Try it out.
After you click Try it out, the example value in the Request Body field becomes editable.
- In the example value, change the first
idvalue to a unique (and unlikely to be repeated) whole number (such as24329). Change the namedoggieto a pet name you can remember (e.g.,Bentley). -
Click Execute.
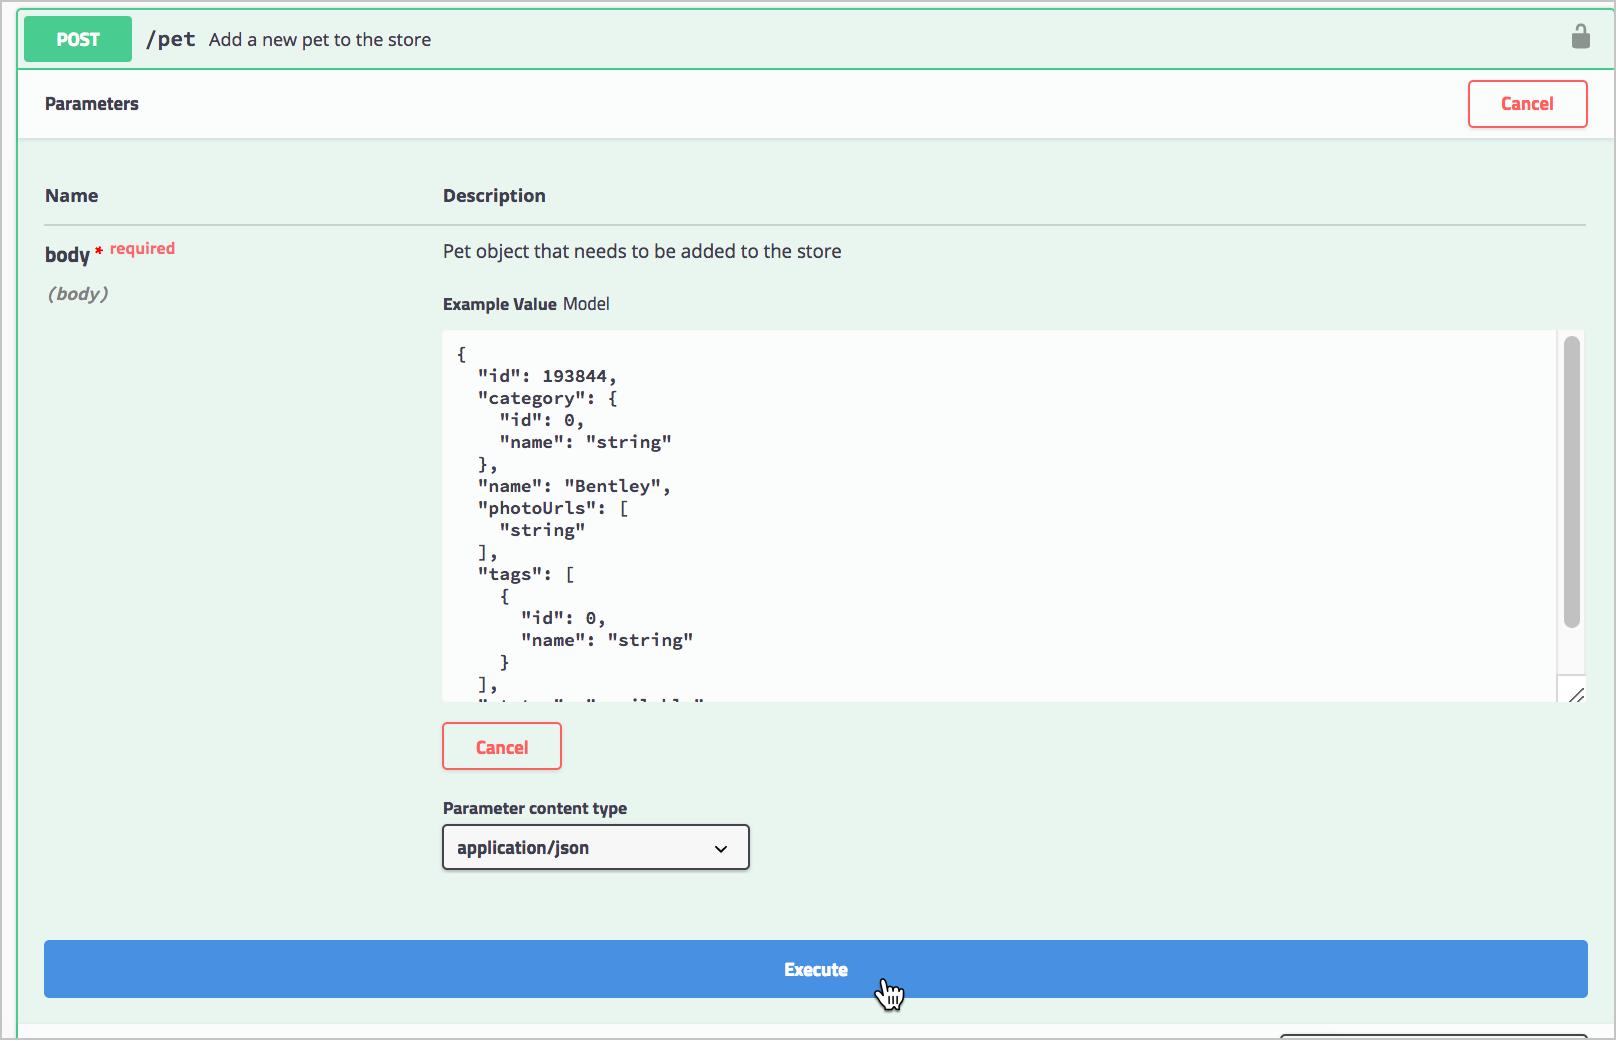
Executing a sample Petstore request Swagger UI submits the request and shows the curl that was submitted. For example, here’s the curl Swagger UI sent:
curl -X POST "https://petstore.swagger.io/v2/pet" -H "accept: application/xml" -H "Content-Type: application/json" -d "{ \"id\": 1000, \"category\": { \"id\": 0, \"name\": \"string\" }, \"name\": \"Bentley\", \"photoUrls\": [ \"string\" ], \"tags\": [ { \"id\": 0, \"name\": \"string\" } ], \"status\": \"available\"}"Notice that, with the
-d(data) parameter, the request body is escaped and added directly into the curl command rather than being loaded from a file (as explained in Common curl commands related to REST).The Responses section in Swagger UI shows the response from the server. By default, the response returns JSON:
{ "id": 1000, "category": { "id": 0, "name": "string" }, "name": "Bentley", "photoUrls": [ "string" ], "tags": [ { "id": 0, "name": "string" } ], "status": "available" } - The Petstore is a functioning API, and you have actually created a pet. For fun, expand the GET/pet/{petId} endpoint, click Try it out, enter the pet
idyou used in the previous operation, and then execute the request. You should see your pet’s name returned.
For this this activity, see this topic: Create a OpenAPI specification using a visual editor (Stoplight Studio). Due to the length fo the topic, I haven’t embedded it here.
12:30 - 1:30pm: Lunch
Lunch provided through catering.
1:30 - 2:00pm: OpenAPI and Swagger (continued)
Activity: Use Redoc to render OpenAPI spec
In this activity, you’ll render your OpenAPI spec with Redoc.
-
Copy the following code into an empty text file (in a text editor such as Sublime Text) and save the file as redoc.html. (Note: This code comes from Redoc’s “TL;DR” readme instructions on GitHub.)
<!DOCTYPE html>
<html>
  <head>
    <title>ReDoc</title>
    <!-- needed for adaptive design -->
    <meta charset="utf-8"/>
    <meta name="viewport" content="width=device-width, initial-scale=1">
    <link href="https://fonts.googleapis.com/css?family=Montserrat:300,400,700|Roboto:300,400,700" rel="stylesheet">

    <!--
    ReDoc doesn't change outer page styles
    -->
    <style>
      body {
        margin: 0;
        padding: 0;
      }
    </style>
  </head>
  <body>
    <redoc spec-url='https://stoplight.io/api/nodes.raw?srn=gh/tomjoht/stoplight_studio_weathermap/reference/openweathermap.v1.yaml'></redoc>
    <script src="https://cdn.jsdelivr.net/npm/redoc@next/bundles/redoc.standalone.js"> </script>
  </body>
</html>
Make sure you save the file with a
.htmlextension so that your browser will render it as HTML. -
Change the value for
redoc spec-urlto a valid OpenAPI spec that is available at an online URL.If you were following the previous tutorial on creating an OpenAPI spec through Stoplight Studio (Create an OpenAPI specification document using Stoplight Studio’s visual editor), you can use the OpenAPI URL that Stoplight provides. From your Stoplight Studio display, go to the Overview topic and click Export OpenAPI. Choose either original or dereferenced. Copy the URL. Here’s an example URL.
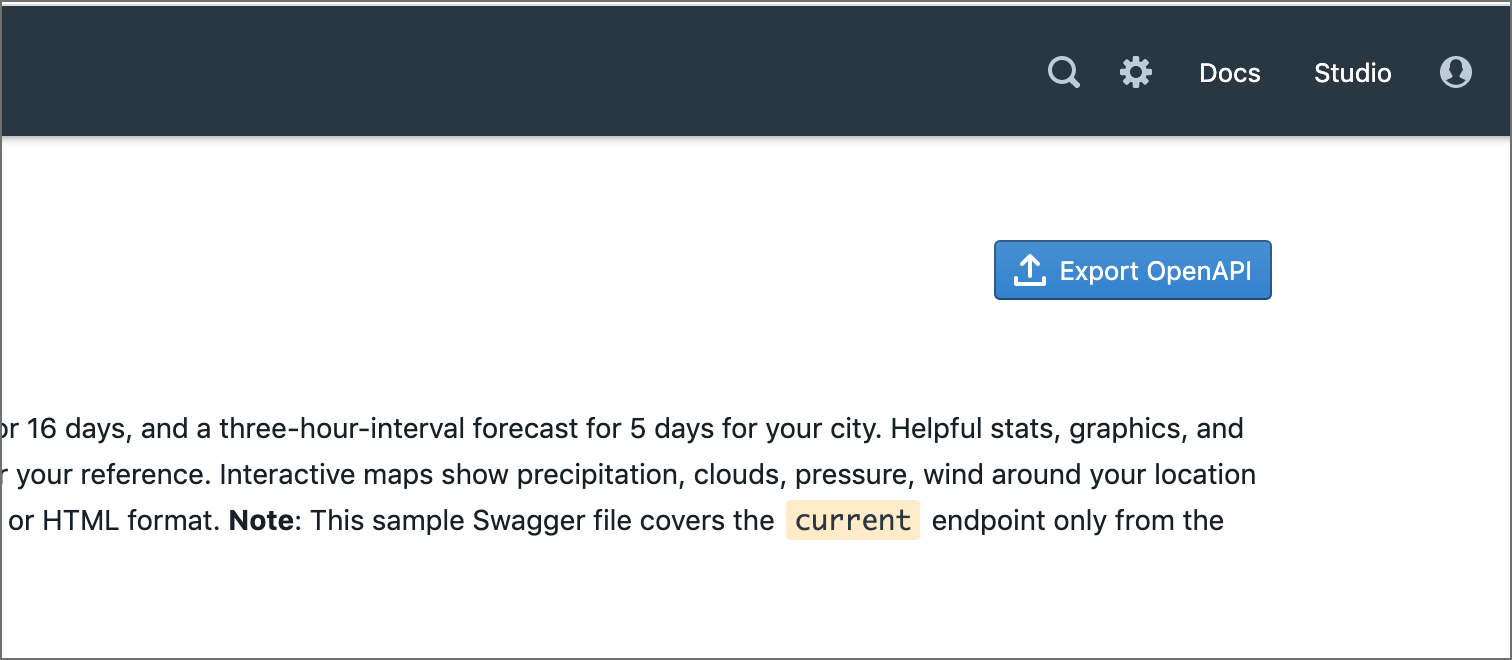
Exporting an OpenAPI URL -
In your web browser, click Cmd + O (Mac) or Ctrl + O (Windows), locate your redoc.html file, and select it.
The display should look as follows:
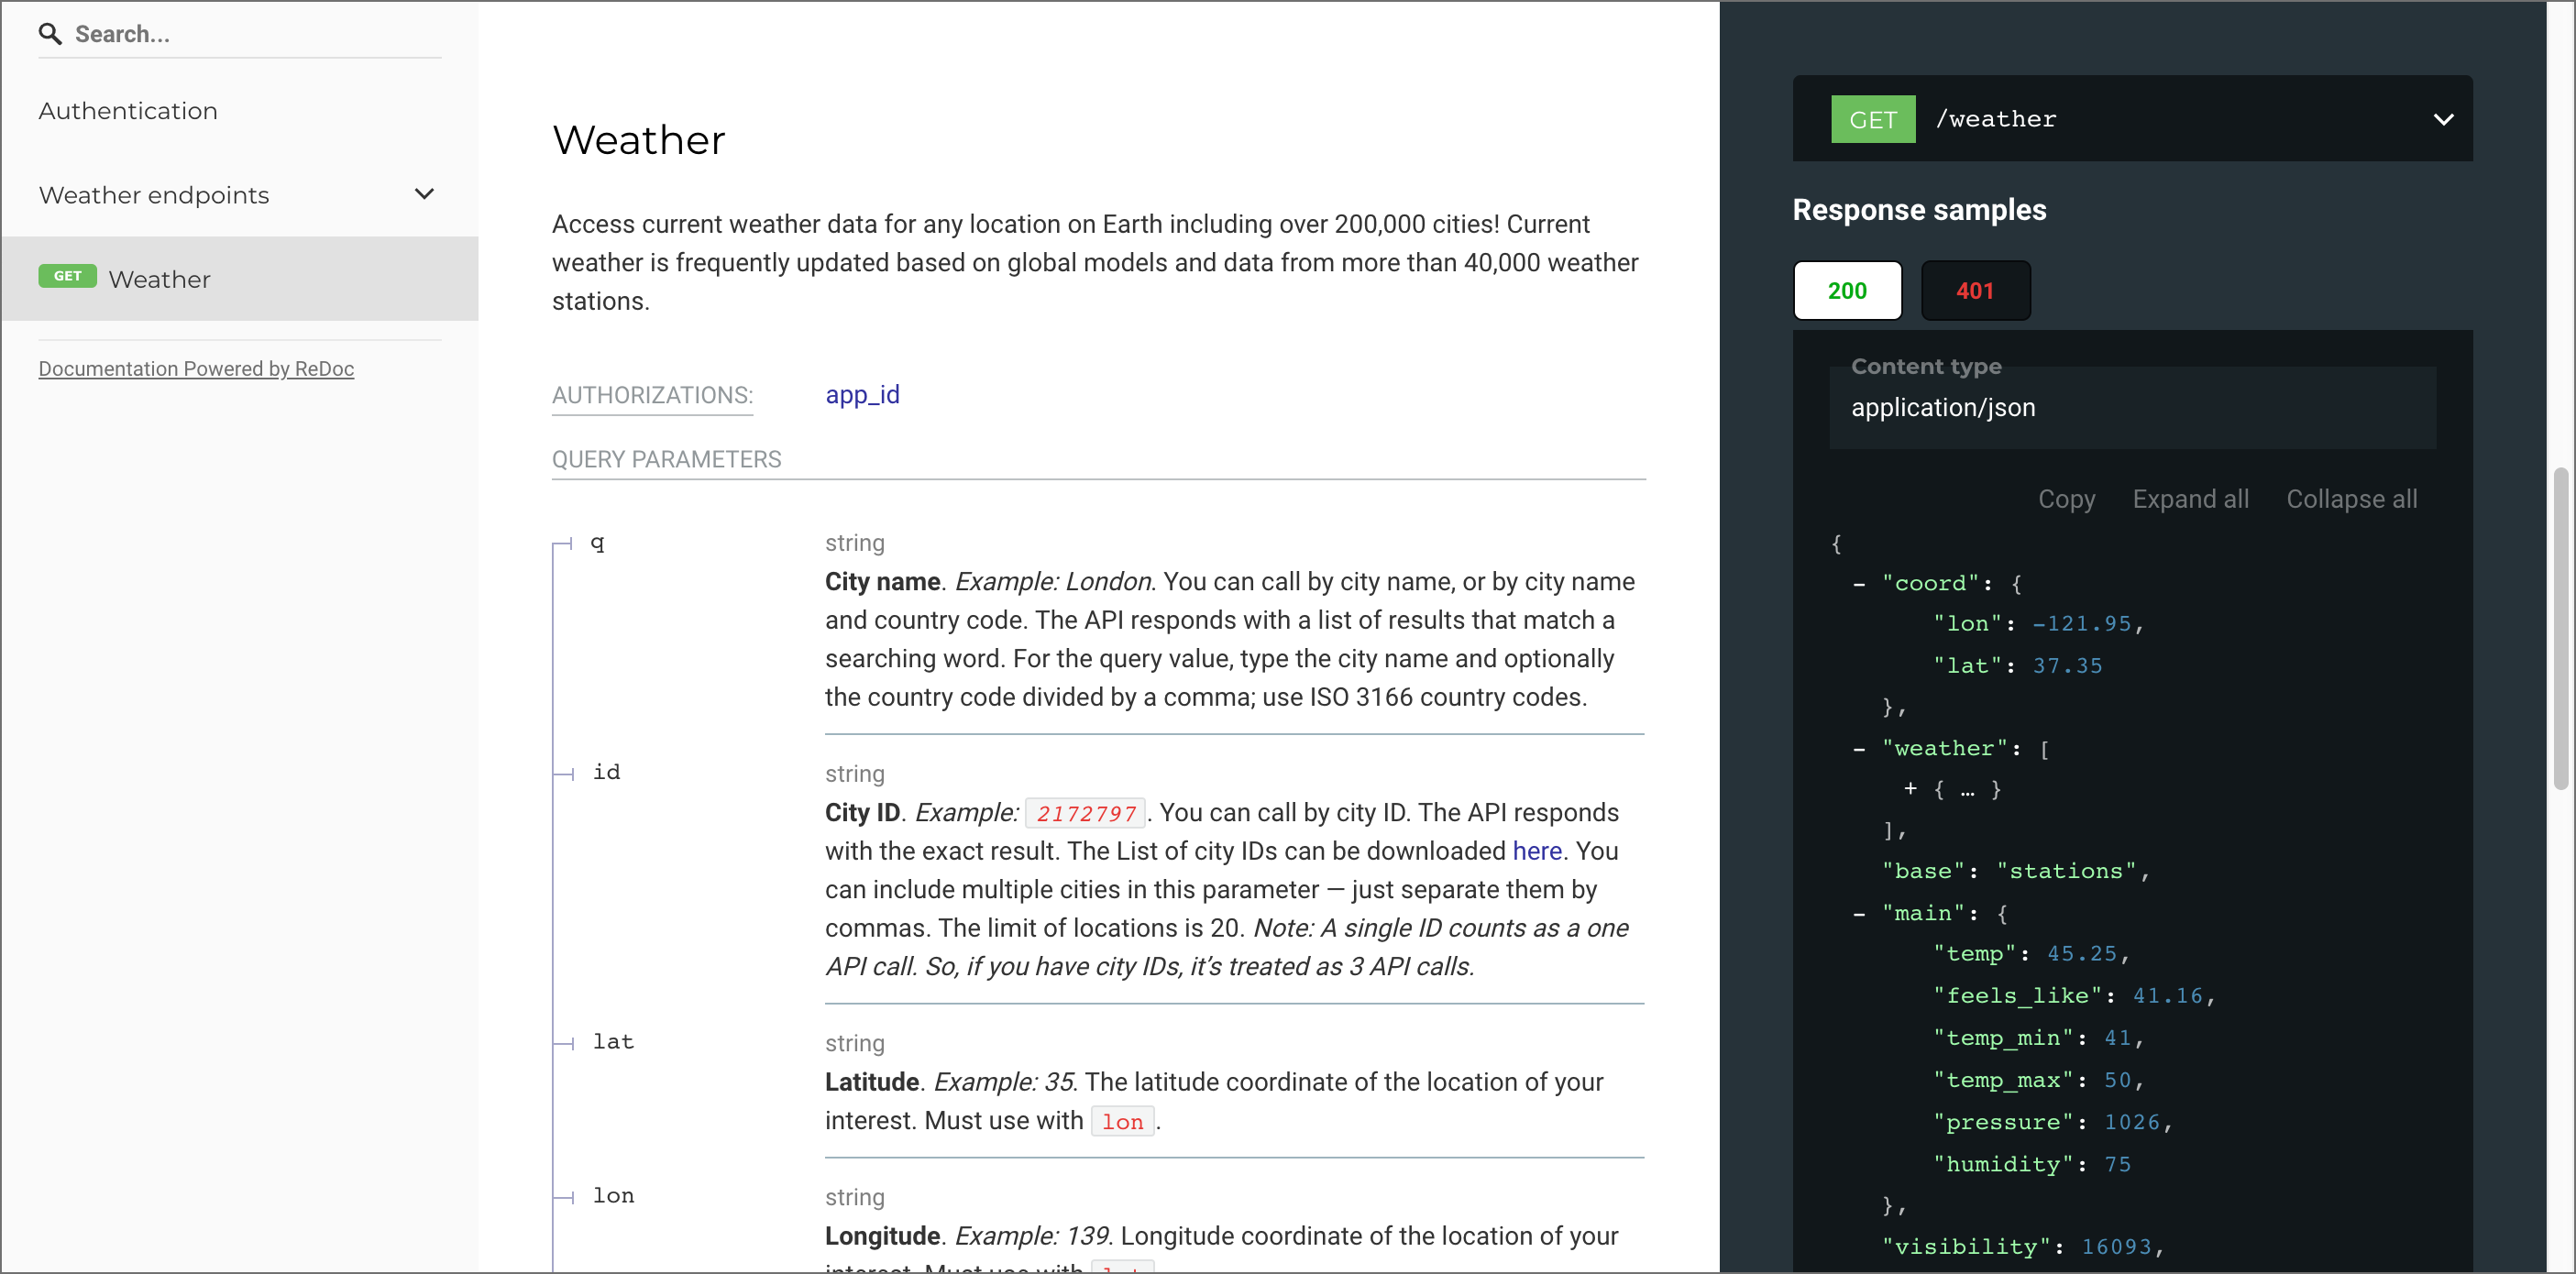
Sample Redoc display
Activity: Create a Swagger UI display with an OpenAPI spec document
In this activity, you’ll create a Swagger UI display for an OpenAPI specification document. If you’re using one of the pre-built OpenAPI files, you can see a demo of what we’ll build here: OpenWeatherMap Swagger UI.
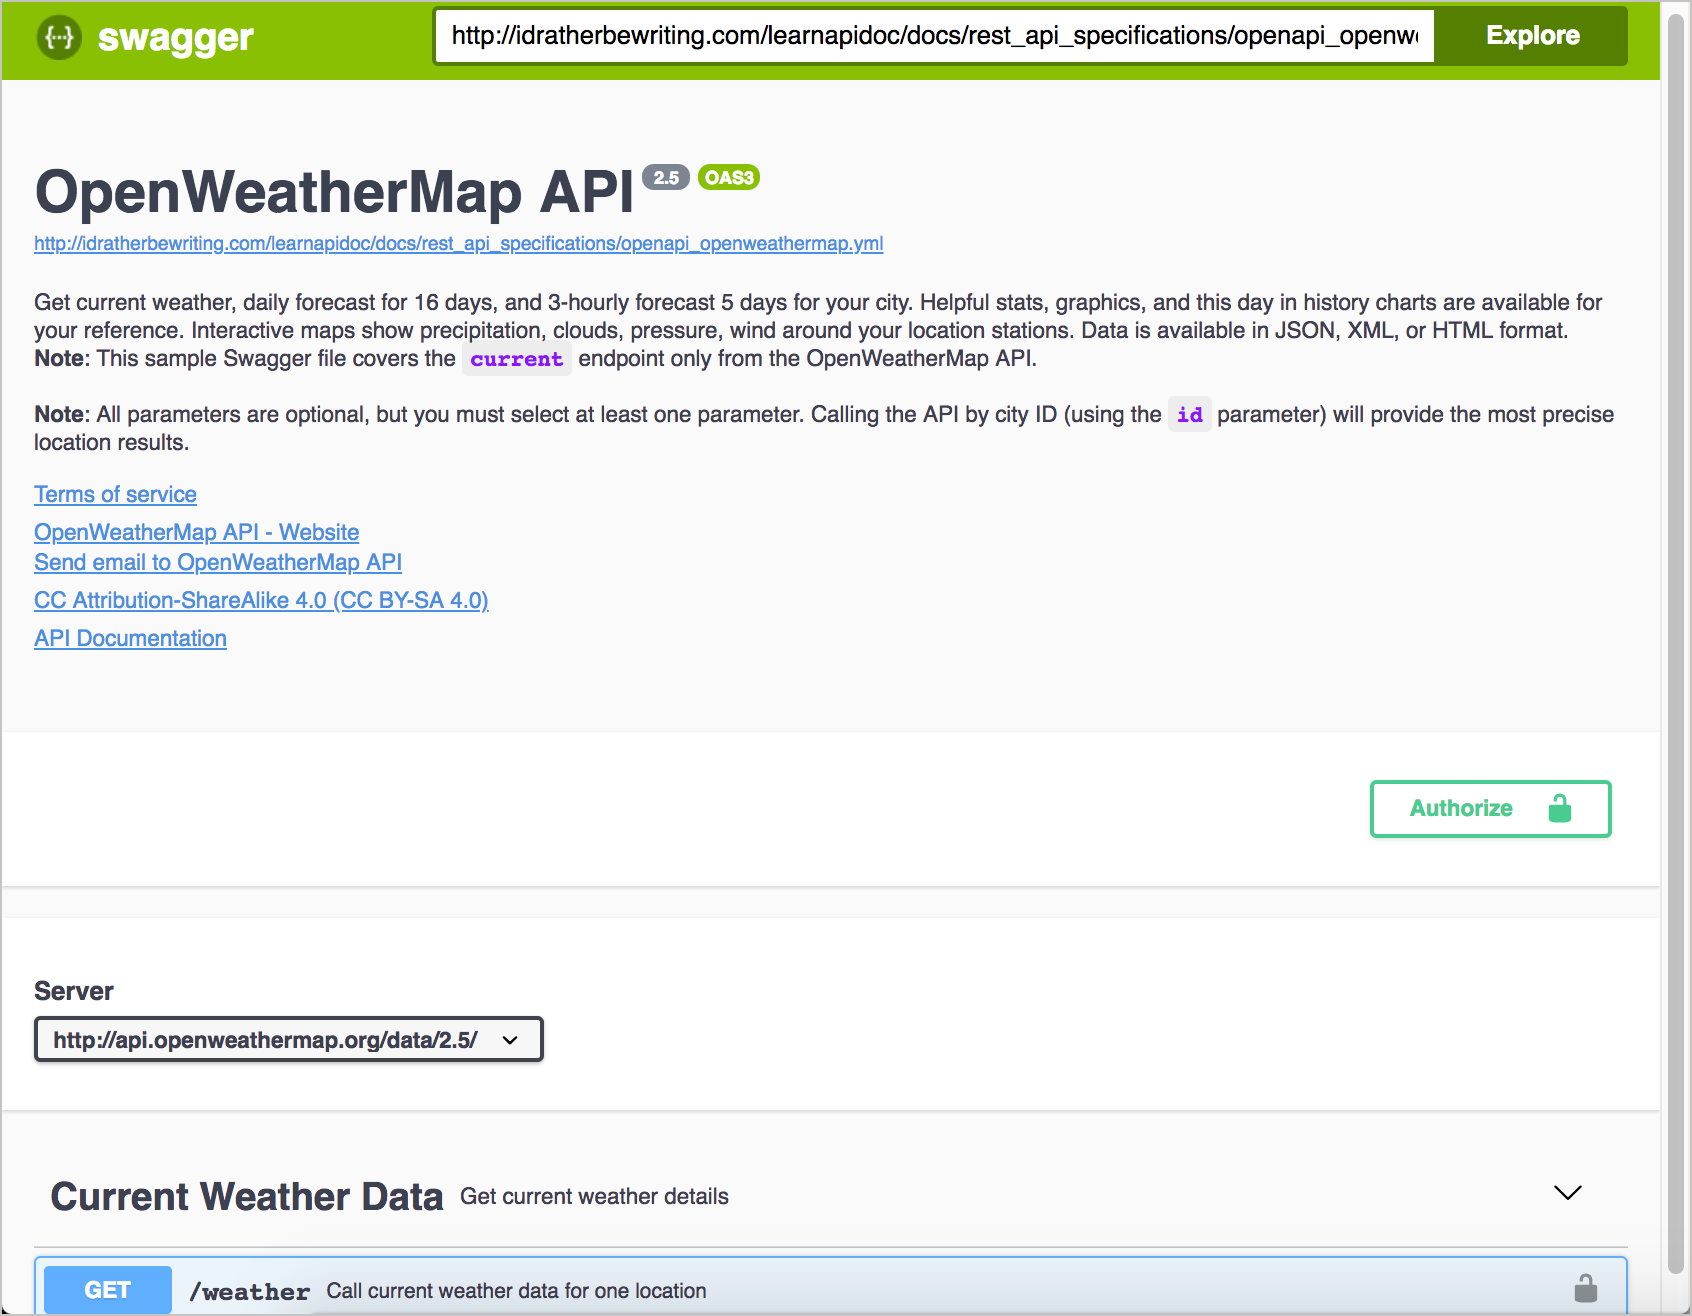
First, you’ll make sure you can view Swagger locally. Then you’ll switch the Petstore OpenAPI document URL with an OpenWeatherMap OpenAPI document URL.
- Go to the Swagger UI GitHub project.
-
Click Clone or download, and then click Download ZIP. Download the files to a convenient location on your computer and extract the files.
The only folder you’ll be working with in the downloaded zip is the
distfolder (short for distribution). Everything else is used only if you’re recompiling the Swagger files, which is beyond the scope of this tutorial. (If desired, you can drag thedistfolder out of theswagger-ui-masterfolder so that it stands alone.) -
In your Chrome browser, press Cmd+O (Mac) or Ctrl+O (Windows), browse to the
distfolder, and select theindex.htmlfile,You should see the Petstore Swagger content. Now you’ll customize the OpenAPI spec file with another file.
- Inside your
distfolder, openindex.htmlin a text editor such as Sublime Text. -
Look for the following code:
url: "http://petstore.swagger.io/v2/swagger.json", -
Change the
urlvalue to an online web URL to your Swagger file. For example:https://idratherbewriting.com/learnapidoc/docs/rest_api_specifications/openapi_openweathermap.yml. Then save the file.If the
urlreference isn’t to an online URL, Swagger UI will create an CORS (cross-origin resource sharing) error. To view Swagger UI with a local OpenAPI file, you can run a simple Python server locally to simulate a web server (this requires you to install Python). -
Refresh the
index.htmlfile in your Chrome browser. The content should show the OpenWeatherMap API content instead of Swagger Petstore content.When you’re ready to publish your Swagger UI file, you just upload the
distfolder (or whatever you want to call it) to a web server and go to theindex.htmlfile. For example, if you called your directorydist(leaving it unchanged), you would go tohttp://myserver.com/dist/.For more instructions in working with Swagger UI, see the Swagger.io docs.
2:00 - 2:30pm: Conceptual topics
Activity: Complete the SendGrid Getting Started tutorial in 5 min
In this section, you explored Getting started tutorials. To get better empathy for these tutorials as a user, try to complete the following tutorial from SendGrid: Getting Started with the SendGrid API.
There are no supplementary instructions or tips for working through the content, as that would be a crutch to the experience. Ideally, you should be able to complete all the steps in about 5 minutes. After you finish, answer the following questions:
- Were you successful?
- If you were successful, how does this make you feel towards the documentation?
- Would you improve any part of this getting started tutorial?
- How could you implement a similar tutorial with your own product?
Activity: Judge conceptual content and decide which is best
The following are 7 common conceptual topics in API documentation. For each topic, examine the three examples and decide which one is best. This is an activity we’ll do together as a group.
API overview
API getting started
API authentication and authorization
API status and error codes
API rate limiting and thresholds
API quick reference
SDKs
2:30 - 2:45pm: Break
Break. Snacks provided.
2:45 - 3:30pm: Code tutorials
Activity: Analyze two code tutorials
Code tutorials often have the following sections or characteristics:
- Scenario description - the “why” behind the tutorial
- Tutorial outcomes - objectives or a demo of solution
- Solution overview - a birds-eye view of the solution
- Intended audience - assumptions about who the tutorial is for, skill level, point in journey
- Prerequisites - expectations about required items, configurations, or utilities for the tutorial (e.g., hardware devices, services set up, API keys, software, etc.).
- Steps - the tasks involved in the solution, often formatted as sections. The steps show an assembly order working up to final solution, building the code piece by piece as needed (like Legos).
- Examples to make it real - examples or personalized info included in the steps to make the steps more meaningful and understandable.
- Teaching moments - conceptual explanations peppered in along the way as asides or footnotes.
- Inline code comments - explanations inside the code about what’s going on.
- Conclusion, next steps - wrap-up, showing fully assembled code, pointing out next logical steps, linking to related tutorials.
The following are sample tutorials. Pick two tutorials and analyze them to see how many of the above common sections and characteristics you can find.
- Stripe - Sending emails for failed payments
- Twilio - How to build a chatbot
- GitHub - Building a CI server
- Message Buttons with Node.js
- Dropbox - Quickly integrate file upload in your web app using the Chooser
- Maps JavaScript API Overview
- Searching By Seller: Reviewing Information About A Seller
- How to Make a Heatmap with Mapbox GL JS
- Using the Marketing API with the Facebook Pixel
- Create a Custom Map URL
- Training Course: How to Build a Multimodal Alexa Skill
- Introduction to Populating a Website with API Data
- Video Skills Kit for Fire TV
3:30 - 4:15pm: Publishing API docs
Section: Publishing API Documentation
Activity: Create a GitHub wiki and publish content on a sample page
In this section, you will create a new GitHub repo and publish a sample file there.
- Create a GitHub account at GitHub.com.
-
Go to GitHub and sign in. After you’re signed in, click the + button in the upper-right corner and select New repository.
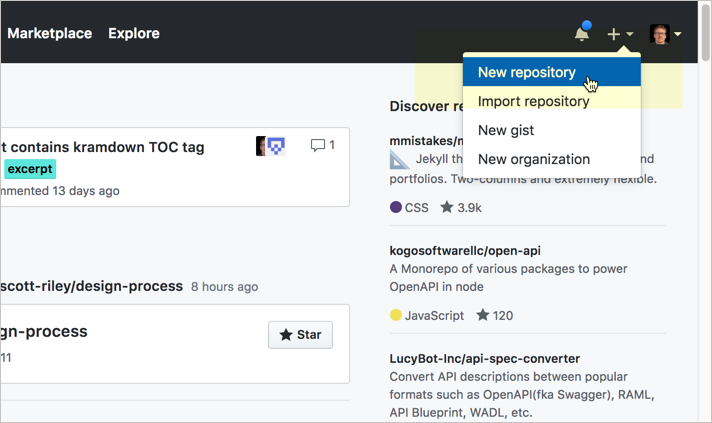
Creating a new GitHub repository - Give the repo a Repository name, a short Description, select Public, select Initialize the repo with a README, and then click Create repository. (Don’t worry about selecting the license or gitignore settings for this activity.)
- Click the Wiki tab on the top navigation bar of your new repository.
- Click Create the first page.
- In the default page (“Home”), insert your own sample documentation content, preferably using Markdown syntax. Or grab the sample Markdown page of a fake endpoint called surfreport here and insert it into the page.
- In the Edit message box, type a description of what you updated (your commit message).
- Click Save Page.
Notice how GitHub automatically converts the Markdown syntax into HTML and styles it in a readable way. You could work with this GitHub wiki entirely in the browser as a way for multiple people to collaborate and edit content. However, unlike other wikis, with GitHub you can also take all the content offline and edit locally, and then commit your changes and push the changes back online.
Activity: Clone your GitHub repo locally
So far you’ve been working with GitHub in the browser. Now we’ll take the same content and work with it locally. This is what makes the GitHub wiki unique from other wikis — it’s a Git repo, so you can manipulate the content the same way as any other Git repo (working locally, pushing, pulling, merging, branching, etc.).
To clone the GitHub repo locally:
- If you don’t already have Git installed, set it up on your computer. (You can check whether Git is installed by typing
git --versionin your terminal or command prompt. See Install Git for more information on installation.) -
While viewing your the GitHub wiki in your browser, look for the section that says Clone this wiki locally (highlighted below). Click the clipboard button. (This copies the clone URL to your clipboard.)
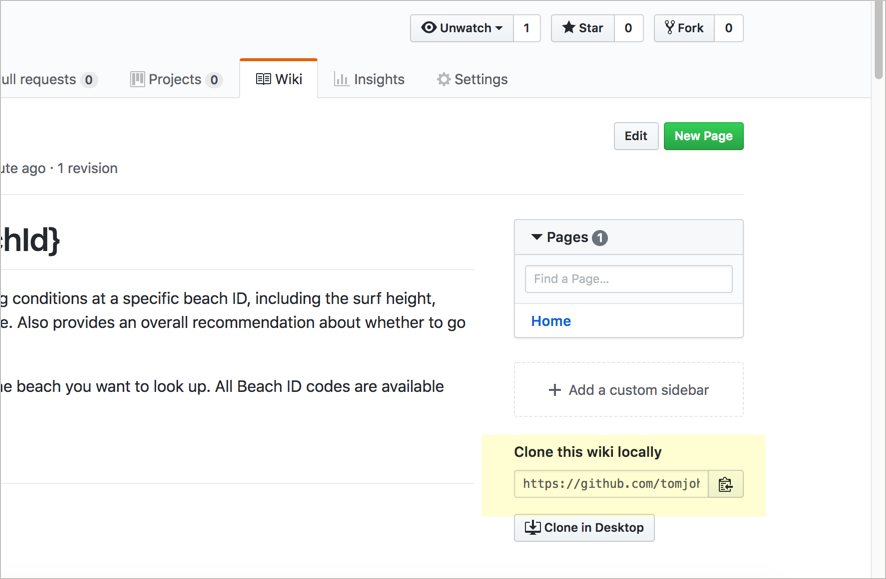
Clone this wiki locally The wiki is a separate clone URL than the project’s repository. Make sure you’re viewing your wiki and not your project. The clone URL will include
.wiki.In contrast to the “Clone this wiki locally” section, the “Clone in Desktop” button launches the GitHub Desktop client and allows you to manage the repository and your modified files, commits, pushes, and pull through the GitHub Desktop client. If you’re interested in using the GitHub Client of the command line, see this other activity: Activity: Use the GitHub Desktop client.
-
Open your terminal emulator:
- If you’re a Windows user, open the Git BASH terminal emulator, which was installed when you installed Git.
- If you’re a Mac user, go to Applications > Utilities > Terminal (or launch iTerm, if you installed it instead).
- In your terminal, either use the default directory or browse (
cd) to a directory where you want to download your repository. -
Type the following, but replace the git URL with your own git URL that you copied earlier (it should be on your clipboard). The command should look something like this:
git clone https://github.com/aiegoo/weatherapi.wiki.gitWhen you clone a repo, Git will show something like the following:
Cloning into 'weatherapi.wiki'...
remote: Enumerating objects: 3, done.
remote: Counting objects: 100% (3/3), done.
remote: Compressing objects: 100% (2/2), done.
remote: Total 9 (delta 0), reused 0 (delta 0), pack-reused 6
Unpacking objects: 100% (9/9), done.
The folder Git creates in the above example is called
weatherapi.wiki.Cloning the wiki gives you a copy of the content on your local machine. Git is distributed version control software, so everyone has their own copy. When you clone the repo, you create a copy on your local machine; the version in the cloud on GitHub is referred to as “origin.” Thus, you have two instances of the content.
More than just copying the files, though, when you clone a repo, you initialize Git in the folder where you clone the repo. Initializing Git means Git will create an invisible Git folder in that directory, and Git can start tracking your edits to the files, providing version control. With Git initialized, you can run
pullcommands to get updates from the online repository (origin) pulled down to your local copy. You can alsocommityour changes and thenpushyour changes back up to origin. -
Navigate to the directory where you cloned the repo (either using standard ways of browsing for files on your computer or via the terminal with
cd) to see the files you downloaded. For example, typecd weatherapi.wikiand thenls(Mac) ordir(Windows) to see the files.You don’t need to type the full directory name. Just start typing the first few letters and then press your Tab key to autocomplete the rest.
You might also want to browse to this folder via Finder (Mac) or Explorer (Windows). The folder also continas an invisible folder called
.git. For instructions on making hidden files visible, see one of the following: Windows or Mac).
Activity: Push local changes to the remote
- In a text editor, open the Markdown file you downloaded in the GitHub repository.
- Make a small change to the content and save it. For example, type your name below the page title.
-
In your terminal, make sure you’re in the directory where you downloaded the GitHub project.
To look at the directories under your current path, type
ls(Mac) ordir(Windows). Then usecd {directory name}to drill into the folder, orcd ../to move up a level. -
See what files have changed:
git statusGit shows the files it’s tracking but which haven’t been added to the commit’s staging area:
Changes not staged for commit: (use "git add <file>..." to update what will be committed) (use "git checkout -- <file>..." to discard changes in working directory) modified: Home.md -
Type
git add .to add all the files to your staging area. The staging area contains all files that you want added to your next commit:git add .Git doesn’t automatically track all files in the same folder where Git has been initialized. Git tracks modifications only for the files that have been “added” to Git. By typing
git add .orgit add --all, you’re telling Git to start tracking modifications to all files in this directory. You could also type a specific file name here instead, such asgit add Home.md, to just add a specific file (rather than all files changed) to Git’s tracking.After you run the
git addcommand, Git adds the files into what’s called the staging area. These files will be committed when you rungit commit. -
See the changes set in your staging area:
git statusGit responds with a message indicating which files are on-deck to be committed.
Changes to be committed:
(use "git reset HEAD <file>..." to unstage)

    modified:   Home.md
The staging area lists all the files that have been added to Git that you have modified in some way. It’s a good practice to always type
git statusbefore committing files because you might realize that you accidentally added some files you didn’t intend to track (such as large binary files). If you want to remove this file from the staging area, you can typegit reset HEAD Home.mdto unstage it. -
Commit the changes:
git commit -m "updated some content"When you commit the changes, you’re creating a snapshot of the files at a specific point in time for versioning.
The
git commit -mcommand is a shortcut for committing and typing a commit message in the same step. It’s much easier to commit updates this way.If you type
git commitonly, you’ll be prompted with another window to describe the change. On Windows, this new window will probably be a Notepad window. Describe the change on the top line, and then save and close the Windows file.On a Mac, a new window doesn’t open. Instead, the Vim editor mode opens up within the terminal. (“vi” stands for visual and “m” for mode, but it’s not a very visual editor.) I don’t recommend using Vim. If you get stuck in this mode and need to escape, press your Escape key. Then type q to quit. (See Vim commands here.) Normally, you want an external editor such as Sublime Text to open from your terminal. See Associating text editors with Git for details.
-
Push the changes to your repository:
git pushUnless you set up automatic GitHub authentication, you will be prompted for your GitHub username and password. (Note that your username is your GitHub login ID, such as “jdoe,” not your friendly name, such as “John Doe.”)
When you type
git pushorgit pulland don’t specify the branch, GitHub uses the default branch from origin. The default branch on GitHub is calledmaster. Thus the command actually passed isgit push origin master(which means “push these changes to the remote origin[al] repository, in themasterbranch”). Some developers prefer to specify the repository and branch to ensure they are interacting with the right repositories and branches.Your terminal window probably looks something like this:
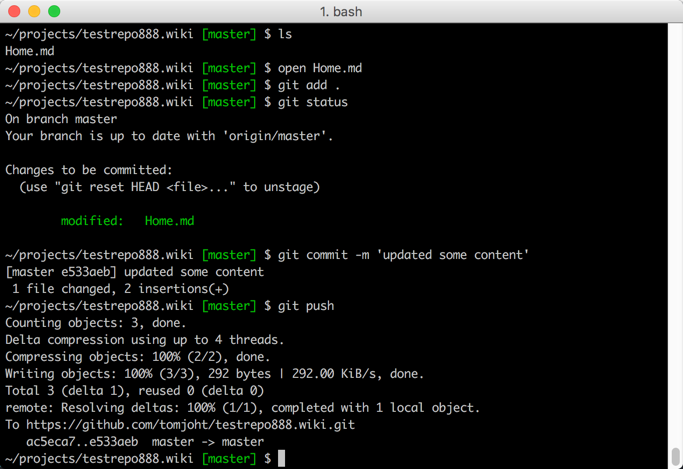
Terminal window with git commands - Now verify that your changes took effect. Browse to your GitHub wiki repository, refresh the page, and look to see the changes.
Although there are many options for authoring and publishing tools with developer docs (see staticgen.com for common docs-as-code tools), at the core of these tools is usually a Git workflow. The Git workflow can be more powerful and complex than any authoring tool. Interacting with Git might also be key for interacting with engineering repos to make edits to documentation that appears inside code.
4:00 - 4:30: Participant’s challenges surfaced and discussed
During this time, I’d like to have participants surface specific challenges that they are facing and address them as a whole.
4:30 - 5:00pm: Thriving in the API doc space
Section: Thriving in the API doc space
Jeopardy: Test your knowledge
This is a jeopardy game to test your learning. To play jeopardy, you’re given an answer. You have to supply the question. For example, if the answer is “a device on your wall that shows the time,” the question might be, “What is a clock?”
Answers
An authorization method for API requests that uses a third-party identity server such as Google, GitHub, or Facebook.
A tool you can use to submit API requests directly from the command line.
A GUI tool that lets you save and organize API requests into collections.
A format that includes both objects and arrays, and often a mix of both.
A space-sensitive format that is commonly used to write the OpenAPI specification.
The four most common methods or operations used with API requests.
The five common sections every API reference topic usually has.
A description of all possible elements in a response, including their data types and other details.
The object within the OpenAPI specification that lets you store re-usable content that can be referenced in other parts of the specification document using $ref.
The original name of the OpenAPI specification.
An authoring and validation tool useful when creating OpenAPI specification files.
A design model where you create the OpenAPI specification first before beginning any coding.
Information about request thresholds and what happens when you exceed them.
An open-source web framework that renders OpenAPI specification documents into an interactive documentation experience.
Authoring and publishing tools/workflows that follow similar patterns as software development tools and workflows.
A request to merge a branch back into the master; this workflow is often used when merging contributions back in to GitHub projects.
The tendency for docs maintained outside of code repositories to become out of sync with the code.
An essential first steps document for users that should usually be linked from your API overview page.
The go-to place to find open-source projects and collaborate with others on code projects.
A number shown in an API response when a request either succeeds or fails.
A parameter that appears in the resource URL after a question mark.
A string often included in a header or query string parameter that authorizes the API request.
The premium version of Swagger Editor.
A GUI tool for designing OpenAPI specification files, including the ability to auto-generate the schema description for JSON.
Programmatically building documentation from the server when you commit to a particular Git branch.
A web service API format, based on XML, that was popular before REST took over the landscape.
A type of API that consists of libraries or other code that you download and incorporate directly into your project.
Tooling that supports the implemention of an API in a specific programming language.
A parameter that appears directly in the resource URL (before any query strings).
A website that lists and describes thousands of web APIs.
You can find the answer key here.
5:00 - 5:30pm: Individual consulting
The general workshop ends and we transition into any individual consulting as desired. If you have specific questions not addressed during the workshop, let’s chat specifically about them. For all those interested, I’ll write your name on then board and then just meet with you individually for about 5 minutes each until everyone’s questions are answered.
Post-workshop review
At the close of the workshop, please take this review survey. Thanks.
5/145 pages complete. Only 140 more pages to go.

