
Create an OpenAPI specification document using Stoplight Studio's visual editor
In Introduction to the OpenAPI specification, I explained that you can create an OpenAPI specification document in several ways: (a) auto-generating it from annotations in your source code, (b) coding it by hand in an editor such as the Swagger Editor, and (c) using a GUI editor such as Stoplight Studio. In this tutorial, I’ll walk through the third approach: using Stoplight Studio, a GUI editor for modeling your API. In this tutorial, you’ll use Stoplight Studio to create a valid OpenAPI specification, using the OpenWeatherMap as the sample API.
A more detailed, conceptual introduction to Stoplight Studio is provided in Stoplight — visual modeling tools for creating your OpenAPI spec.
- Using a visual editor
- Before we begin
- Which version of Stoplight Studio?
- Set up a project in Stoplight Studio
- Enter the API name, version, description, and contact information
- Previewing the output
- Enter the path and parameters
- Re-using parameters
- Save and preview your parameter work
- Enter the responses and response schema
- Save and preview your schema work
- Reusing responses through components
- Preview, test, and publish the output
Using a visual editor
When you create an OpenAPI spec, an initial consideration is how to create it, which editor to use, and which approach to follow. Why use a visual/GUI editor, which hides the code (unless you toggle the view open) instead of coding every detail of the spec by hand?
All approaches have their merits. If you don’t work with the OpenAPI specification enough to remember all the fields and syntax for each property, or if you’re learning it for the first time, trying to get the syntax valid can be challenging. Coding it by hand leads to many errors and forces you to spend a lot of time troubleshooting why the syntax is invalid.
Using an editor helps you avoid these errors and focus instead on the content. For more on this philosophy, read this post by Phil Sturgeon, who says Stoplight Studio is “an absolute game changer for API Design, and something I’ve been waiting for since I found out about it somewhere in 2018” (Reinventing API Design with Stoplight Studio).
Before we begin
Before we begin the tutorial, note the following:
- Stoplight Studio isn’t the only GUI editor for creating OpenAPI specifications. You can also use OpenAPI-GUI, Apibldr, SwaggerHub’s visual editor, and others.
- Although Stoplight has a commercial offering, their editor is free. In general, you can use the editor to create a valid specification and then choose the tool you want to use to render it (e.g., Stoplight, Redoc, Spectacle, Swagger UI, or some other display framework). You can also publish your spec on Stoplight for free as well. My point is this: once you have a valid OpenAPI specification, the spec is tool agnostic and can be rendered by many different frameworks.
- Stoplight’s platform gives you a nice path toward more comprehensive documentation, including not only API reference but also conceptual documentation and tutorial content. This lets you create a more seamless documentation experience for your readers across many different types of content.
- In this tutorial, we’ll use sample information from the OpenWeatherMap API (more specifically, the Current weather data endpoint), which is the same API we’ve been using in this course uses in other areas, such as the OpenAPI tutorial.
- Stoplight is one of the sponsors of my site. I would still recommend this approach regardless of any site sponsorship. It makes sense to use an editor when your content must conform to a highly technical syntax.
- For full documentation, see the Stoplight Studio documentation.
Which version of Stoplight Studio?
Stoplight offers both a web app and a desktop app (Mac, Windows, or Linux). In this tutorial, you will use the web app version of Stoplight Studio because only the web app gives you the ability to publish your content online and try out requests (see Studio Desktop vs. Studio Web for more on the difference). However, you could also use the desktop app if desired (such as for scenarios where you’re working with private, unreleased data).
Set up a project in Stoplight Studio
Stoplight Studio’s user interface and workflow have changed, making these instructions no longer accurate. At some point I plan to update the tutorial here. In the meantime, refer to Stoplight’s documentation rather than continuing on below.
To get started in Stoplight Studio, you first create a GitHub repo to serve as the content source, and then you configure a new Stoplight Studio project to point to this GitHub source:
- Go to GitHub.com and create a repo, calling it something like “stoplight_openweathermap.” If you’ve never created a Github repo before, see Create a repo from GitHub’s docs. Copy the URL to your repo.
- Go to https://stoplight.io/studio/ and click On the Web.
- Follow the on-screen instruction to create a workspace and sign into it.
- In the Open Git Project box, paste your GitHub URL, and then click Clone:
- Follow the on-screen prompts to connect to GitHub and select the repo you created earlier.
-
When the project loads, in the left pane you’re prompted with the text “You do not have any APIs or models.” Click the API button in the sidebar.
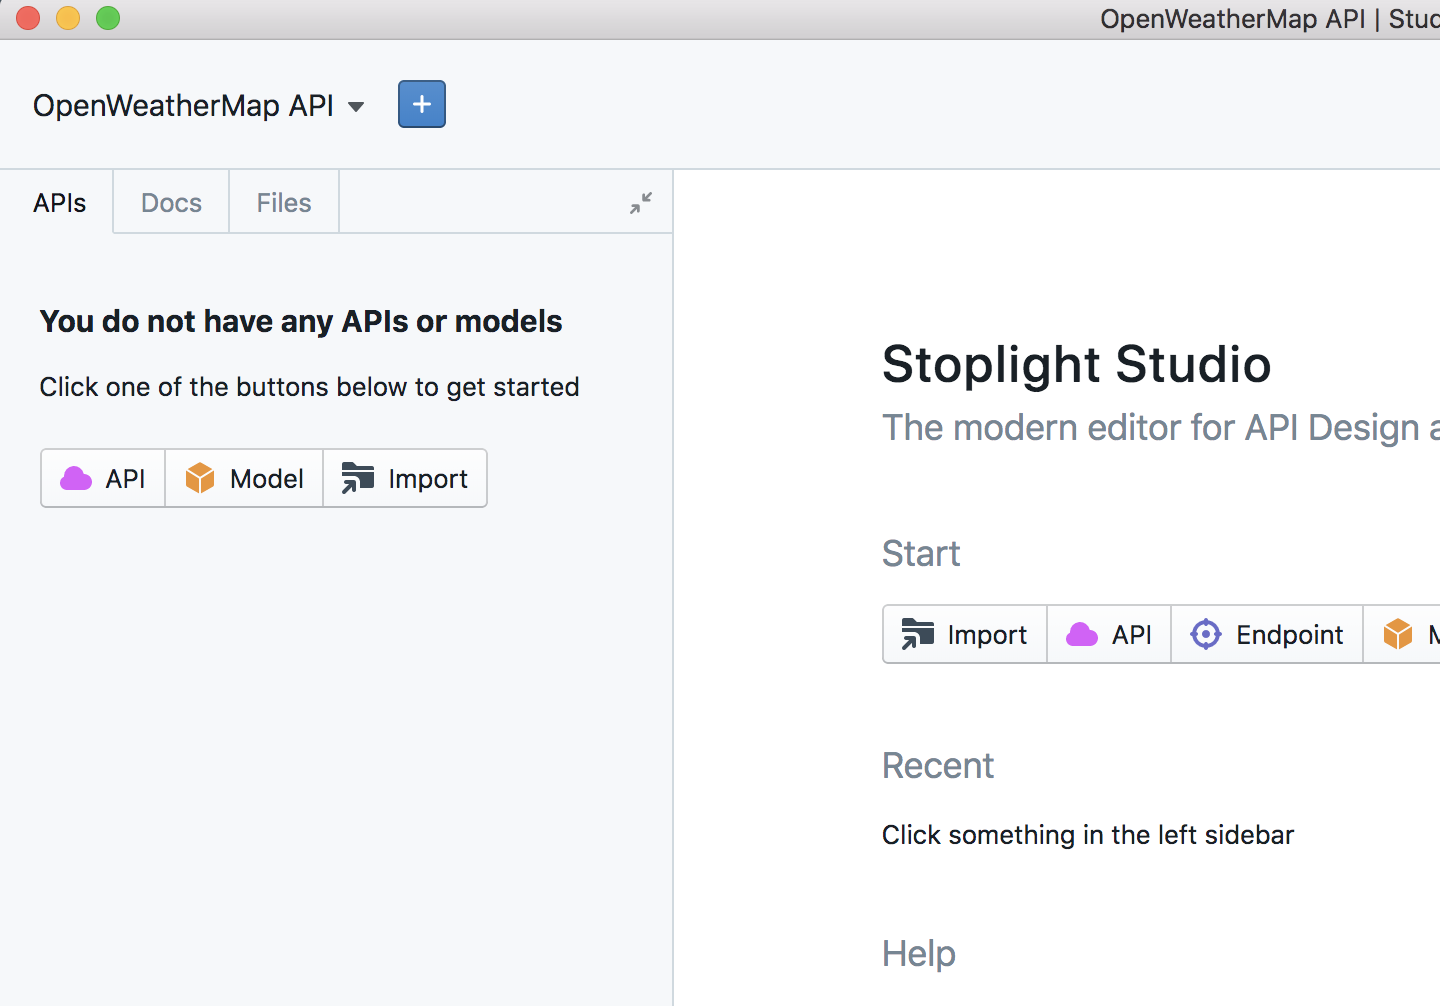
Creating a new API file -
In the New API dialog box, name your API (e.g., “openweathermap”), and click Create. By default, the editor will use OAS 3.0 and YAML. (You can see options for using JSON or OAS 2.0 by clicking Advanced.)
Stoplight Studio creates an OAS file (“OpenAPI Specification”) called, in this case, openweathermap.v1.yml and loads it as follows:
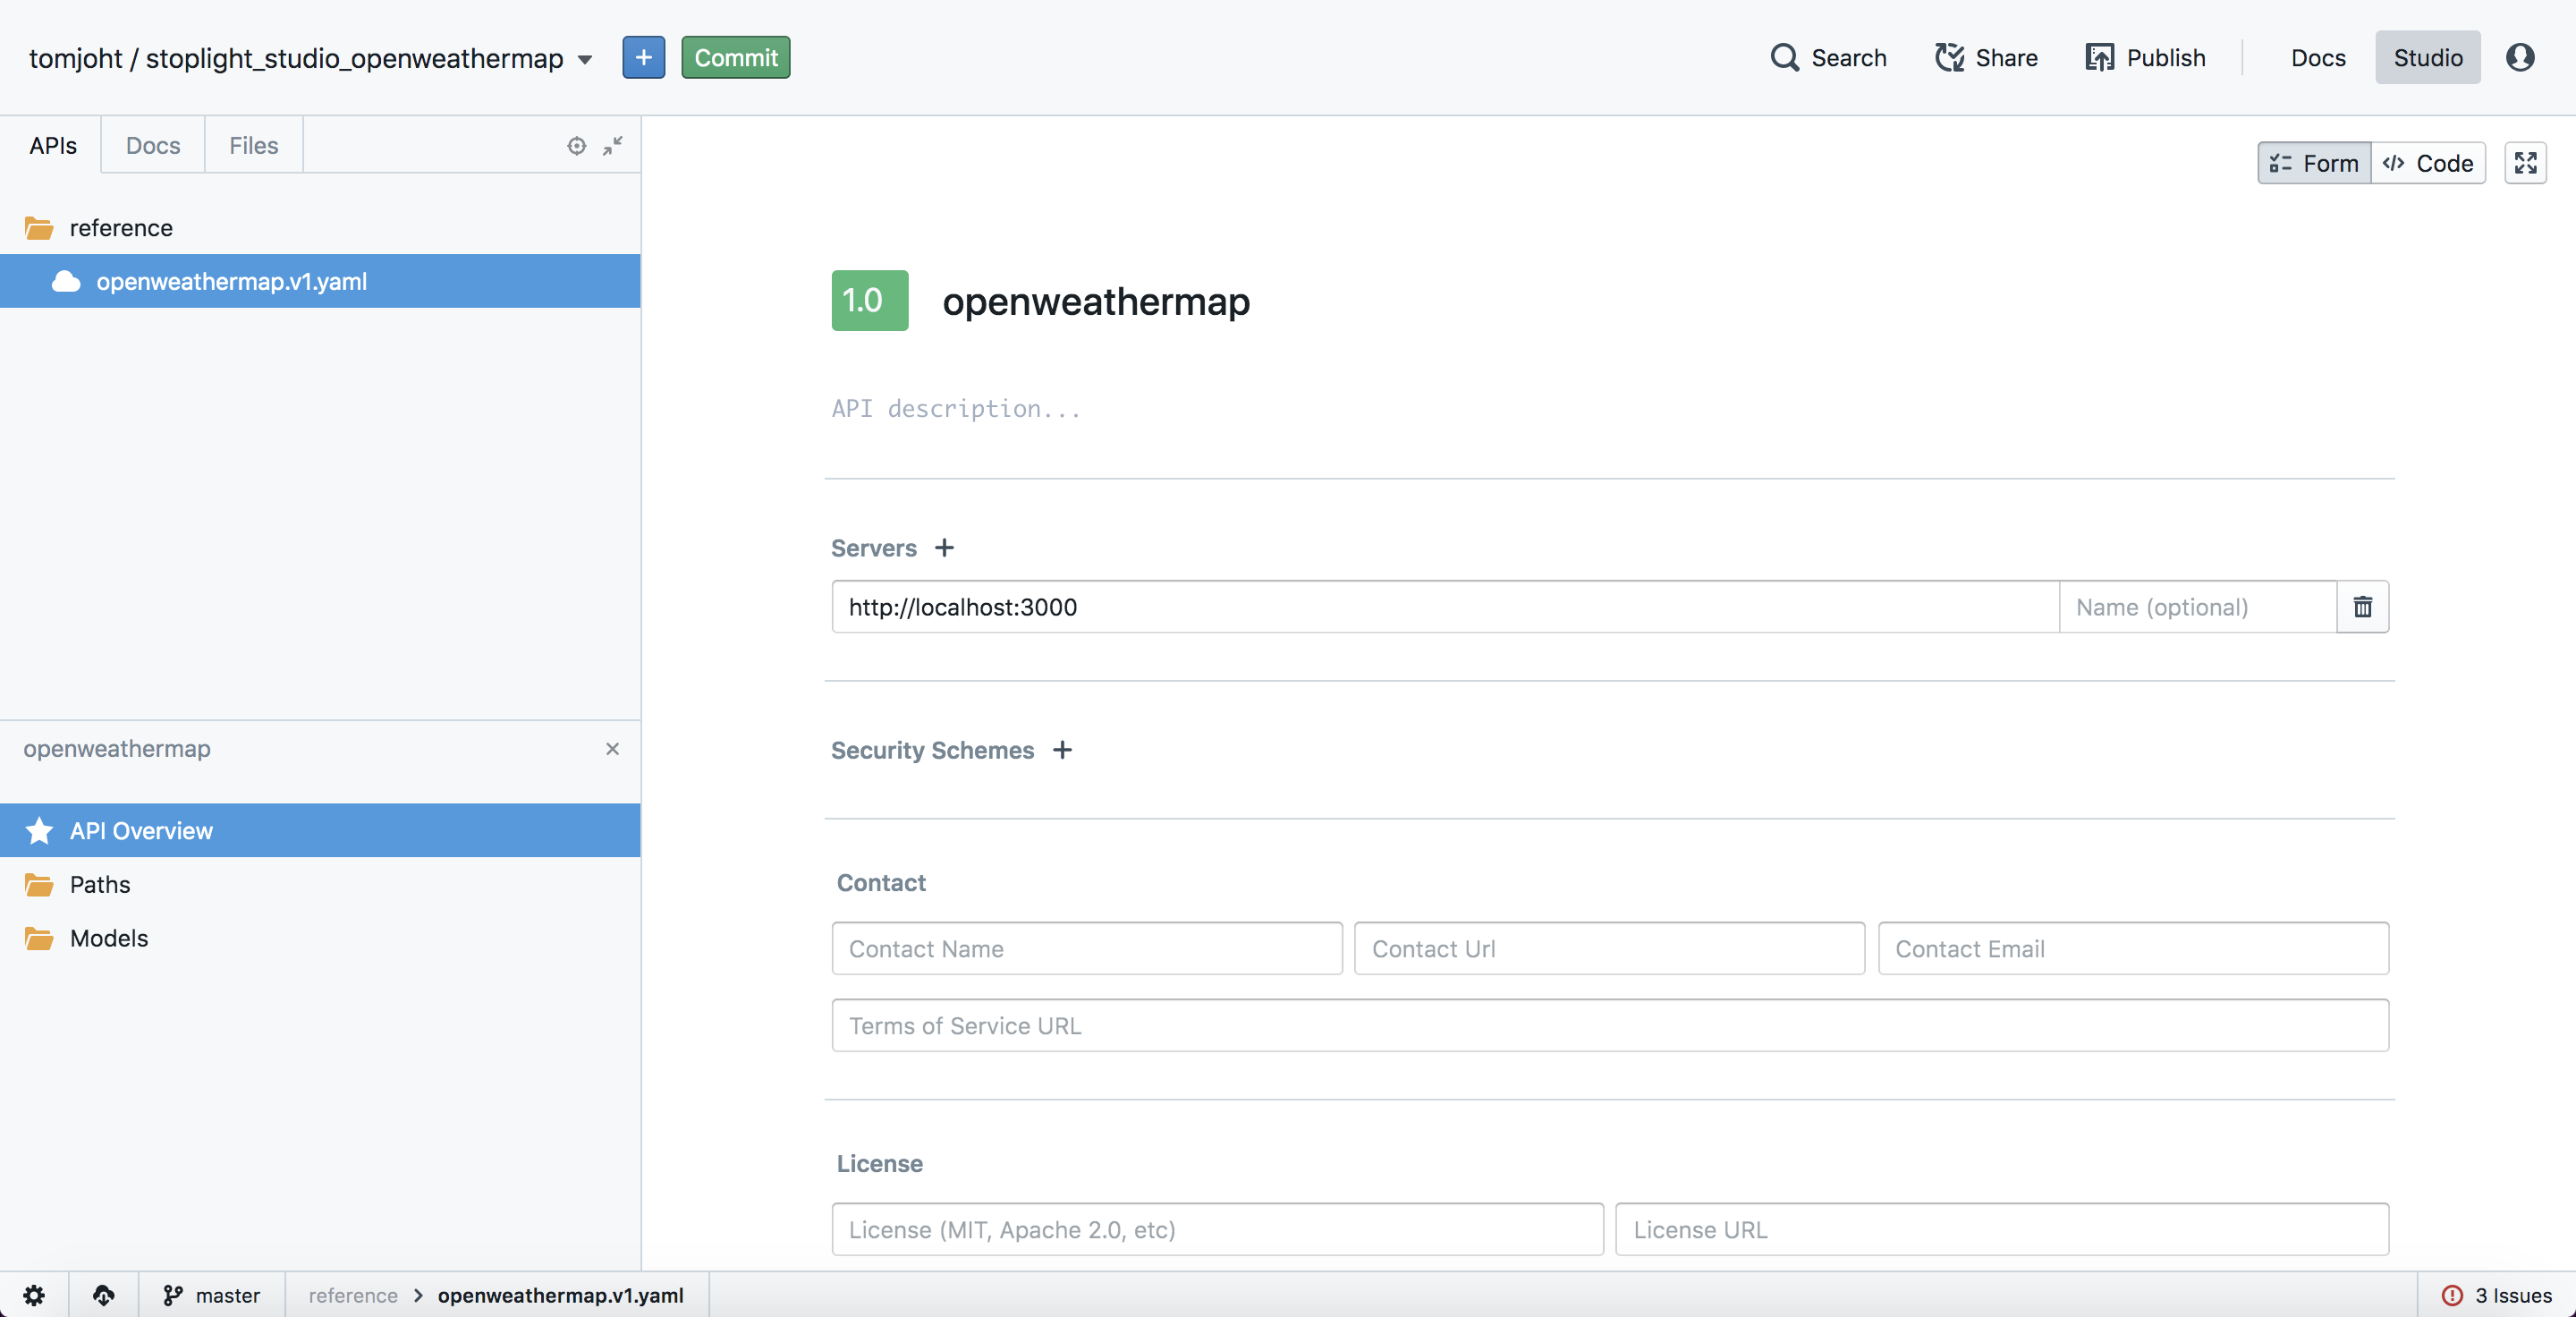
Initial project in the Stoplight Studio editor -
Stoplight lets you toggle between a form and code view. The above screenshot shows the form view. Click the Code button in the upper-right to see the code automatically created:
openapi: '3.0.0'
info:
  title: openweathermap
  version: '1.0'
servers:
- url: http://localhost:3000
paths: {}
components:
  schemas: {}
The empty curly braces
{}are placeholders for content and are required for the spec to be valid. You will be populating the specification information here in the upcoming sections.
Enter the API name, version, description, and contact information
Let’s populate the API name, version, description, and contact information. Note that in this tutorial, I’ve prepared sample information for you to insert into the Stoplight Editor. Each of the blue buttons expands to show detailed information that you can insert.
To populate the API info into Stoplight Studio, expand the API information button above and then complete the following:
- Insert the General API information.
- Insert the Contact information.
- Insert the License information.
- Insert the Servers information.
- Insert the Security information.
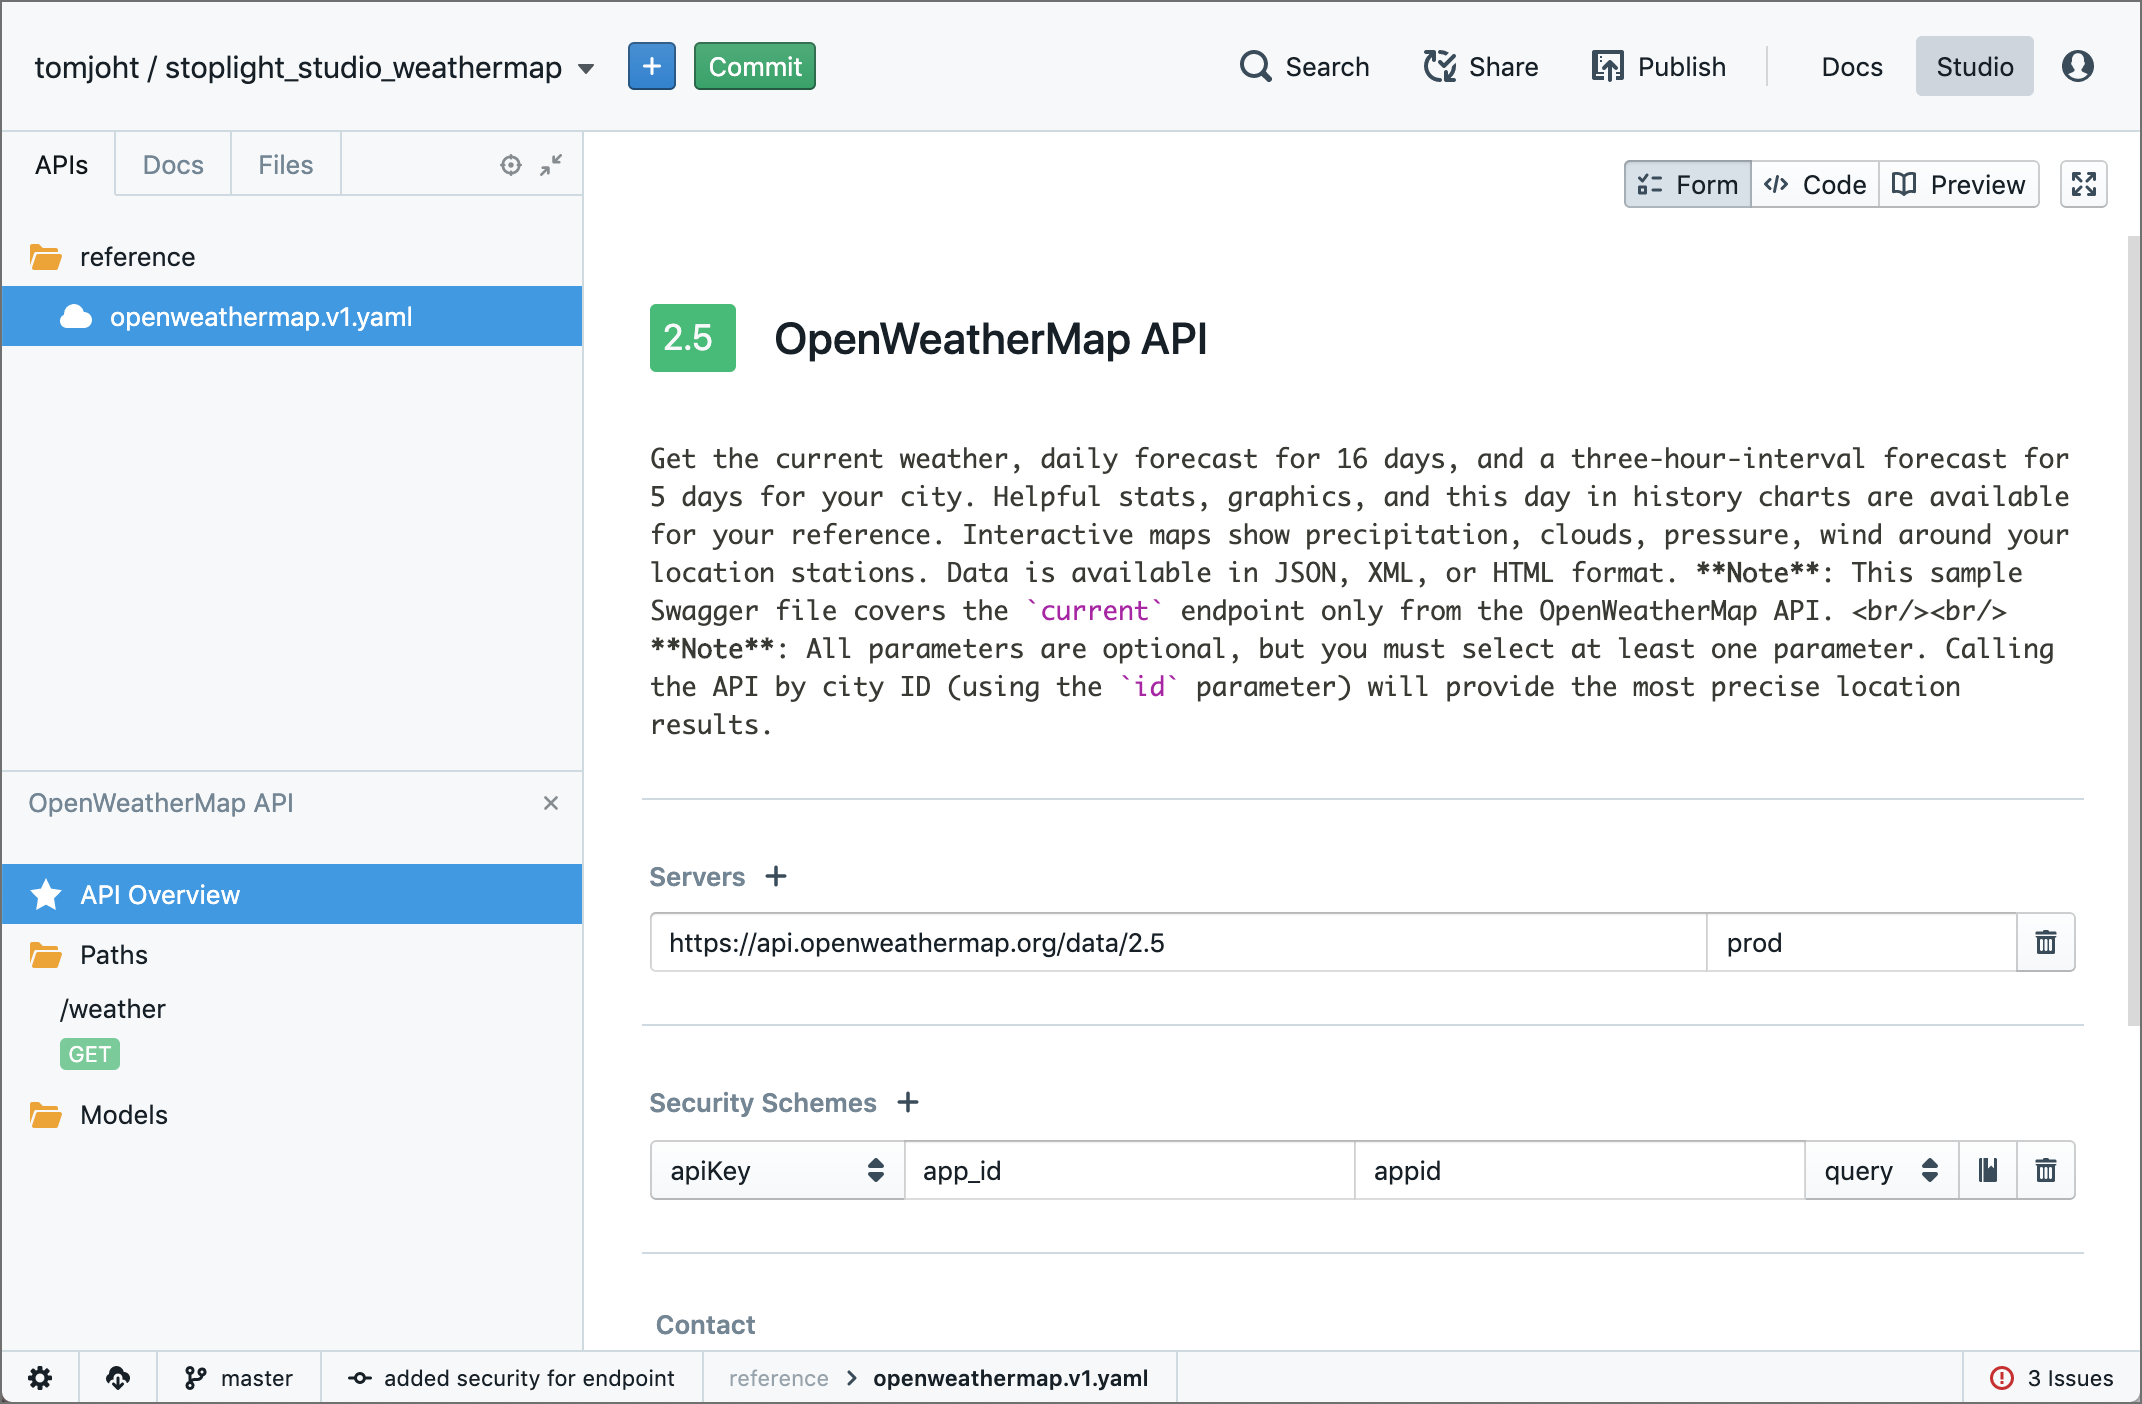
When finished, the editor should look as follows:
Previewing the output
Now that you entered information for the first section, click the Commit button, type a commit message, and then click Push. Because the storage source is Git, each save is a commit following a Git workflow.
After you commit the changes, you can preview the OpenAPI documentation by clicking Publish and then sliding the Show Preview slider.
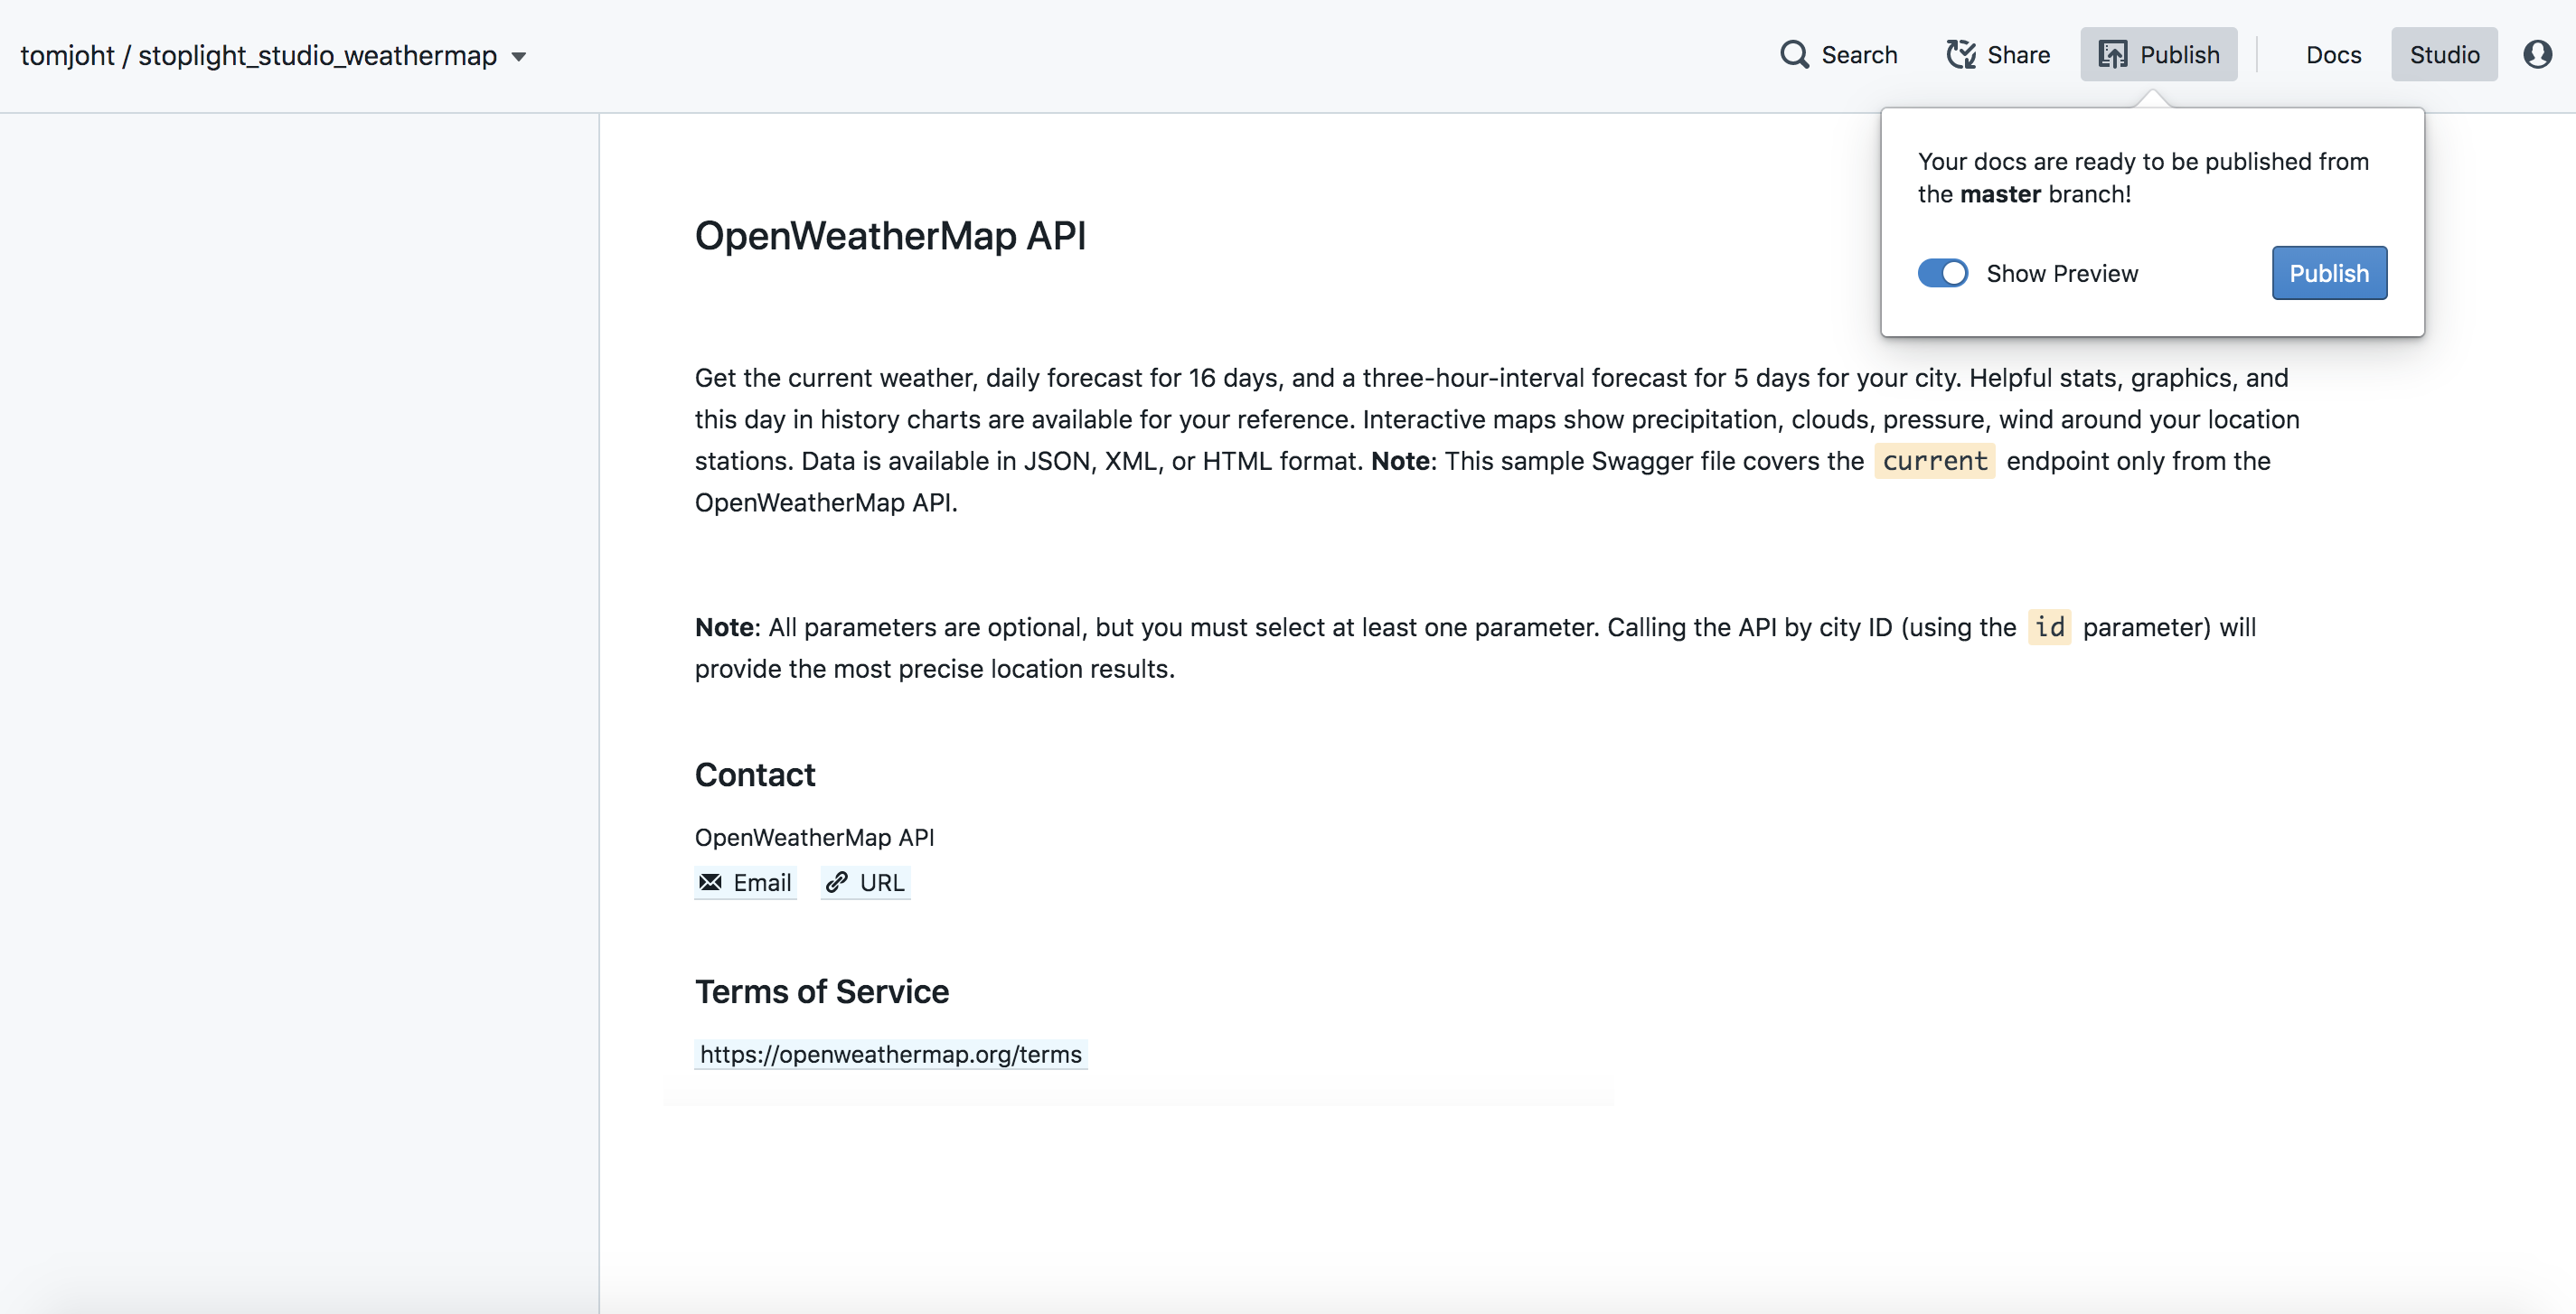
To close the preview, slide the Show Preview slider to off and click publish to hide the dialog.
Enter the path and parameters
Now let’s enter the path and parameter information.
To enter paths and parameters:
-
In the left sidebar, right-click the Paths folder and select New Path.
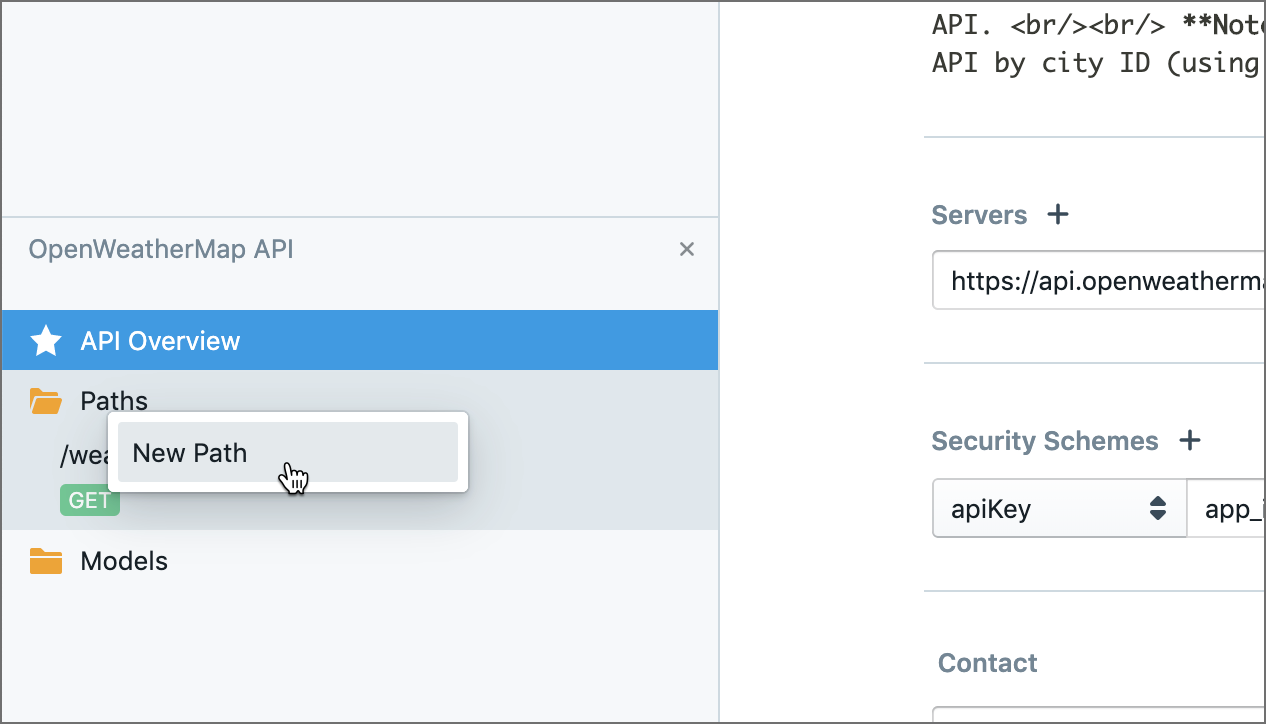
New path - Type weather and press enter. By default Stoplight creates a GET operation for the weather endpoint. (If your path doesn’t have a GET operation, you can right-click the path and delete the GET operation.)
- Change the path’s title from “Your GET endpoint” to “weather.”
-
Click the no tags button and add a tag called “Weather endpoints”. This tag will group the endpoints in the sidebar by this tag.
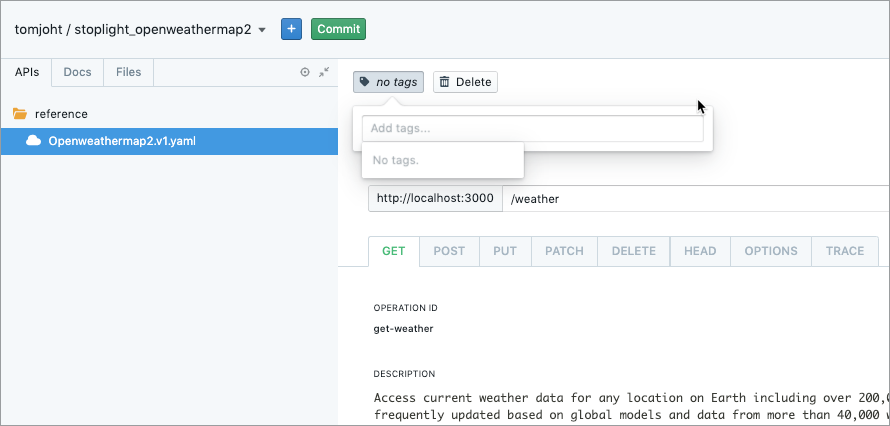
Adding tags - Expand the Path and parameter information button above and enter the operation ID and description into Stoplight.
- Click + Security and select app_id.
-
Click + Query Param and enter some of the parameter information from the above details as well. (Note that our sample API has only query parameters, no path parameters.)
For this exercise, you don’t need to enter all the parameters, but at least enter the
zipparameter.When you’re finished entering the parameters, Stoplight should look like this:
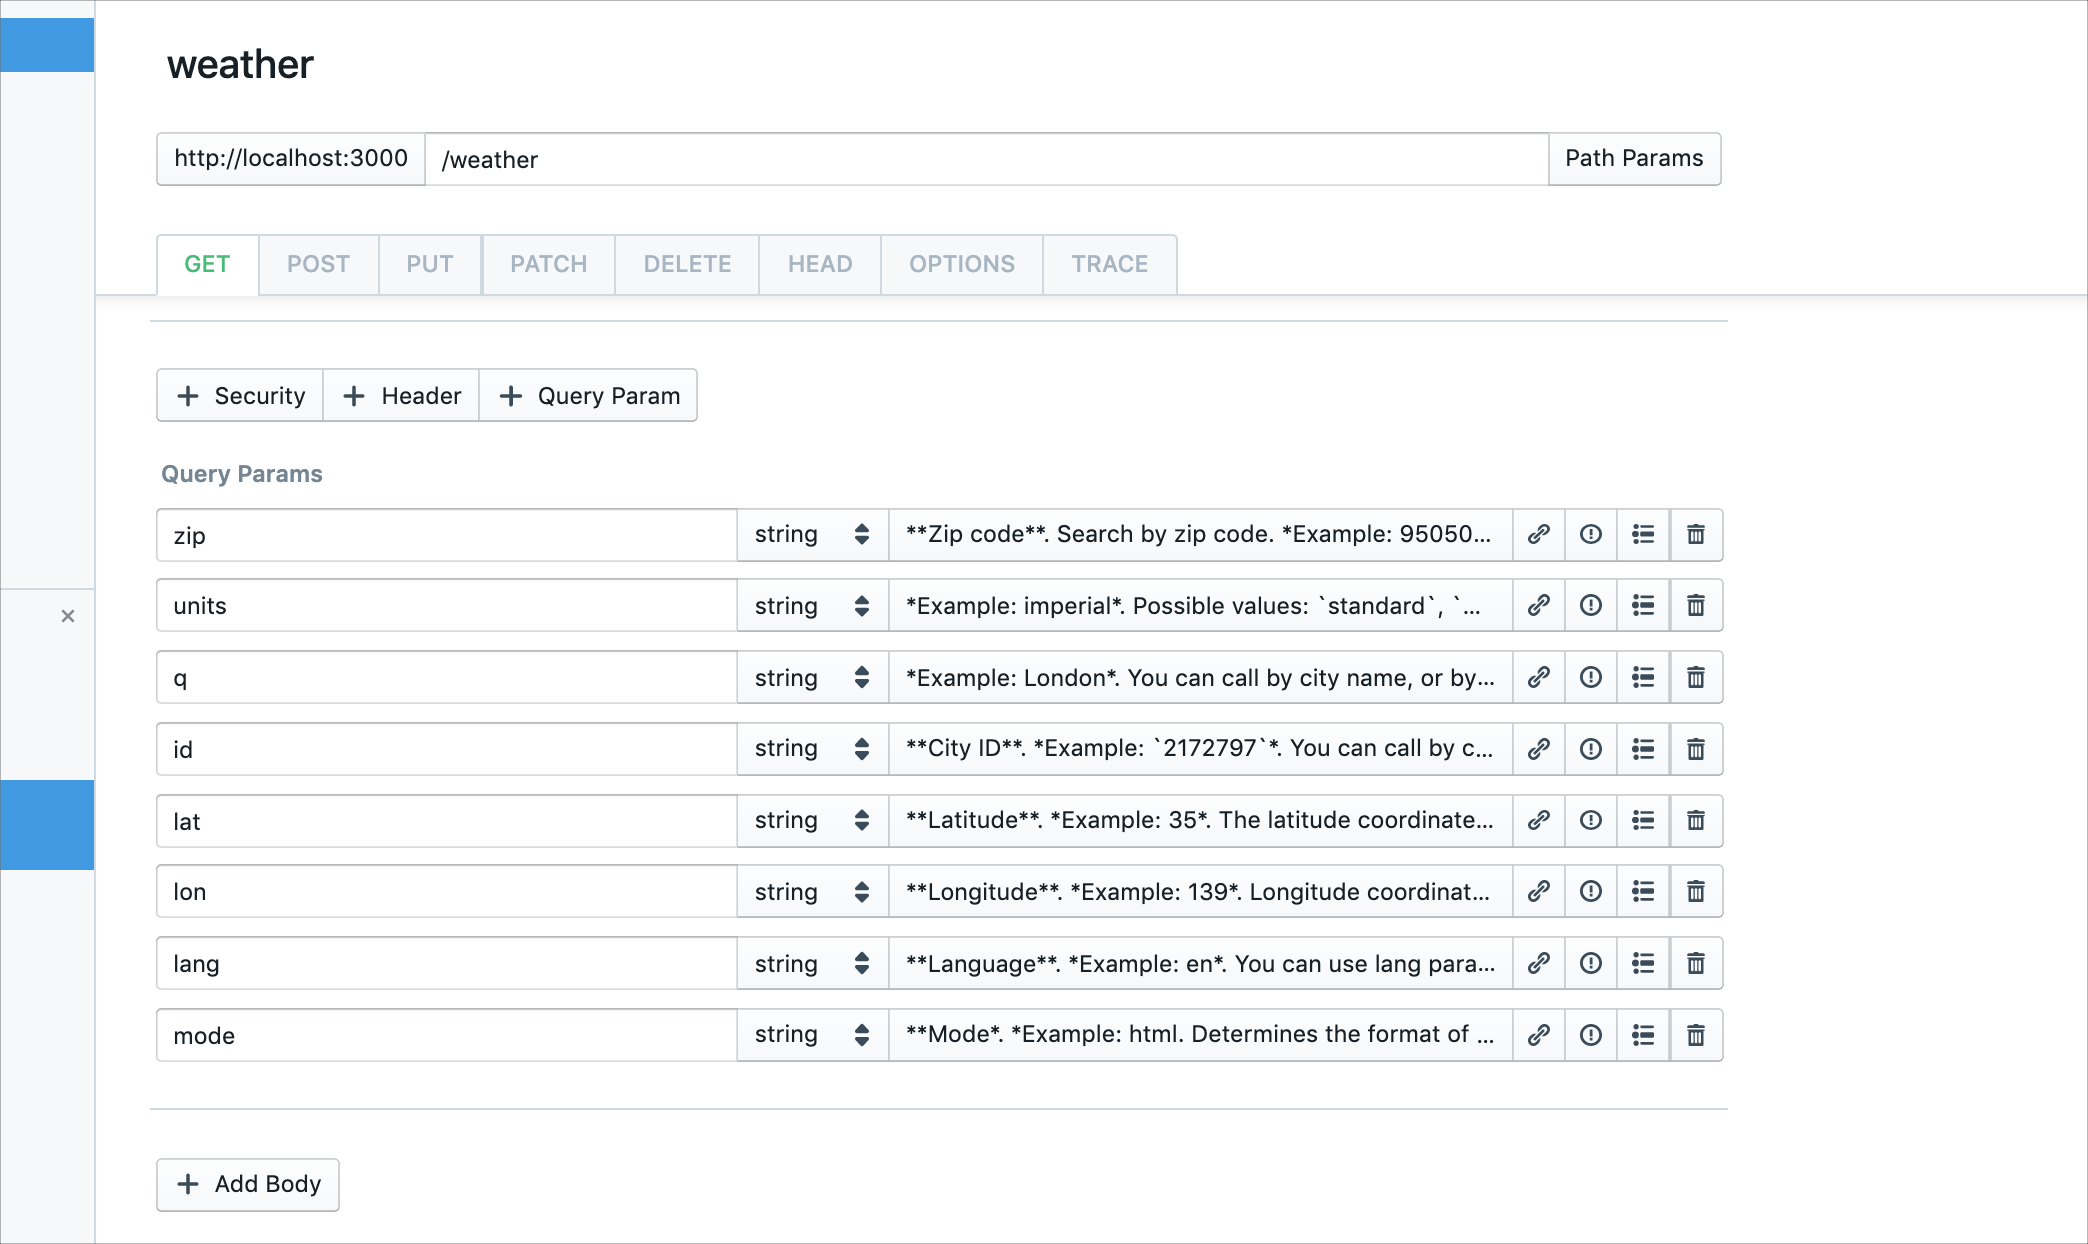
Parameters configuration
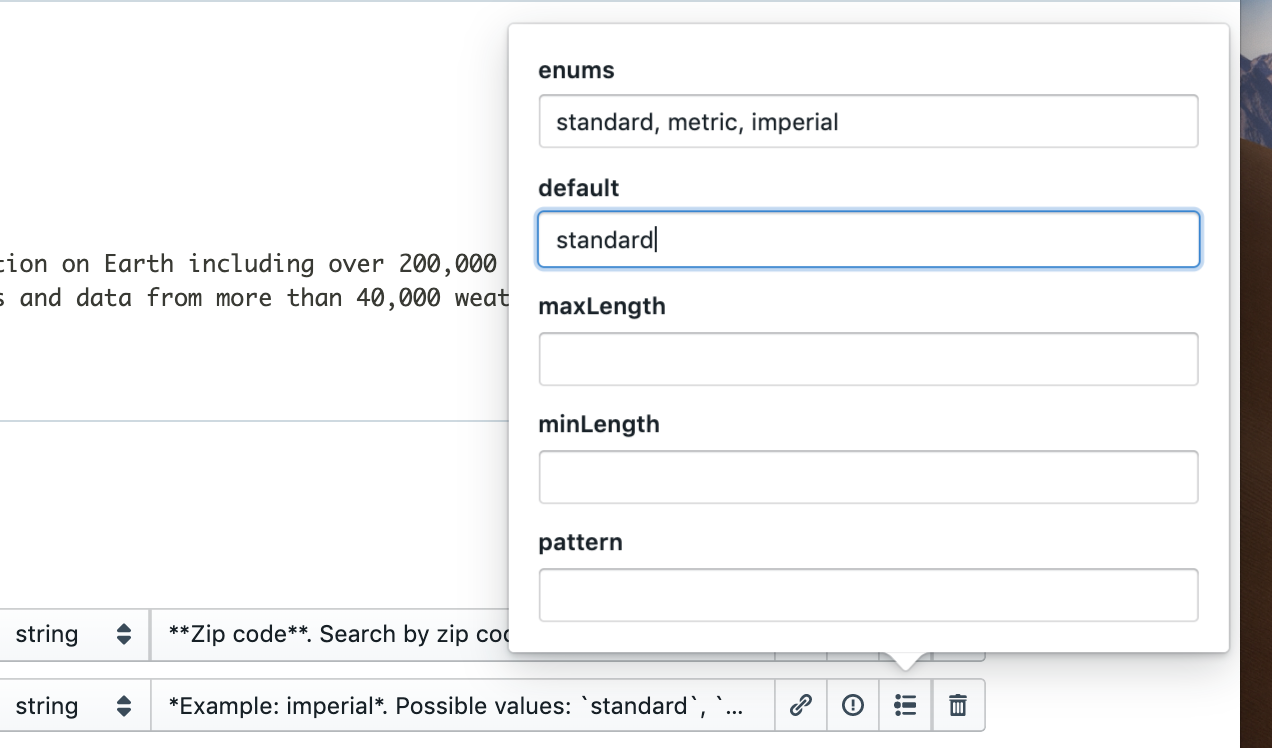
Re-using parameters
Note that the OpenAPI spec allows to re-use parameters by storing the information in the components section. In the Stoplight Studio editor, currently you can’t directly add parameters into components using the GUI, but if you switch to the code view and manually enter the necessary code, then you can click the link button and select that reference.
For example, suppose you have the following inside components:
components:
  parameters:
    lon:
      name: lon
      in: query
      description: '**Longitude**. *Example: 139*. Longitude coordinate of the location of your interest. Must use with `lat`.'
      schema:
        type: string
Then you can click the link icon in the Stoplight editor and select this reference:
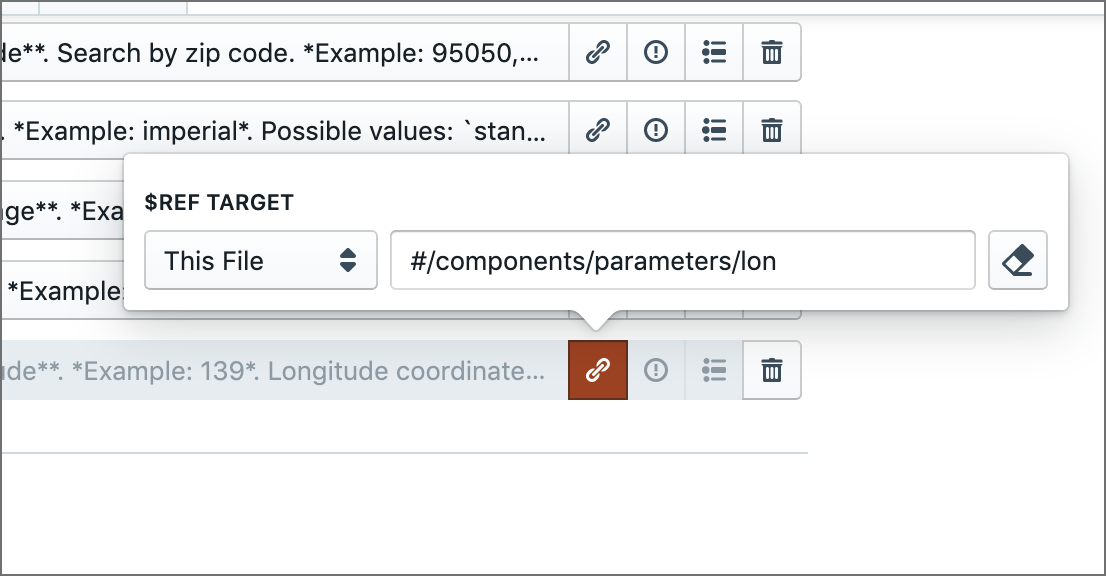
If you have a lot of parameter re-use but still want to use Stoplight to create your OpenAPI file, you could first create the parameters using Stoplight’s GUI and then copy the same code (with minor adjustments and indentations) into the components section under a parameters sublevel. For more details, see the “Re-using parameters across multiple paths” section in the Step 5: The components object tutorial.
Save and preview your parameter work
Now that you finished entering parameters, save your work: Click the Commit button, type a brief description, and then click Push.
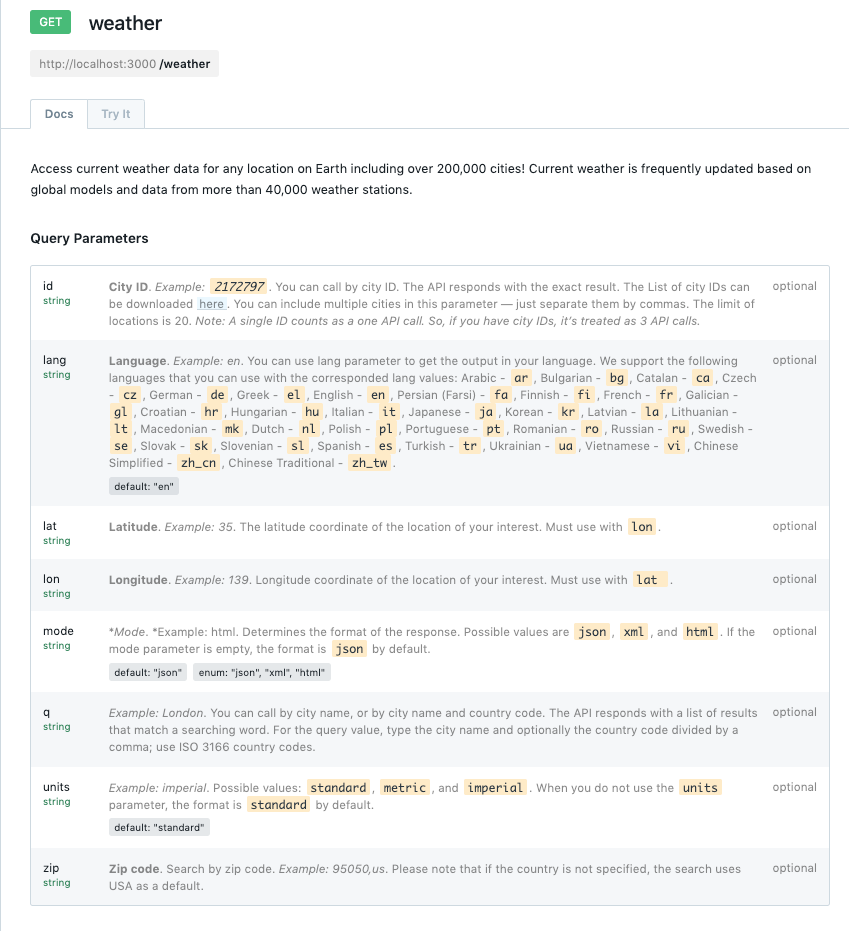
After you commit the changes, you can preview the OpenAPI documentation by clicking Publish and then sliding the Show Preview slider. The parameters display looks like this:
Enter the responses and response schema
As a final step for this endpoint, you need to enter the response information. The response includes not only an example response but also the schema describing the response. The schema describes all possible values in the response, their data types, and whether the values are required.
Stoplight Studio’s editor has a GUI feature that lets you build your response. This editor might seem a little unintuitive at first, but as you become familiar with it, the editor works well and makes coding your schema relatively easy.
To enter the response in Stoplight Studio:
-
Below the parameter section for the endpoint, click + Response. Then click + Add Body.
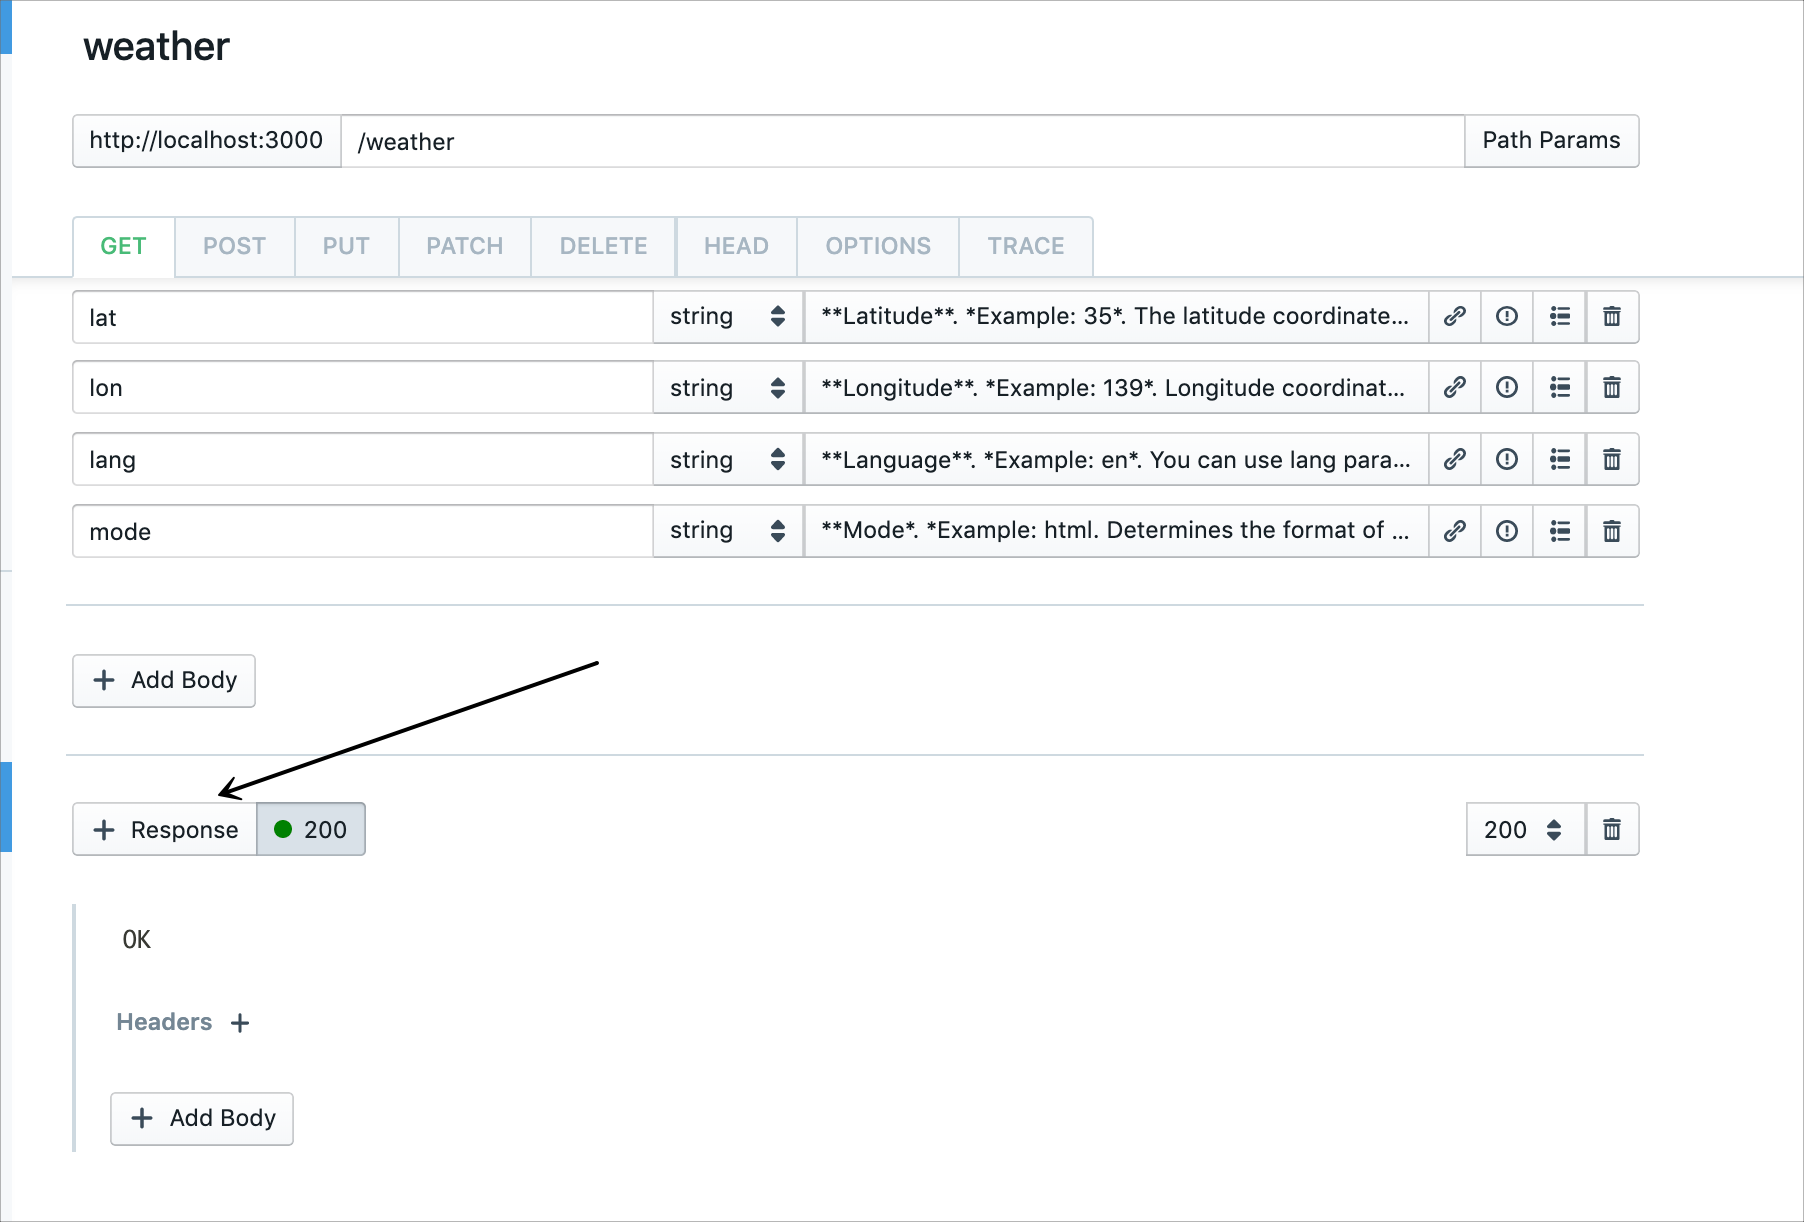
Adding a response -
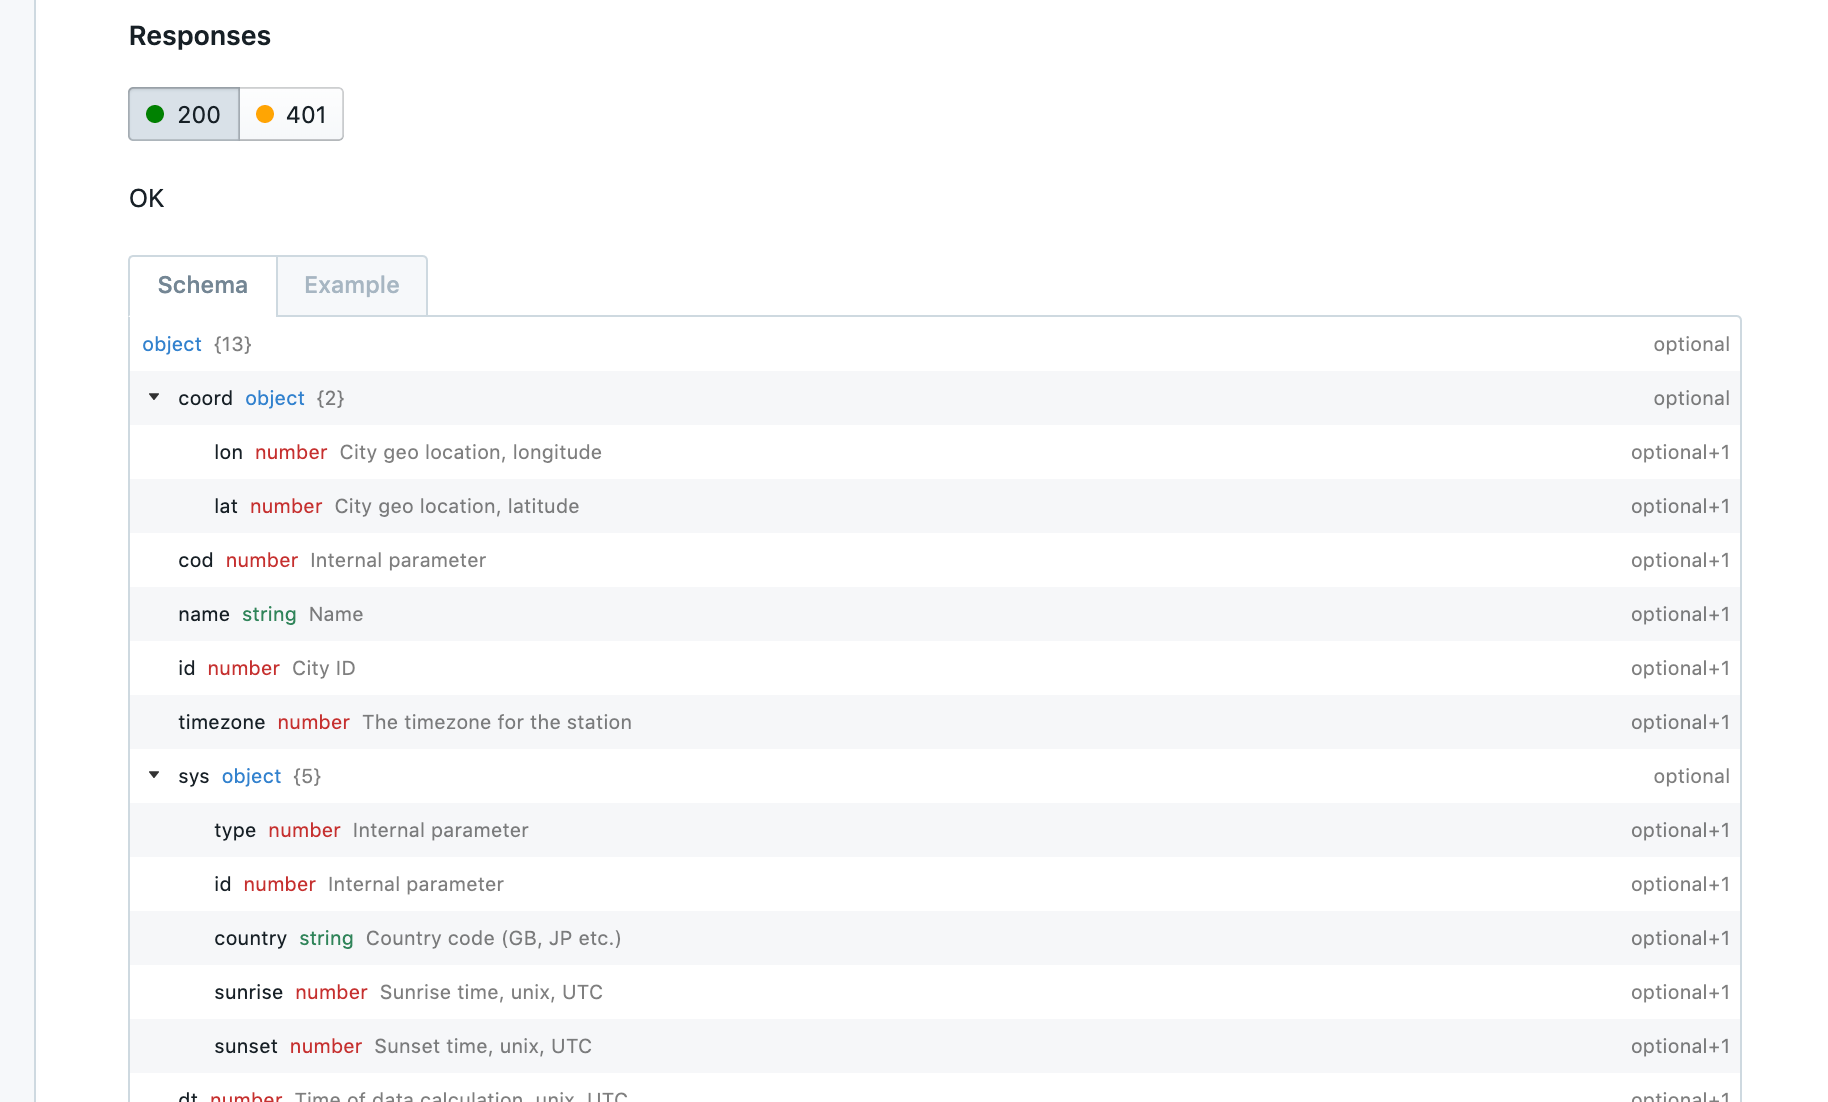
Expand the Response information button above to see the sample response information you’ll be adding. You’ll likely need to consult this screenshot as you enter the response information:

Schema object editor -
In the schema editor, click the + button next to object. This adds a property under object. Then customize the property’s key-value pairs until it looks like the example above.
Tips for working with the Schema editor
As you enter content using the Schema editor, note the following behavior. Clicking the + plus button next to a property creates a new property at that level. If the property you’re adding is an object, as soon as you change its data type from string (the default) to object, a plus button will appear at that level too. First get the structure right, and then go back and add descriptions, requirements, and other details. -
After you finish entering the property structure so that it looks like the preceding screenshot, go through and add a description and example for each property. Click the Description button
 and the Additional Properties button
  to add this information.
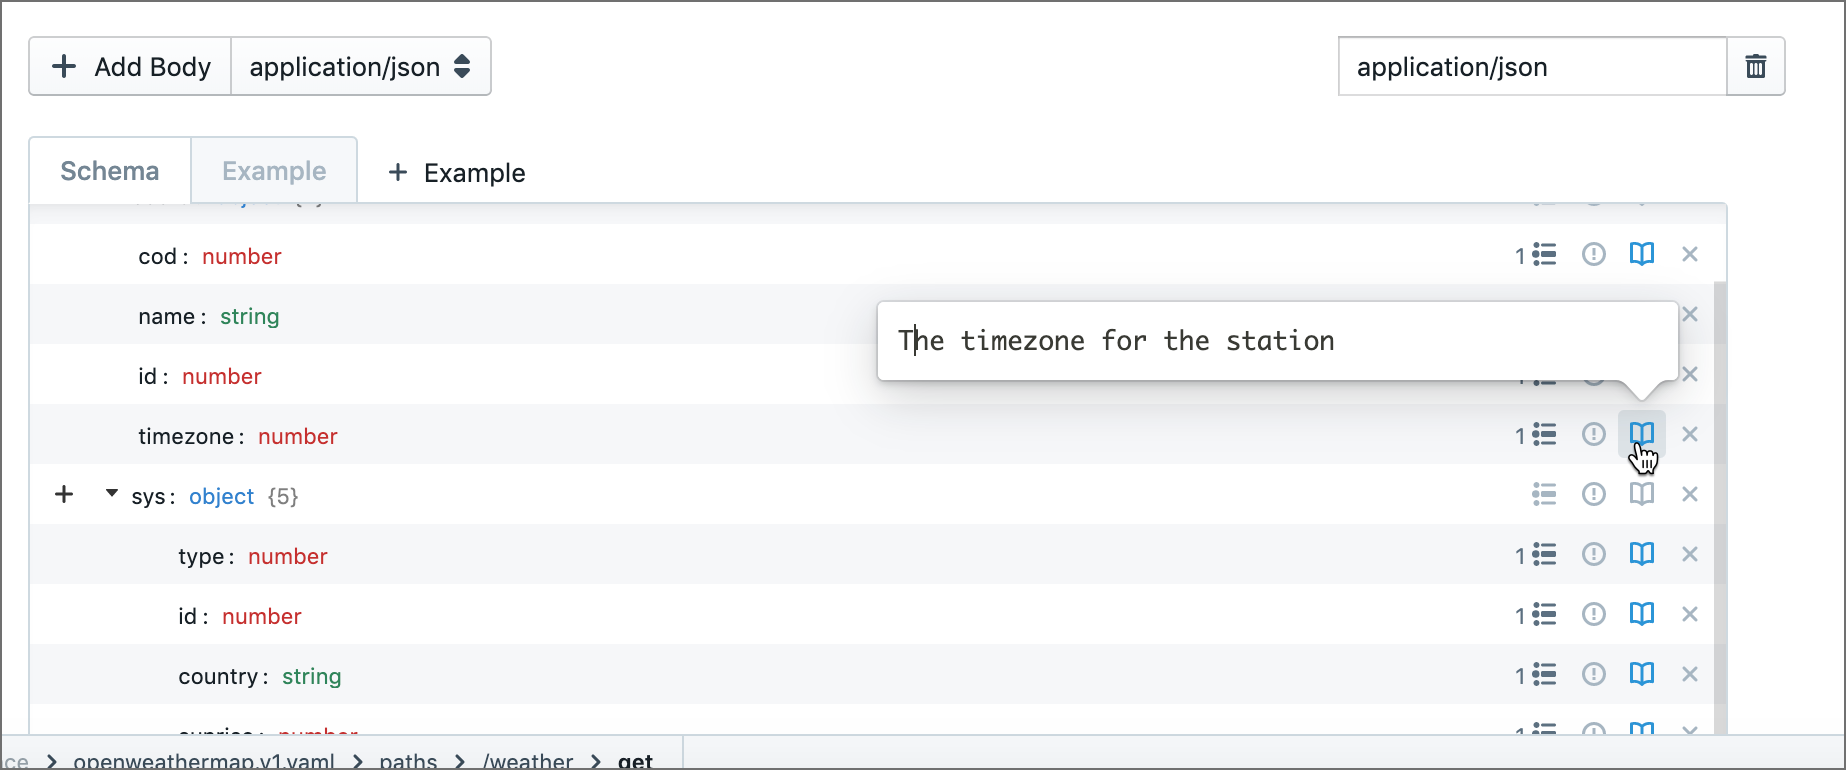
Entering descriptions in the GUI editor -
Click the Example tab and insert the example (from the same Response information button above). Call the example “Example.”
Save and preview your schema work
Now that you finished entering schema information, save your work: Click the Commit button, type a brief description, and then click Push. The schema display should look like this:
Reusing responses through components
The OpenAPI spec allows you to re-use common components, including parameters and responses. If you have a dozen different endpoints that all return the same information, you can create a “model” for that information that can be re-used. (A model is a description of some object’s properties). You can create models directly through the Stoplight editor. In the code, this model will be stored the inside the components section. Anytime you see a $ref button in Stoplight, you can choose to use those sections stored in components (called “Models” in the Stoplight Studio interface).
A common scenario for re-use with responses might be 401 (unauthorized response), which could likely be returned with each endpoint. To store this 401 response as a re-usable model:
- In the left sidebar, right-click Models and select New Model. Name the model “unauthorized_response”.
-
You can use the JSON schema editor to create the properties of your re-usable model. Click the + object link twice to create two properties for the object. Name them
codandmessage. Change the data type for the first from string to integer. The model should look as follows: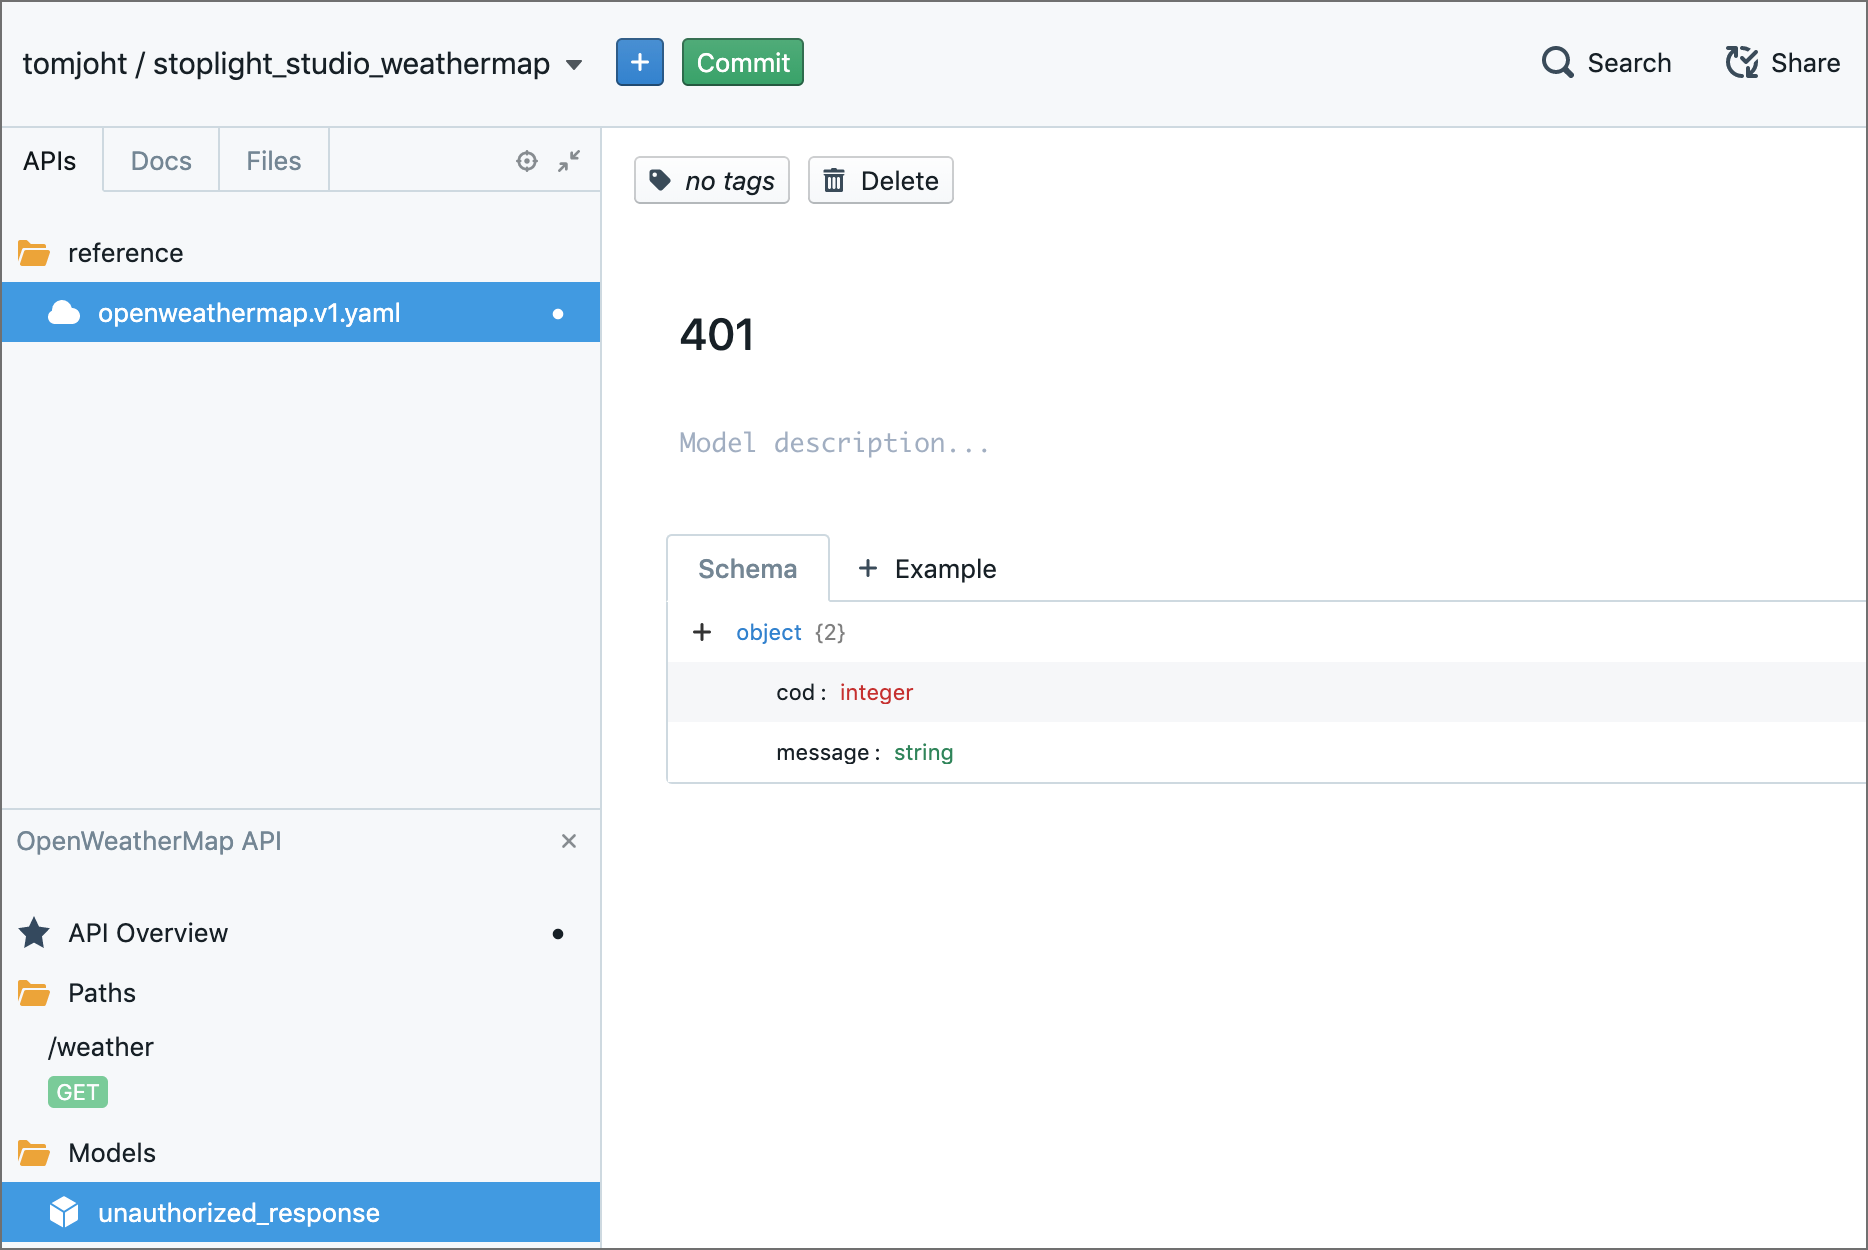
Creating a re-usable model - Click the Required? button
 and select required for both properties.
 - Return to your weather path and click + Response to create a new response.
- For the response code, select 401: Unauthorized.
- Click + Add Body.
-
In the $Ref Target, click and select the unauthorized_response component:
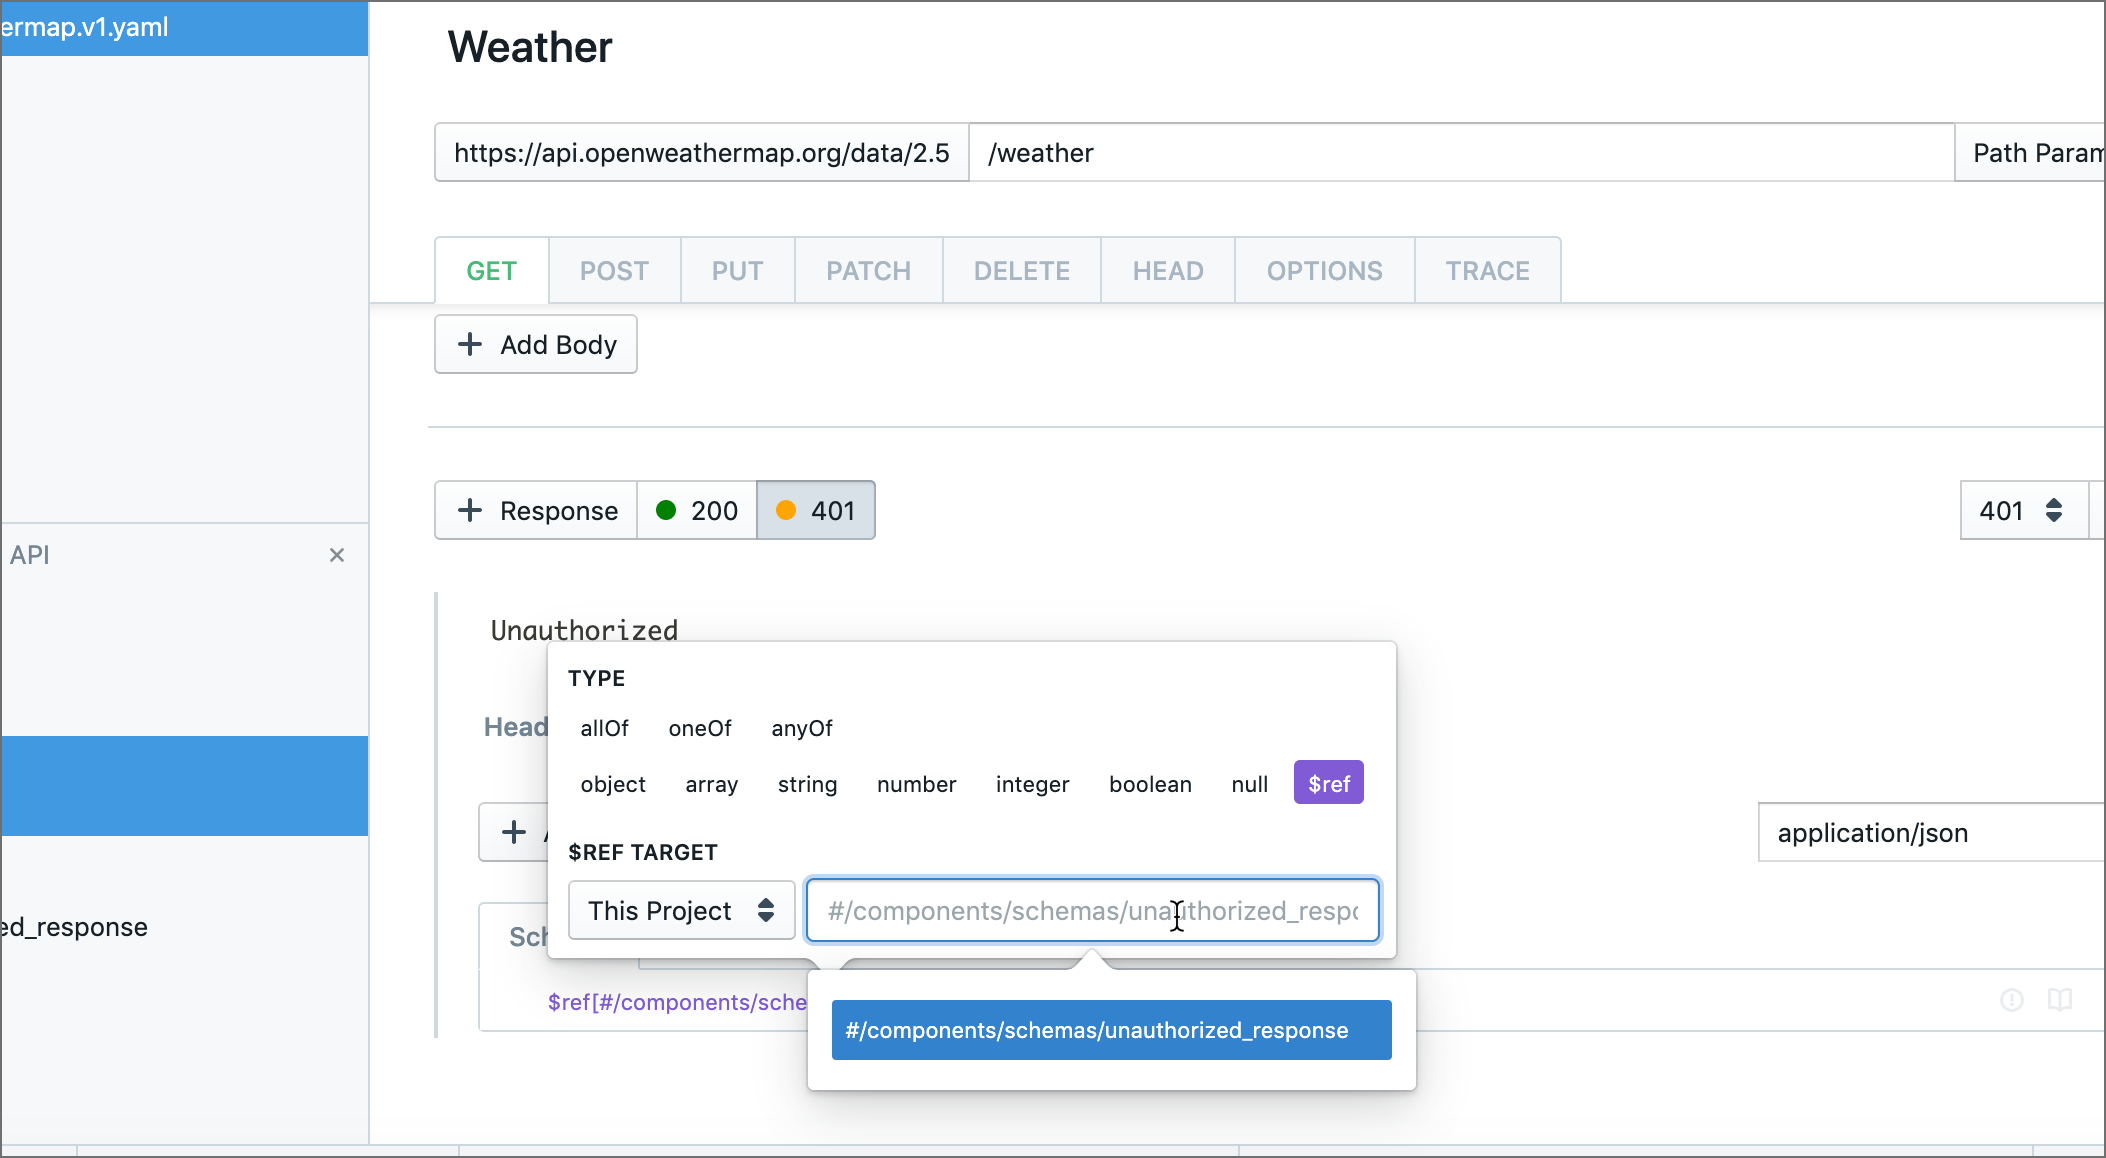
Selecting a re-usable model Now you’re re-using the same model. As you work with larger APIs that re-use components, be sure to store your re-usable parts as models (or other subsections under
components). As you can see from the options in the $Ref Target, you can even store these components outside the existing OpenAPI file:
Reference target storage options
Preview, test, and publish the output
Now that you’ve finished creating your OpenAPI spec, let’s preview, test, and publish your documentation.
- Click the Commit button, type a commit message, and then click Push.
- Click the Publish button, and then slide the Preview toggle on.
-
In the left sidebar, expand Weather Endpoints and click the Weather endpoint. Your API should look as follows:

Full display of Stoplight output - Click the Try It tab.
- Select zip check box and enter a zip code. (At least one location parameter is required for the API to retrieve weather information.)
- Enter an API key into the value for the appid parameter.
-
Click the Send button. If you’ve done everything correctly, you will see a response returned.
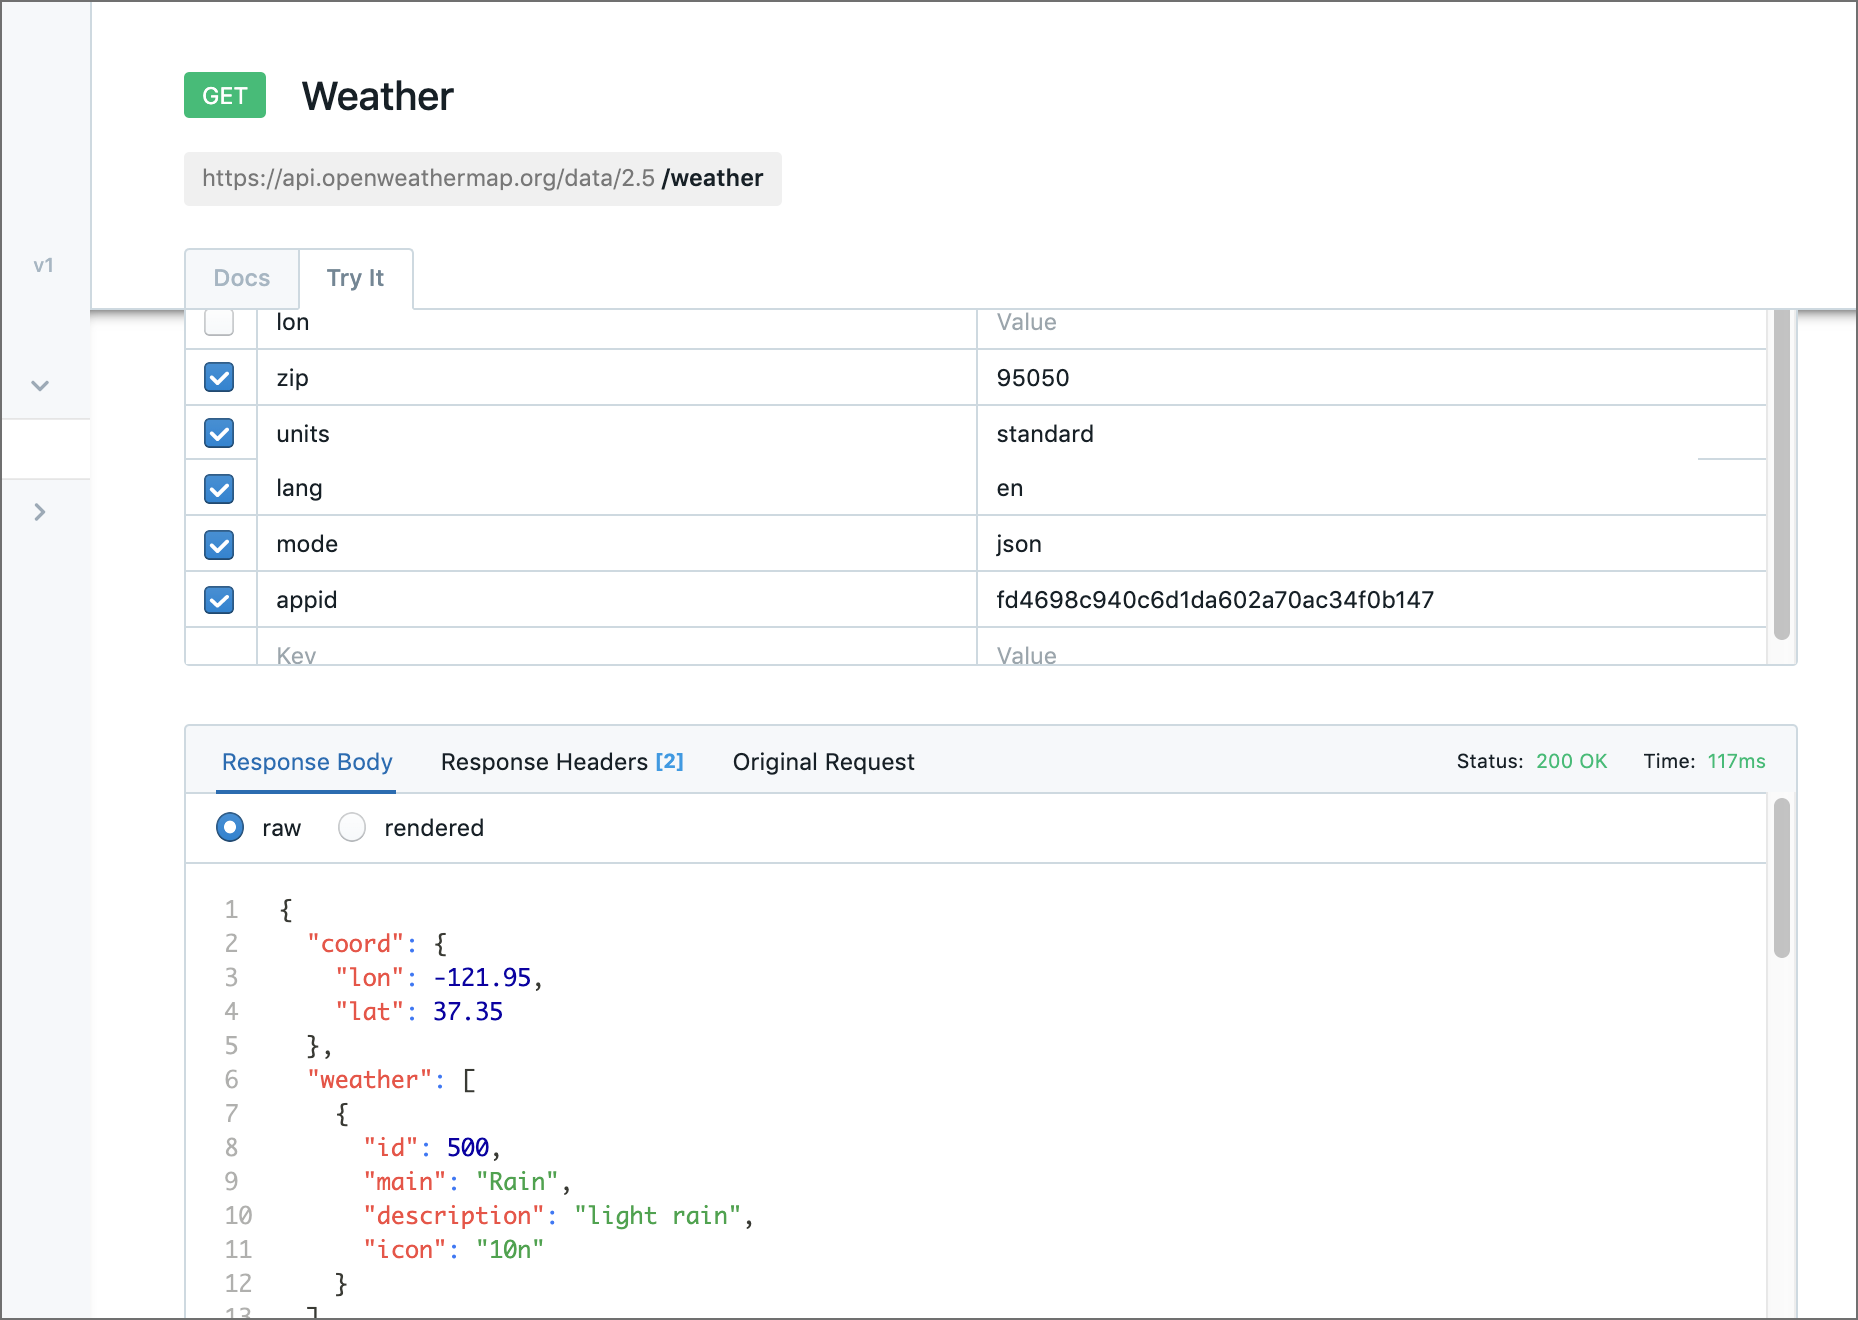
Successful response using Stoplight -
At this point, you can either publish or export your API documentation. To publish, click the Publish button. You will receive a URL for the published content.
You can view my published API docs here.
-
To export the OpenAPI content to publish in another tool, click Export OpenAPI. You can view mine here.
If you don’t want to publish docs through Stoplight, you could use your OpenAPI definition with Redoc, Swagger UI, Spectacle, Docsy, and other tools. See Openapi.tools for a list of possibilities. You can find a Redoc tutorial in this course here.
For various demos of Stoplight with different API docs, see Stoplight Demo.
For more details about working with Stoplight Studio, see their documentation here: Stoplight Studio.
38/145 pages complete. Only 107 more pages to go.