Step 5: Response example and schema (API reference tutorial)
The response example shows a sample response from the request example; the response schema defines all possible elements in the response. The response example is not comprehensive of all parameter configurations or operations, but it should correspond with the parameters passed in the request example. The response lets developers know if the resource contains the information they want, the format, and how that information is structured and labeled.
The description of the response is known as the response schema. The response schema documents the response in a more comprehensive, general way, listing each property that could possibly be returned, what each property contains, the data format of the values, the structure, and other details.
- Examples of response examples and schemas
- Do you need to define the response?
- Use realistic values in the example response
- Format the JSON and use code syntax highlighting
- Strategies for documenting nested objects
- Three-column designs
- Embedding dynamic responses
- What about status codes?
- Response example and schema for the surfreport endpoint
- Next steps
Examples of response examples and schemas
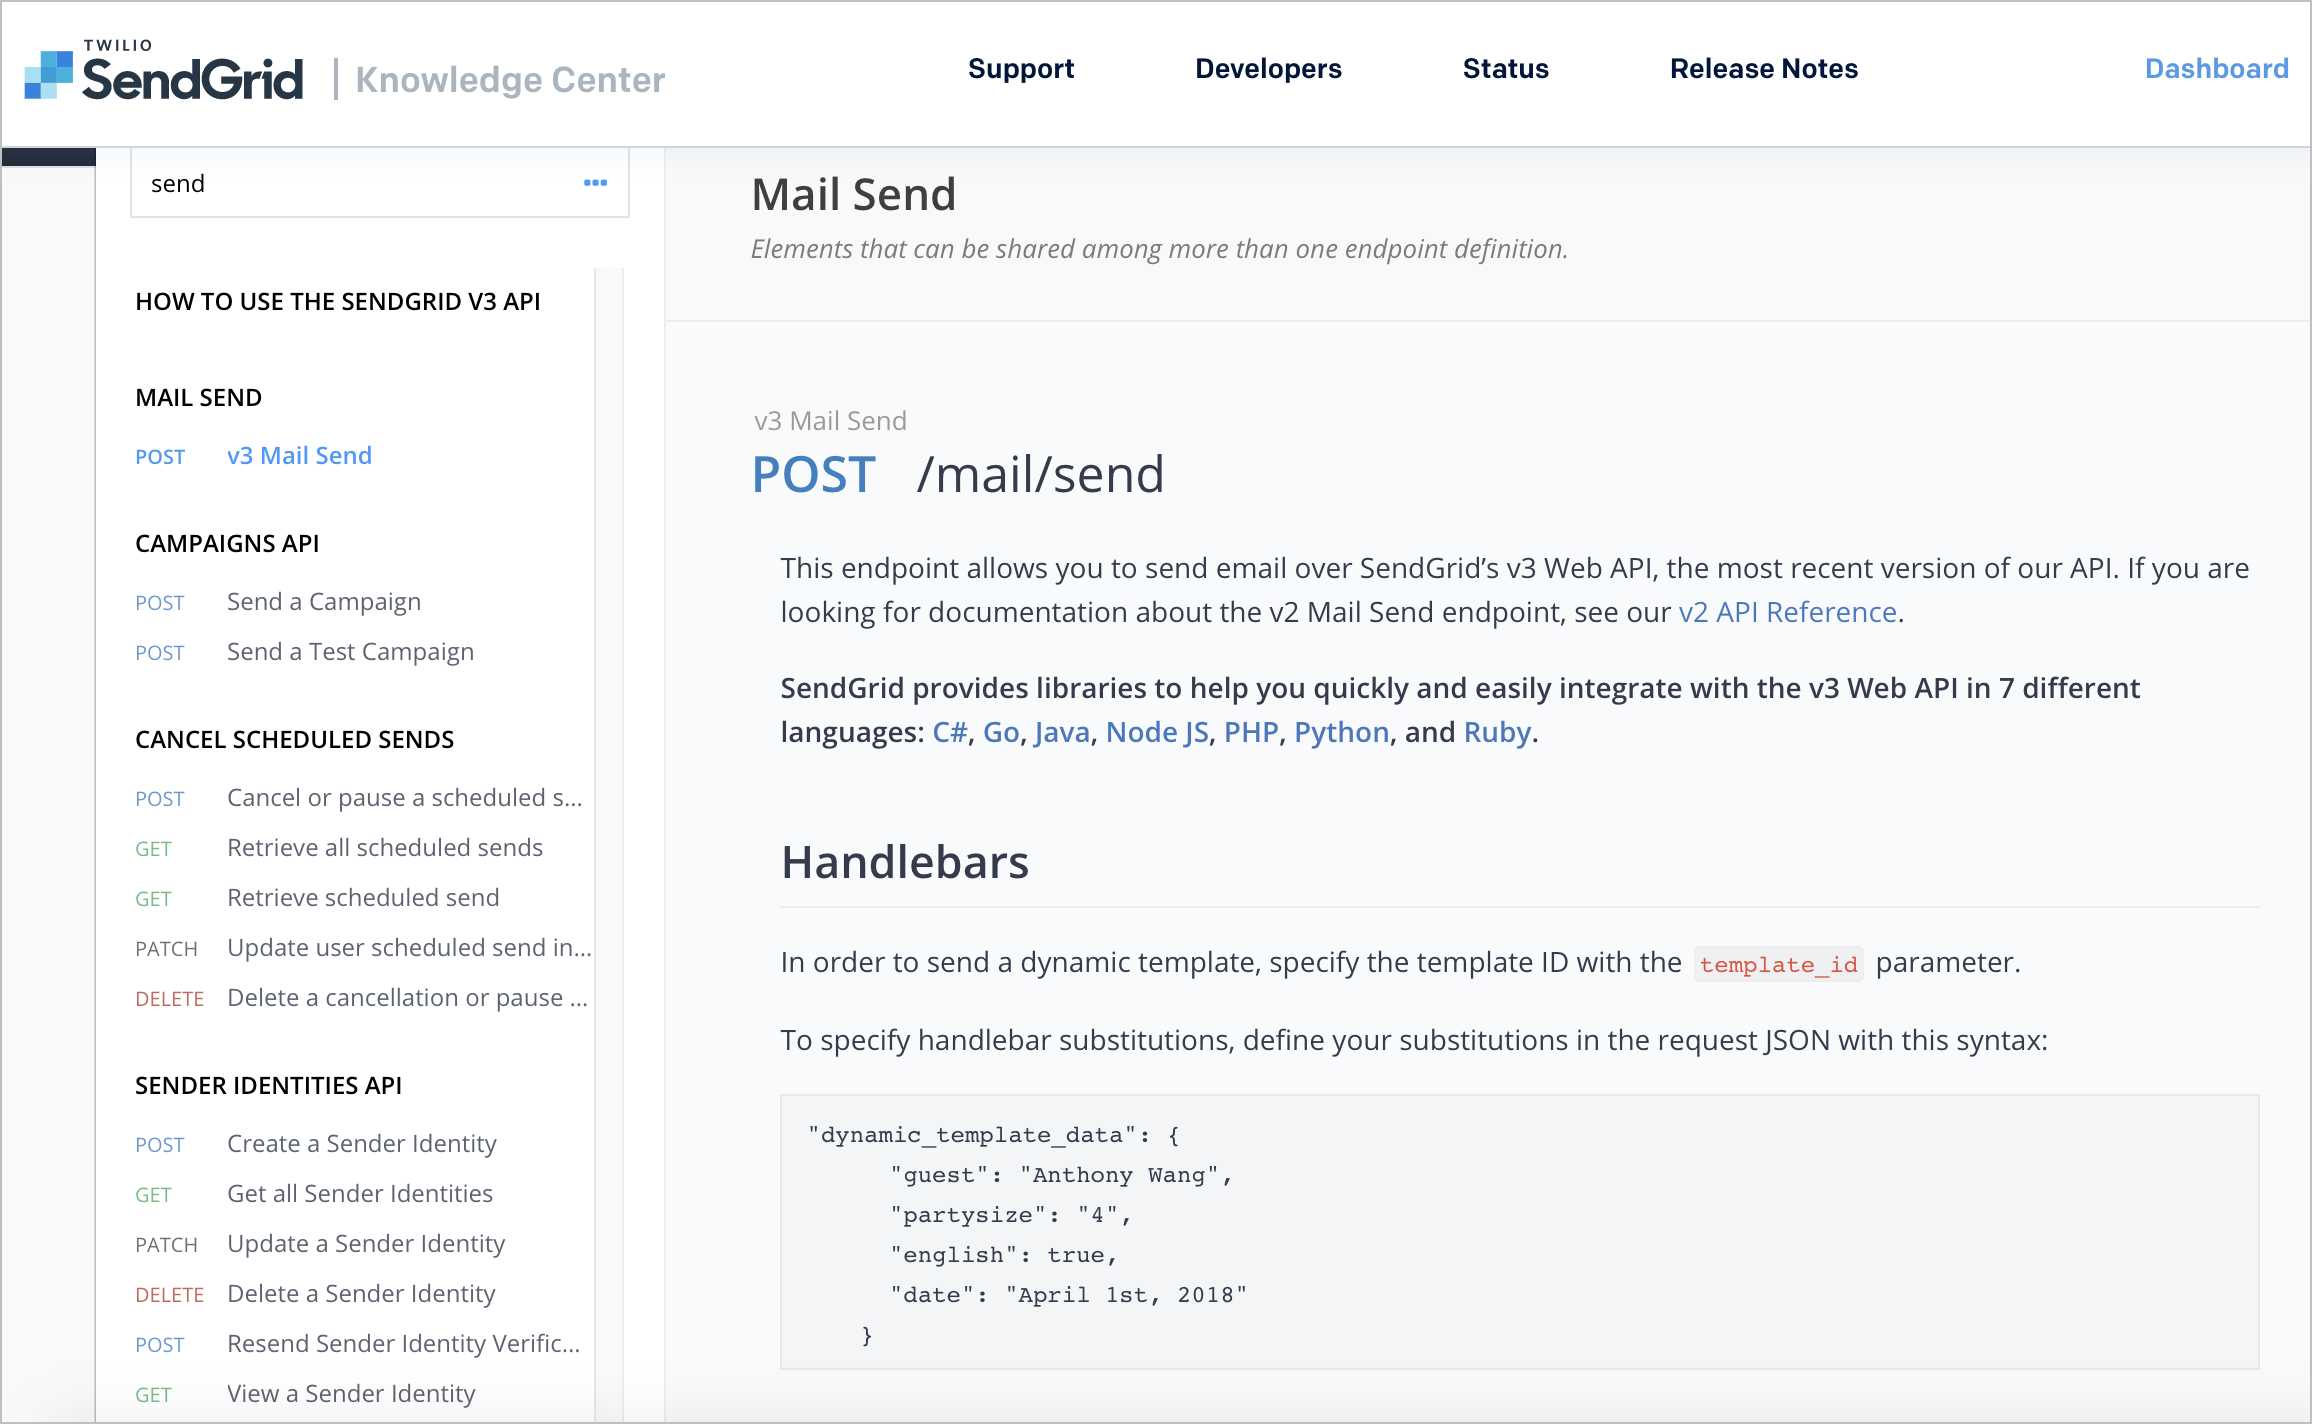
The following is a sample response from the SendGrid API. Their documentation provides a tabbed display with an Example on one tab:
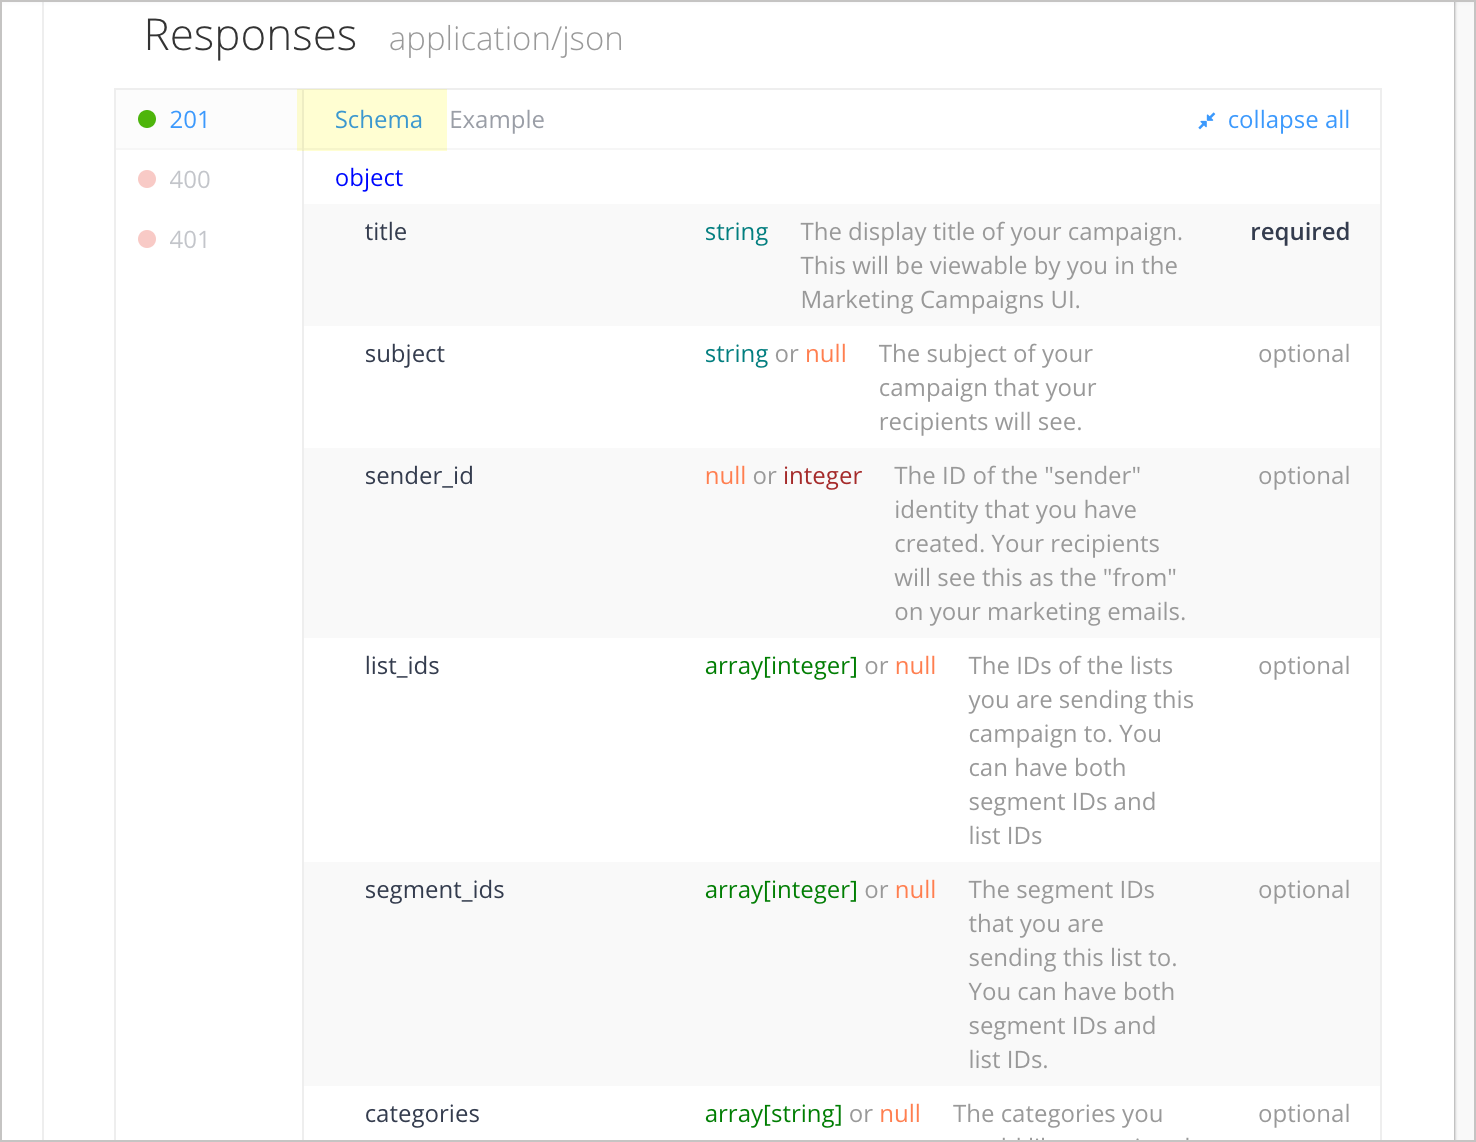
And the response Schema on another tab:
The definition of the response is called the schema or model (the terms are used synonymously) and aligns with the JSON schema language and descriptions. What works particularly well with the SendGrid example is the use of expand/collapse tags to mirror the same structure as the example, with objects at different levels.
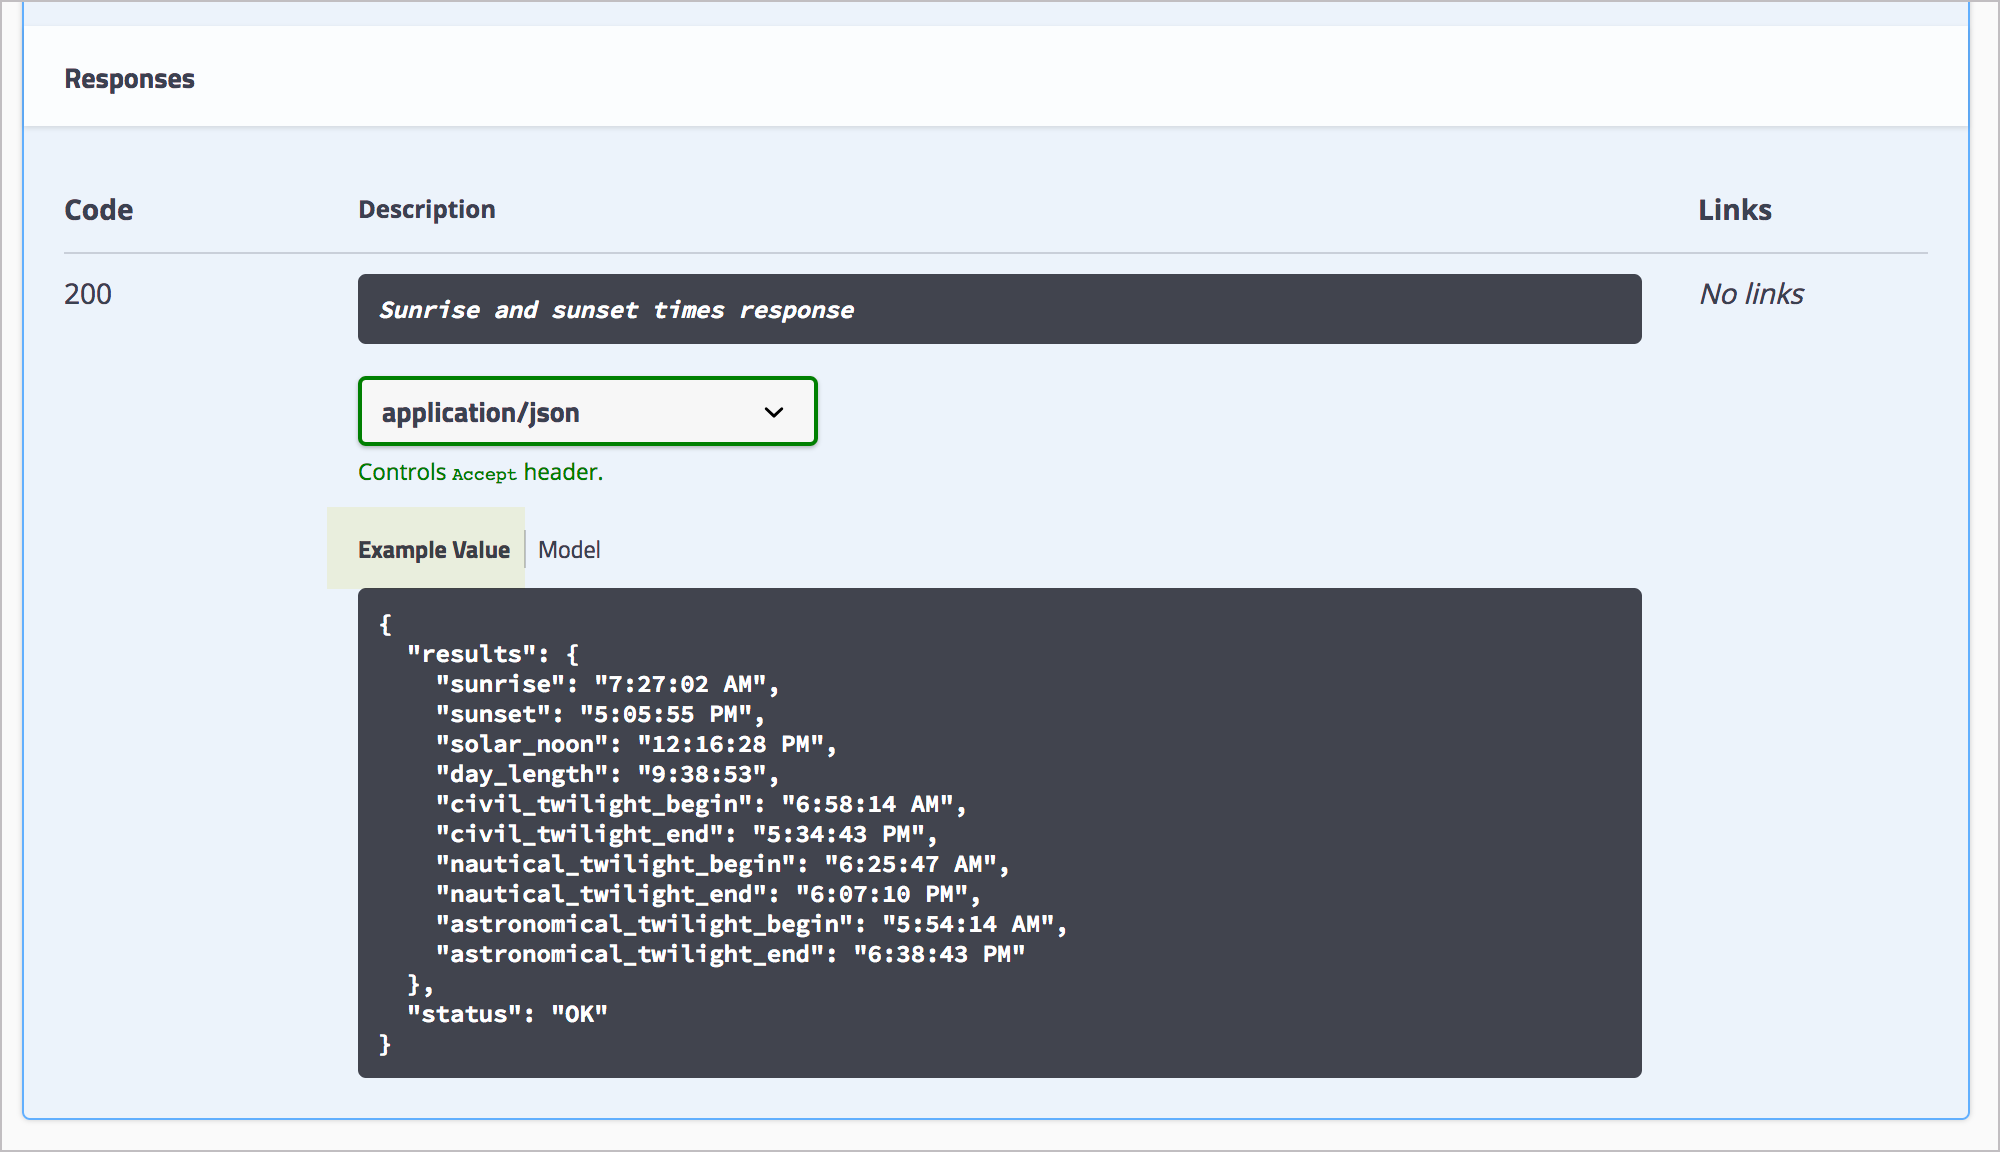
Swagger UI also provides both an example value and a schema or model. For example, in the sample Sunrise and Sunset Times API doc that I used for the SwaggerUI activity (which comes later in the course), you can see a distinction between the response example and the response schema. Here’s the Example Value:
The example response should correspond with the example request. Just as the request example might only include a subset of all possible parameters, the response example might also be a subset of all possible returned information.
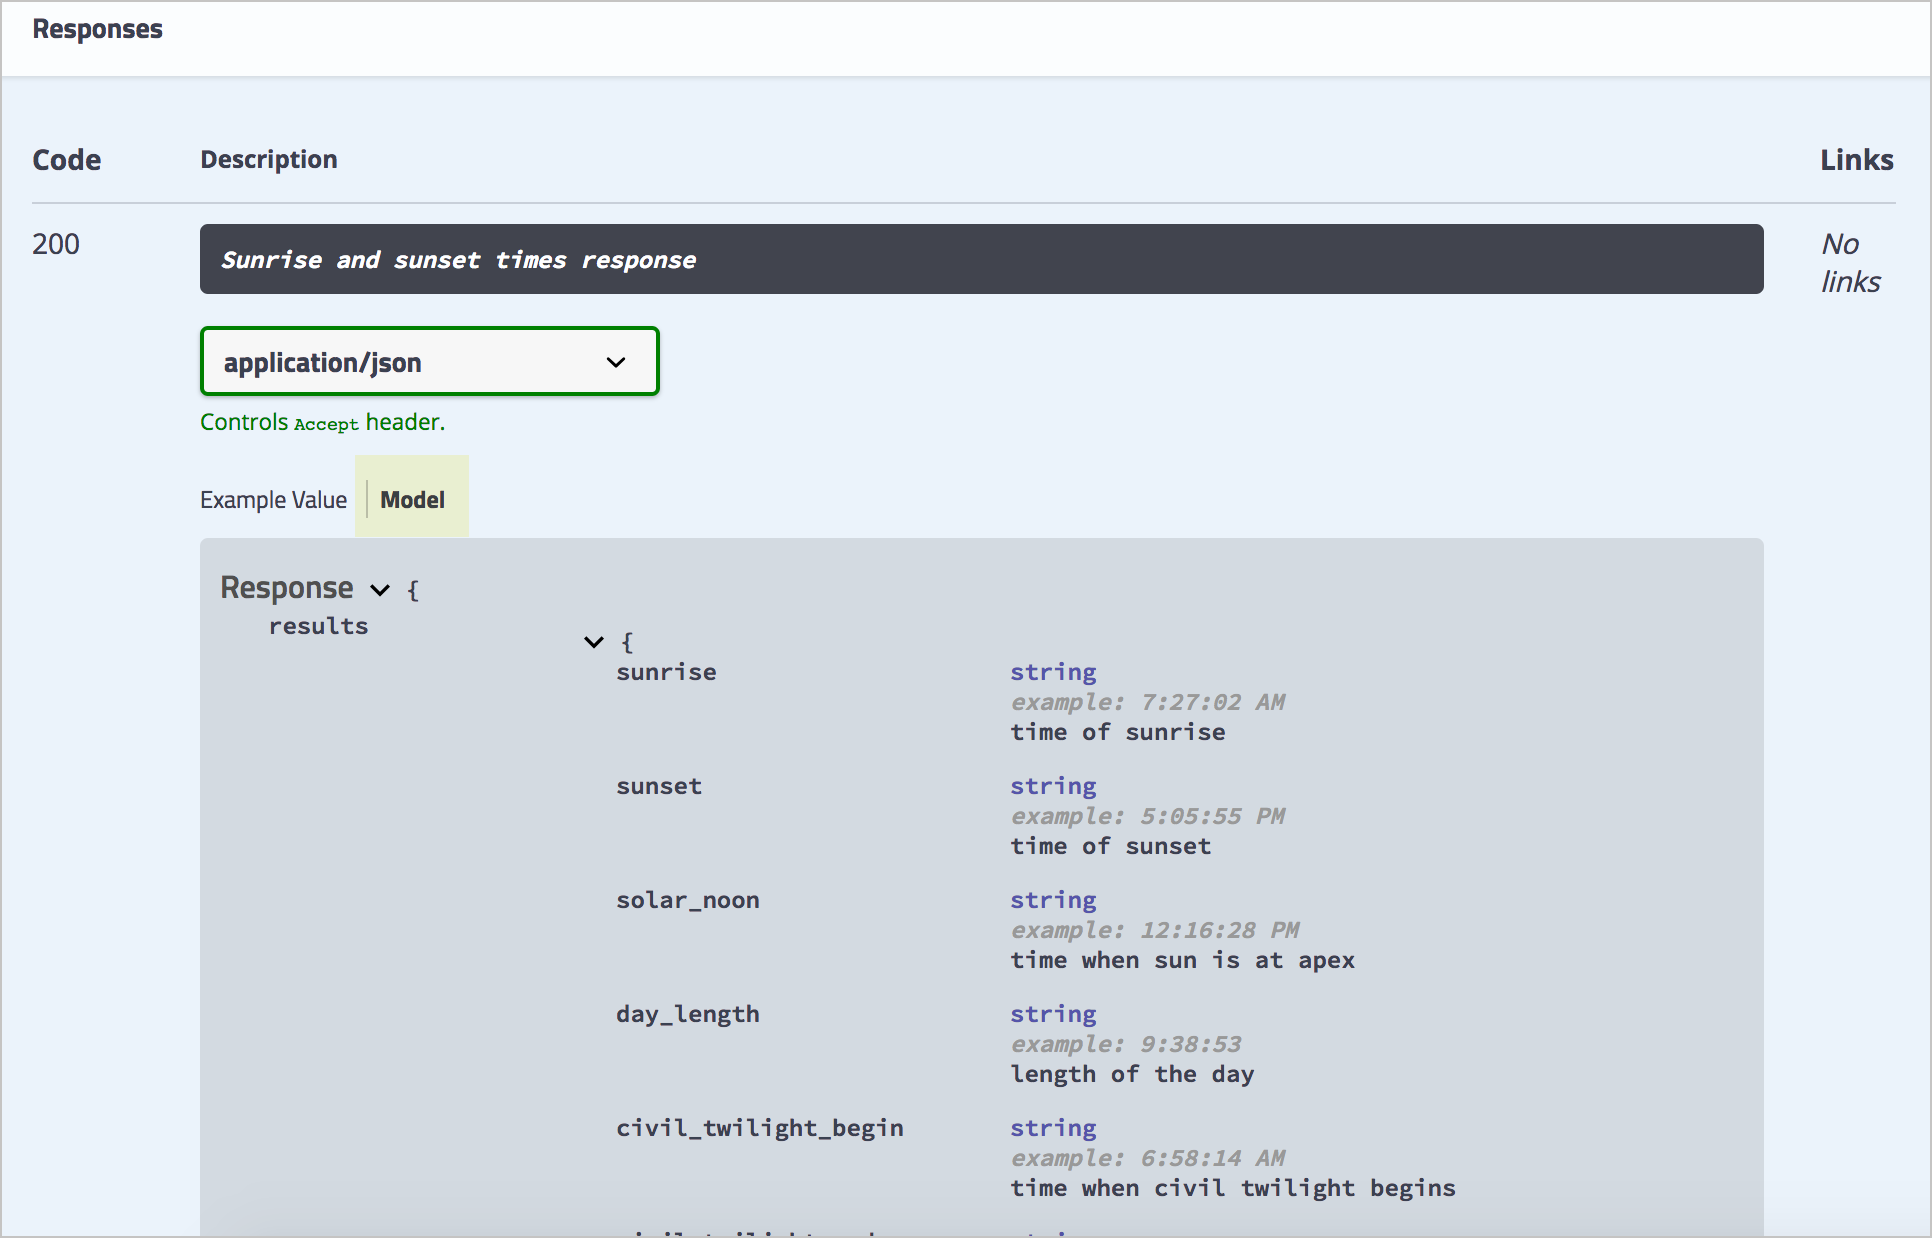
However, the response schema is comprehensive of all possible properties returned in the response. This is why you need both a response example and a response schema. Here’s the response schema for the Sunrise and Sunset Times API:
The schema or model provides the following:
- Description of each property
- Definition of the data type for each property
- Whether each property is required or optional
If the header information is important to include in the response example (because it provides unique information other than standard status codes), you can include it as well.
Do you need to define the response?
Some API documentation omits the response schema because the responses might seem self-evident or intuitive. In Twitter’s API, the responses aren’t explained (you can see an example here).
However, most documentation would be better off with the response described, especially if the properties are abbreviated or cryptic. Developers sometimes abbreviate the responses to increase performance by reducing the amount of text sent. In one endpoint I documented, the response included about 20 different two-letter abbreviations. I spent days tracking down what each abbreviation meant, and found that many developers who worked on the API didn’t even know what many of the responses meant.
Use realistic values in the example response
In the example response, the values should be realistic without being real. If developers give you a sample response, make sure the values are reasonable and not so fake they’re distracting (such as users consisting of comic book character names).
Also, the sample response should not contain real customer data. If you get a sample response from an engineer, and the data looks real, make sure it’s not just from a cloned production database, which is commonly done. Developers may not realize that the data needs to be fictitious but representative, and scraping a production database may be the easiest approach for them.
Format the JSON and use code syntax highlighting
Use proper JSON formatting for the response. A tool such as JSON Formatter and Validator can make sure the spacing is correct.
If you can add syntax highlighting as well, definitely do it. If you’re using a static site generator such as Jekyll or markdown syntax with GitHub, you can probably use the Rouge built-in syntax highlighter. Other static site generators might use Pygments or similar extensions.
Rouge and Pygments rely on “lexers” to indicate how the code should be highlighted. For example, some common lexers are java, json, html, xml, cpp, dotnet, and javascript.
If you don’t have any syntax highlighters to integrate directly into your authoring tool, you can use an online syntax highlighter such as tohtml.com/jScript/. However, manually pasting code into these editors will be tedious and probably unsustainable.
Strategies for documenting nested objects
Many times, the response contains nested objects (objects within objects) or has repeating elements. Formatting the documentation for the response schema is one of the more challenging aspects of API reference documentation.
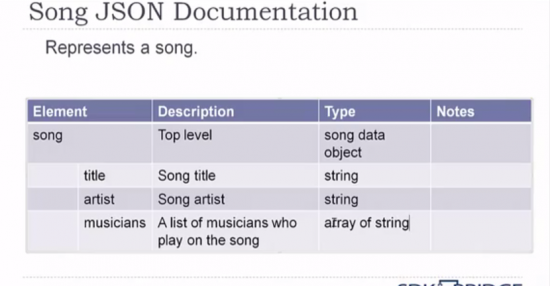
Tables are most commonly used. In Peter Gruenbaum’s API tech writing course on Udemy, Gruenbaum represents the nested objects using tables with various columns:
Gruenbaum’s use of tables is mostly to reduce the emphasis on tools and place it more on the content.
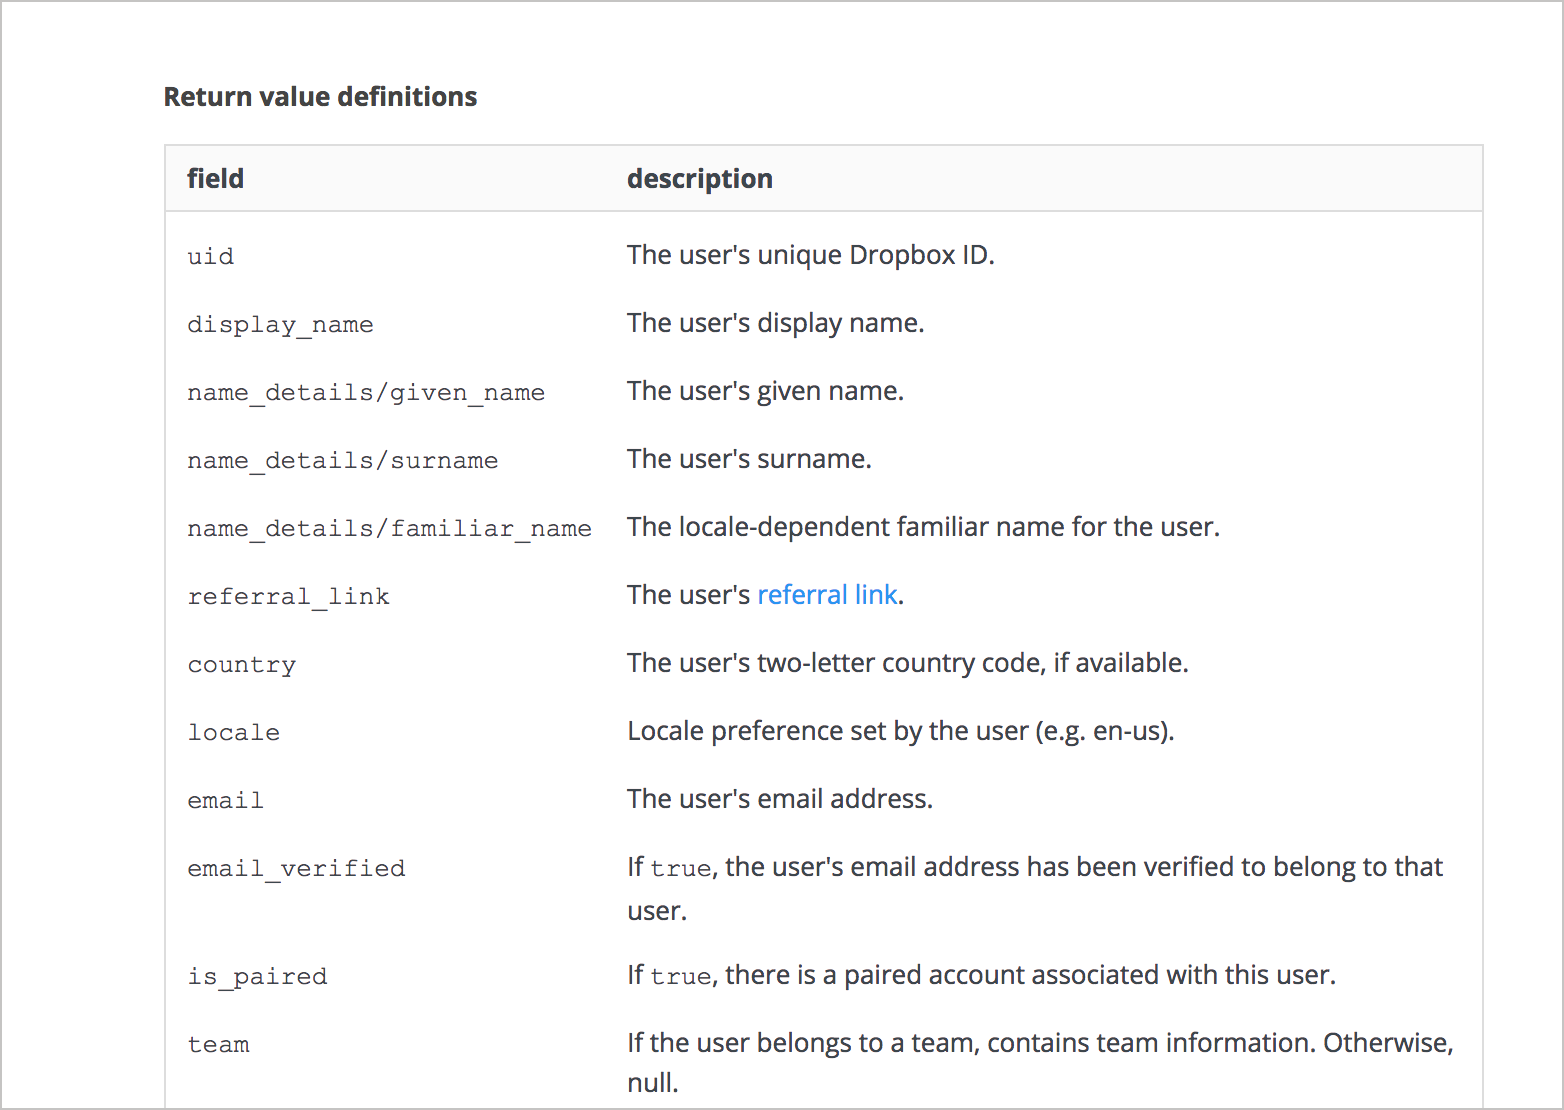
The Dropbox API represents the nesting with a slash. For example, name_details/, team/, and quota_info indicate the multiple object levels.
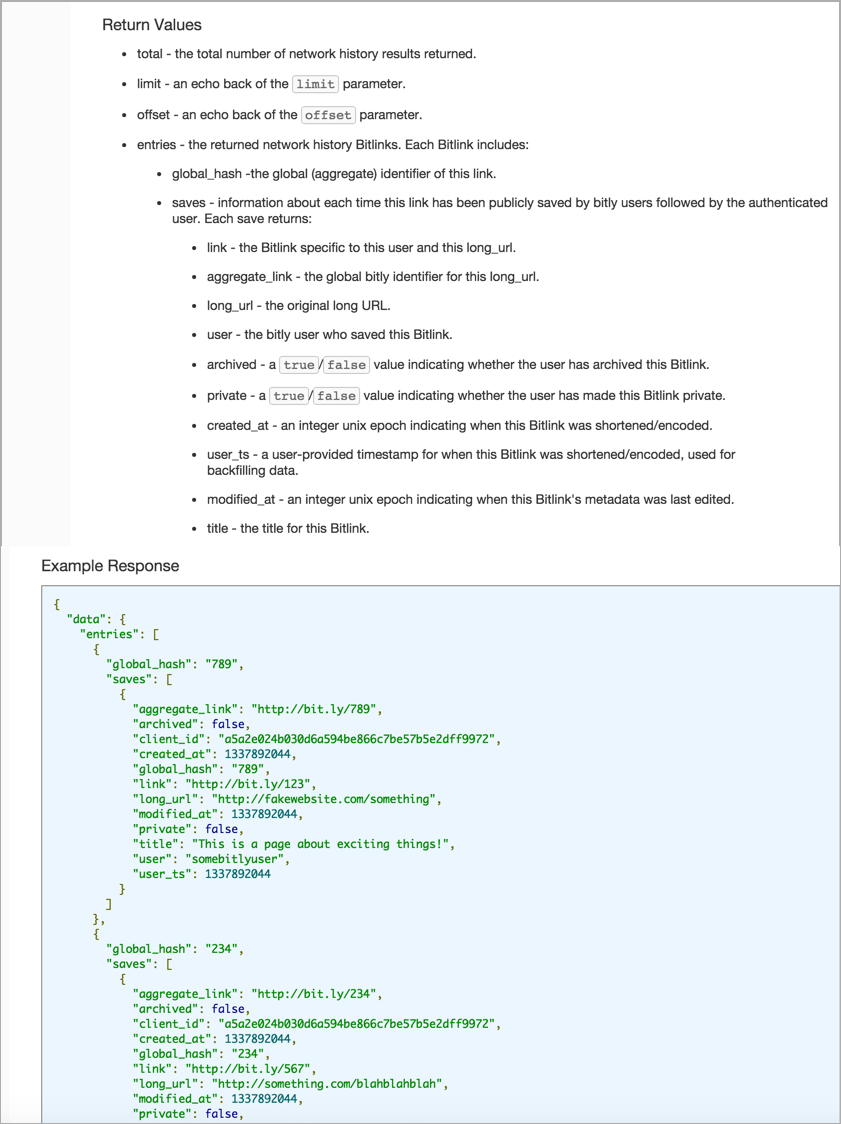
Other APIs will nest the response definitions to imitate the JSON structure. Here’s an example from bit.ly’s API:
Multiple levels of bullets is usually an eyesore, but here it serves a purpose that works well without requiring sophisticated styling.
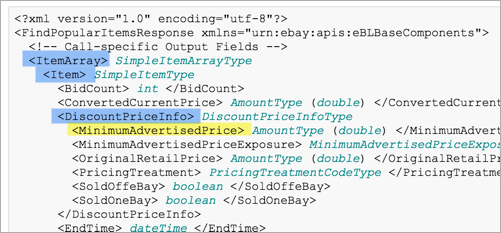
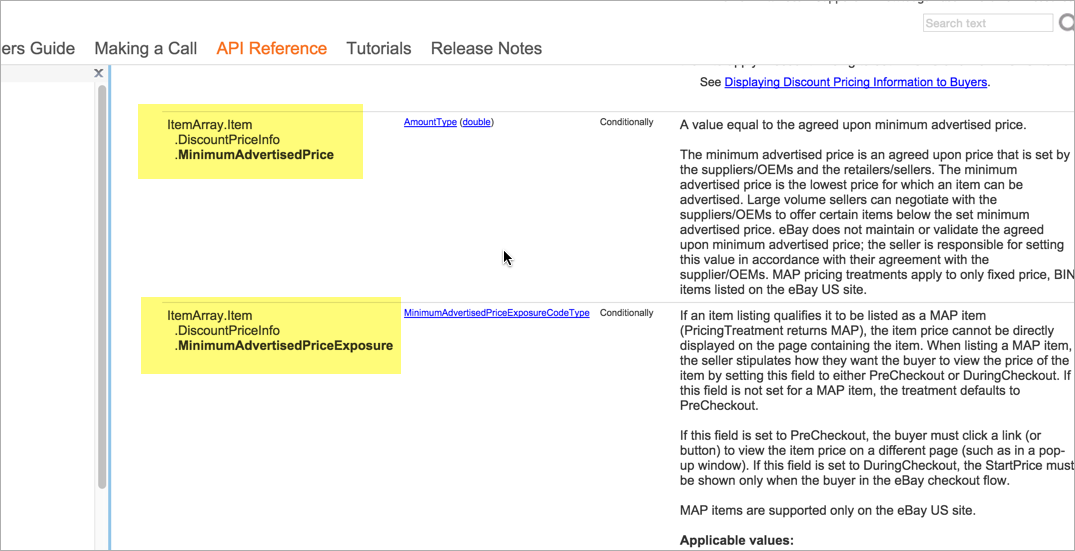
eBay’s approach is a little more unique. In this case, MinimumAdvertisedPrice is nested inside DiscountPriceInfo, which is nested in Item, which is nested in ItemArray. (Note also that this response is in XML instead of JSON.)
Here’s the response documentation:
It’s also interesting how much detail eBay includes for each item. Whereas the Twitter writers appear to omit descriptions, the eBay authors write small novels describing each item in the response.
Three-column designs
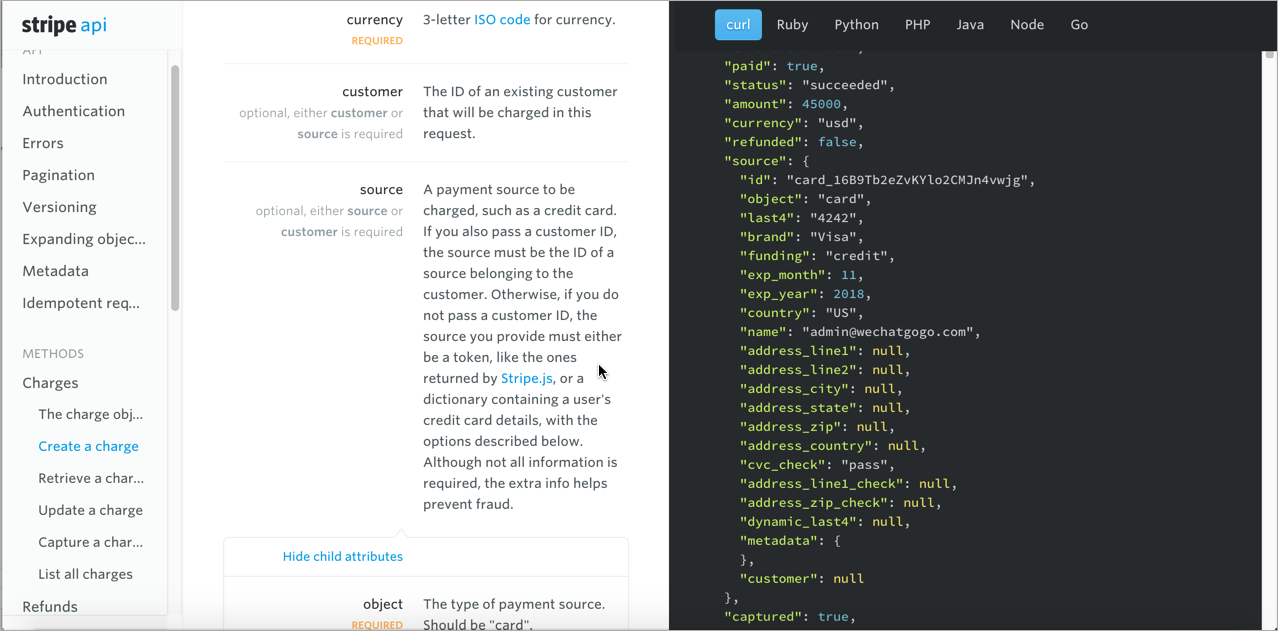
Some APIs put the response in a right column so you can see it while also looking at the resource description and parameters. Stripe’s API made this three-column design popular:
Stripe’s design juxtaposes the sample response in a right side pane with the response schema in the main window. The idea is that you can see both at the same time. The description won’t always line up with the response, which might be confusing. Still, separating the response example from the response schema in separate columns helps differentiate the two.
A lot of APIs have modeled their design after Stripe’s. For example, see Slate or Spectacle. Should you use a three-column layout with your API documentation? Maybe. But if the response example and description don’t line up, the viewer’s focus is somewhat split, and the user must resort to more up-and-down scrolling. Additionally, if your layout uses three columns, your middle column will have some narrow constraints that don’t leave much room for screenshots and code examples.
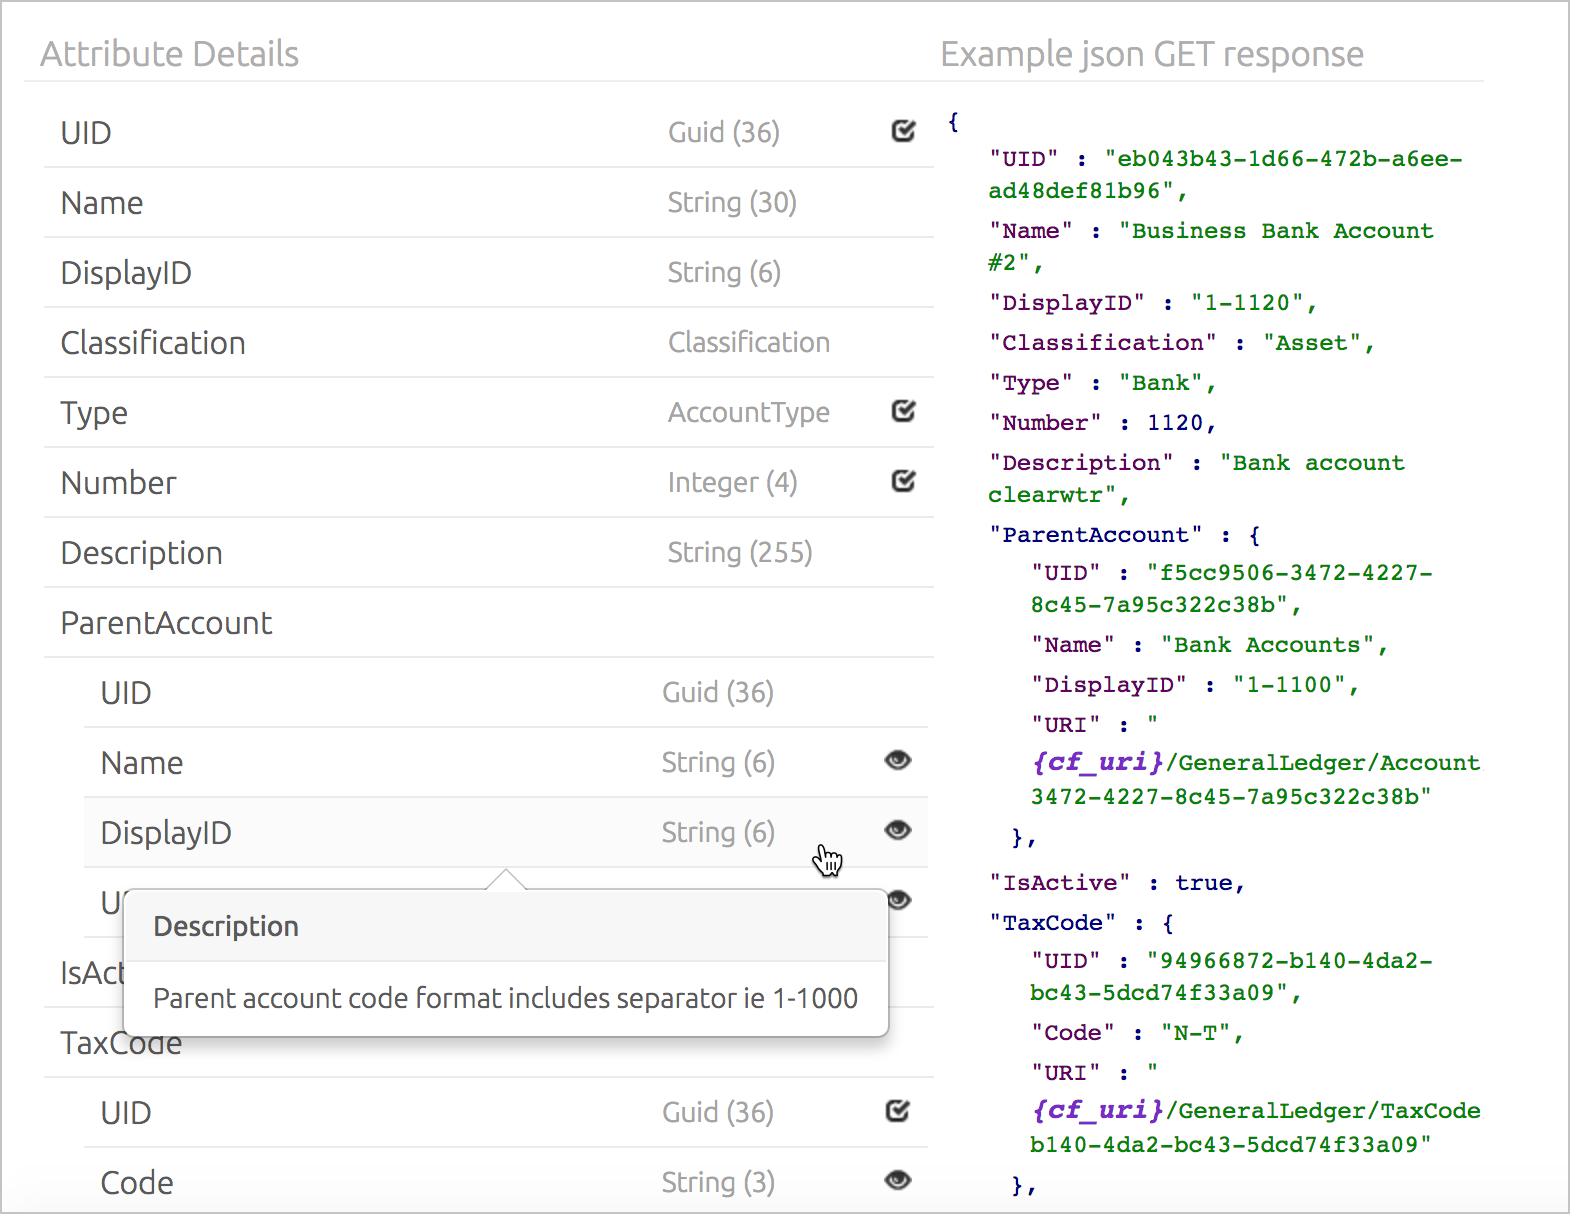
The MYOB Developer Center takes an interesting approach in documenting the JSON in their APIs. They list the JSON structure in a table-like way, with different levels of indentation. You can move your mouse over a field for a tooltip description, or you can click it to have a description expand below. The use of tooltips enables the rows containing the example and the description to align perfectly.
To the right of the JSON definitions is a code sample with real values. When you select a value, both the element in the table and the element in the code sample highlight at the same time.
This approach facilitates scanning, and the popover + collapsible approach allows you to compress the table so you can jump to the parts that interest you. However, this approach requires more manual work from a documentation point of view. Still, if you have long JSON objects, it might be worth it.
Embedding dynamic responses
Sometimes responses are generated dynamically based on API calls to a test system. Or if not generated dynamically, they appear to be dynamic. For example, look at OpenWeatherMap API (which we used in earlier activities). When you click a link in the “Examples of API calls” section, such as http://samples.openweathermap.org/data/2.5/weather?q=London, you see the response returned in the browser.
Actually, the OpenWeatherMap response isn’t generated dynamically — it just looks that way.
This dynamic approach works well for GET requests that return public information. However, it probably wouldn’t scale for other methods (such as POST or DELETE) or which request authorization.
What about status codes?
The responses section sometimes briefly lists the possible status and error codes returned with the responses. However, because these codes are usually shared across all endpoints in the API, status and error codes are often documented in their own section, apart from a specific endpoint’s documentation. For this reason, I cover this topic in Documenting status and error codes.
Response example and schema for the surfreport endpoint
For the surfreport/{beachId} endpoint that we’ve been exploring in our sample API scenario, let’s create a section that shows the response example and schema. Here’s my approach to these sections:
Sample response
The following is a sample response from the surfreport/{beachId} endpoint:
{
    "surfreport": [
        {
            "beach": "Santa Cruz",
            "monday": {
                "1pm": {
                    "tide": 5,
                    "wind": 15,
                    "watertemp": 80,
                    "surfheight": 5,
                    "recommendation": "Go surfing!"
                },
                "2pm": {
                    "tide": -1,
                    "wind": 1,
                    "watertemp": 50,
                    "surfheight": 3,
                    "recommendation": "Surfing conditions are okay, not great."
                },
                "3pm": {
                    "tide": -1,
                    "wind": 10,
                    "watertemp": 65,
                    "surfheight": 1,
                    "recommendation": "Not a good day for surfing."
                }
                ...
            }
        }
    ]
}
Response definitions
The following table describes each item in the response.
| Response item | Description | Data type |
|---|---|---|
| beach | The beach you selected based on the beach ID in the request. The beach name is the official name as described in the National Park Service Geodatabase. | String |
| {day} | The day of the week selected. A maximum of 3 days gets returned in the response. | Object |
| {time} | The time for the conditions. This item is included only if you include a time parameter in the request. | String |
| {day}/{time}/tide | The level of tide at the beach for a specific day and time. Tide is the distance inland that the water rises to, and can be a positive or negative number. When the tide is out, the number is negative. When the tide is in, the number is positive. The 0 point reflects the line when the tide is neither going in nor out but is in transition between the two states. | Integer |
| {day}/{time}/wind | The wind speed at the beach, measured in knots (nautical miles per hour). Wind affects the surf height and general wave conditions. Wind speeds of more than 15 knots make surf conditions undesirable because the wind creates white caps and choppy waters. | Integer |
| {day}/{time}/watertemp | The temperature of the water, returned in Fahrenheit or Celsius depending upon the units you specify. Water temperatures below 70 F usually require you to wear a wetsuit. With temperatures below 60, you will need at least a 3mm wetsuit and preferably booties to stay warm. | Integer |
| {day}/{time}/surfheight | The height of the waves, returned in either feet or centimeters depending on the units you specify. A surf height of 3 feet is the minimum size needed for surfing. If the surf height exceeds 10 feet, it is not safe to surf. | Integer |
| {day}/{time}/recommendation | An overall recommendation based on a combination of the various factors (wind, watertemp, surfheight). Three responses are possible: (1) "Go surfing!", (2) "Surfing conditions are okay, not great", and (3) "Not a good day for surfing." Each of the three factors is scored with a maximum of 33.33 points, depending on the ideal for each element. The three elements are combined to form a percentage. 0% to 59% yields response 3, 60% - 80% and below yields response 2, and 81% to 100% yields response 1. | String |
Next steps
Now that you’ve completed each of the sections, take a look at all the sections together: Putting it all together.
31/145 pages complete. Only 114 more pages to go.

